Reviewed by Daniel M. · Last Updated October 14, 2026 · How we review
Beehive maintenance comes down to four recurring jobs: keep the woodenware sealed and sound, repaint the outside every three to five years, rotate old brood comb out on a schedule, and clean and store equipment so it does not carry disease or pests from one colony to the next. Everything else on a beekeeper’s calendar, from feeding to winter wraps, fits around those four.
Every interval below is traced to an extension service or a peer-reviewed study, and the seasonal checklist puts each task next to its reason and its source.
Key Takeaways
- Assemble woodenware with screws and outdoor-rated wood glue, and caulk the outside joints. University of Florida extension says water is the biggest threat to hive boxes.
- Paint only the outside, two to three coats of non-toxic outdoor paint, and repaint every three to five years if you can. Never paint the inside walls or the inner cover.
- Replace one-fifth to one-third of your brood comb every year, so no brood comb stays in service longer than three to five years. A 2010 survey of 259 North American wax samples found an average of eight pesticide residues per sample.
- Freeze used equipment at 20°F or lower for at least 24 hours, then scrape, wash and sterilize. Freezing kills all wax moth stages but does not kill spores.
- Clean hive tools after every use and sterilize them at least monthly. Fit a mouse guard before cold weather and check stored comb for pests on a schedule.
Table of Contents
- What Hive Maintenance Covers
- Repairing Boxes, Frames and Joints
- Paint and Wood Treatment: What Is Bee-Safe
- Replacing Old Brood Comb on a Schedule
- Cleaning and Sterilizing Equipment
- Pest-Proofing: Mice, Beetles and Wax Moths
- Ventilation and Moisture Upkeep
- Storing Drawn Comb and Idle Equipment
- Seasonal Maintenance Checklist With Sources
- What to Check on Every Hive Visit
- Frequently Asked Questions
- The Bottom Line
What Hive Maintenance Covers
Montana State University Extension describes hive maintenance as a yearly cycle of feeding, adjusting hive components, making repairs, harvesting honey and winterizing (Montana State University Extension, A Year in the Hive). Colony tasks change with the season. Equipment tasks run on longer clocks, and those are the ones people forget until a box rots through or a frame of black comb sours a colony. This guide covers the woodenware and comb; the colony routine is in our guides to low-stress hive inspections, varroa timing by season and winter honey targets.
Repairing Boxes, Frames and Joints
The University of Florida’s extension guide to preserving woodenware starts with assembly, because most failures begin at the joints. Wood swells when wet and shrinks as it dries, and over many cycles that works nails out of the wood and opens gaps. The guide recommends assembling everything except frames with screws instead of nails, and applying plenty of outdoor-rated wood glue to the joints so it squeezes out when the pieces are fastened (Ellis, Kern and Zettel, University of Florida IFAS Extension, Preserving Woodenware in Beekeeping Operations).
Two more details from the same guide are cheap and easy to apply:
- Caulk the outside joints. Run a bead down each outside joint and smooth it flat, using a non-toxic, silicone-based caulk.
- Choose wood with decay resistance in mind. The guide suggests kiln-dried, rot-resistant wood such as cypress, and warns against building hive parts from pre-treated lumber.
Termites add a regional wrinkle. In Florida, drywood and subterranean termites both attack hive woodenware, and the guide’s main fix is simple: keep hives off the ground, and use concrete blocks, ant-guard stands or other metal or plastic supports rather than wooden ones. In most of the United States and Canada, only subterranean termites are a concern. Our guide to hive stand height covers the stand itself.
What to fix on a winter workbench
Montana State’s calendar schedules equipment assembly, repair and replacement for November through February and calls winter the ideal time to repair or replace broken frames and boxes. Look for popped joints, split corners, warped boxes, soft wood along bottom edges, and broken frame lugs (see replacing broken frame ears and end bars).
Paint and Wood Treatment: What Is Bee-Safe
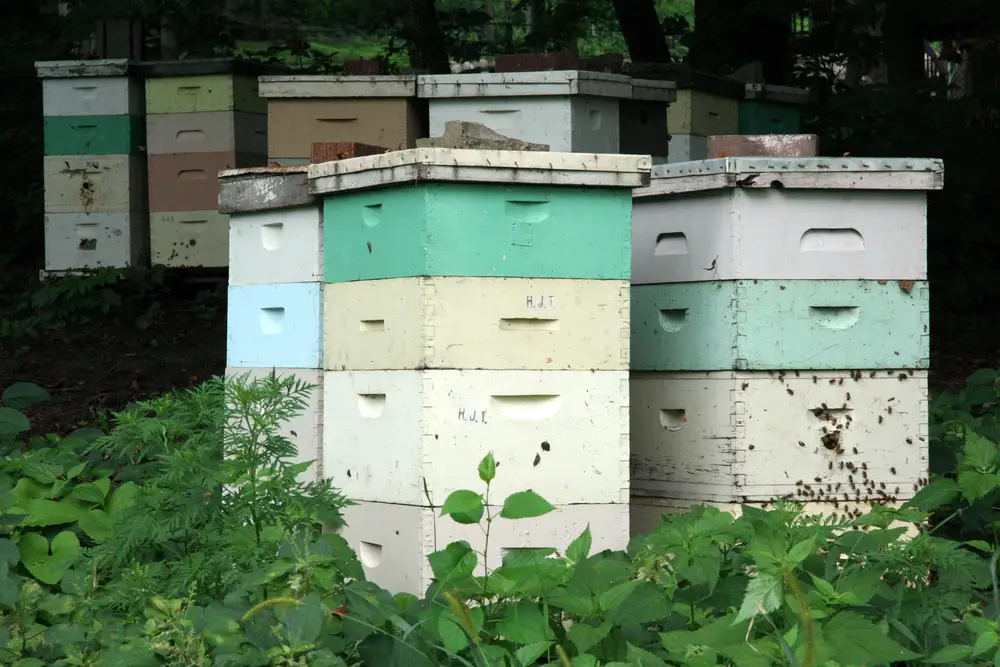
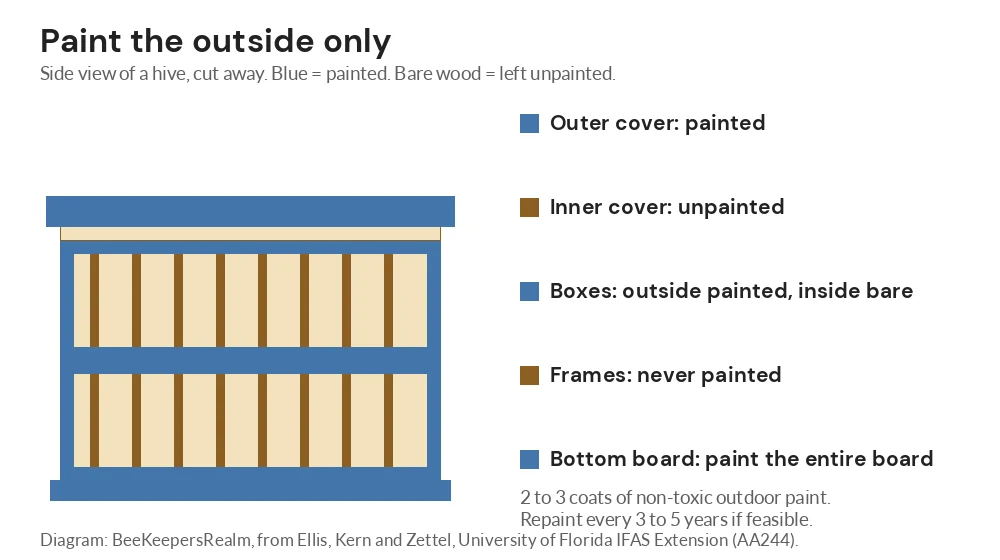
The same University of Florida guide gives the clearest extension rules on finishes. Outer covers, supers, hive bodies and bottom boards should be painted with a non-toxic paint registered for outdoor use, in at least two to three coats. The color is unimportant, but very dark colors absorb heat and are best avoided. The whole bottom board gets painted, and if you can afford it, hive equipment should be repainted every three to five years.
“Inner covers or the inside surfaces of supers should not be painted”
The guide’s reason is that painting the inside traps moisture in the hive.
What about wood preservatives?
Extension guidance here is cautious. The Florida guide notes that many wood preservatives are toxic to bees, and that if you use one at all, it should list copper naphthenate as its active ingredient. It also points out two drawbacks of copper naphthenate: some data suggest it may affect bees in ways not previously considered, and a quick brush or dip may not give the moisture protection people expect, since research from Australia indicates the wood must be submerged for hours or even days. If you do treat wood, the guide says to treat only surfaces that face outside the colony, so no treated wood is on the inside where bees walk.
The guide’s bottom line is that a preservative may be unnecessary at all if you assemble with screws and glue, caulk the joints, use rot-resistant wood and keep the equipment painted. For paint choices, see our review of the best exterior paint for bee hives. If you want a preservative-free alternative, wax dipping beehive boxes explains the hot-wax method and why temperature matters.
Replacing Old Brood Comb on a Schedule
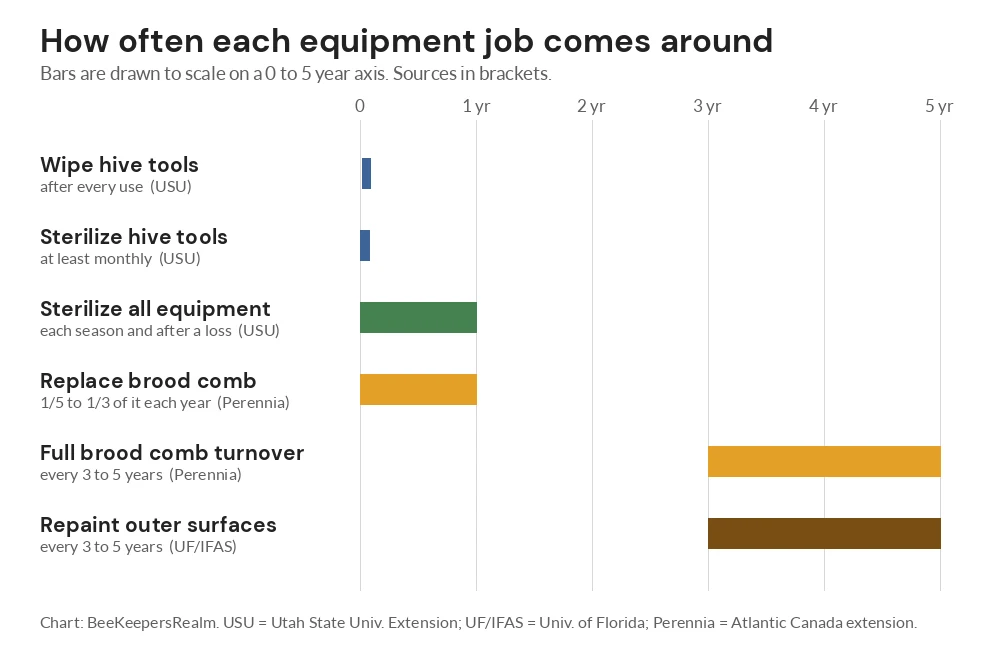
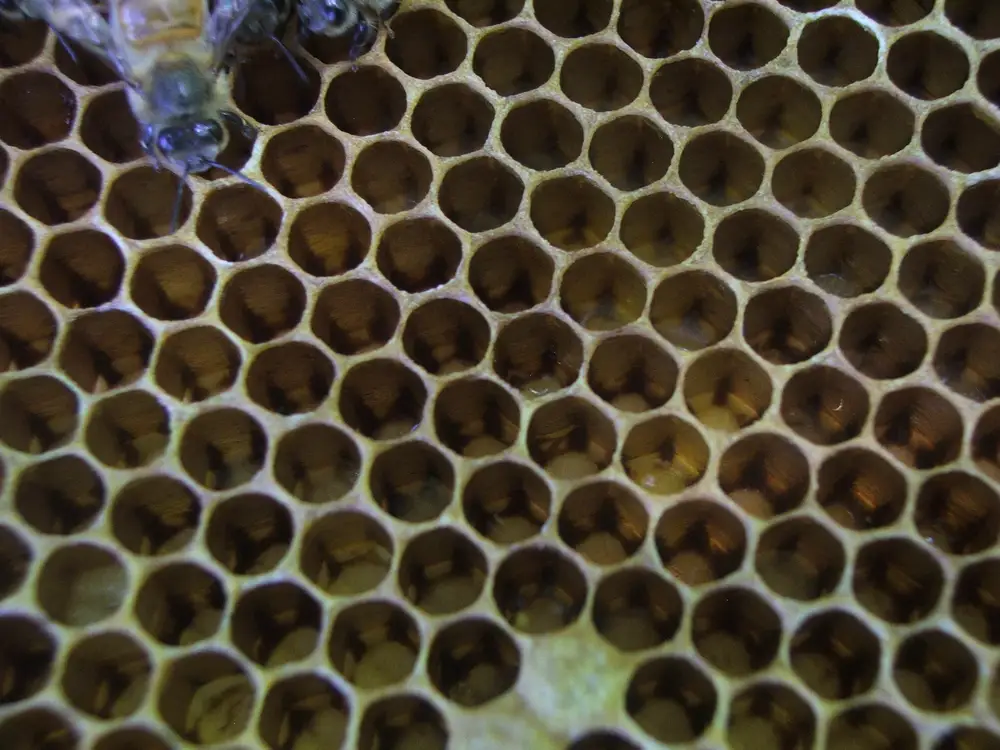
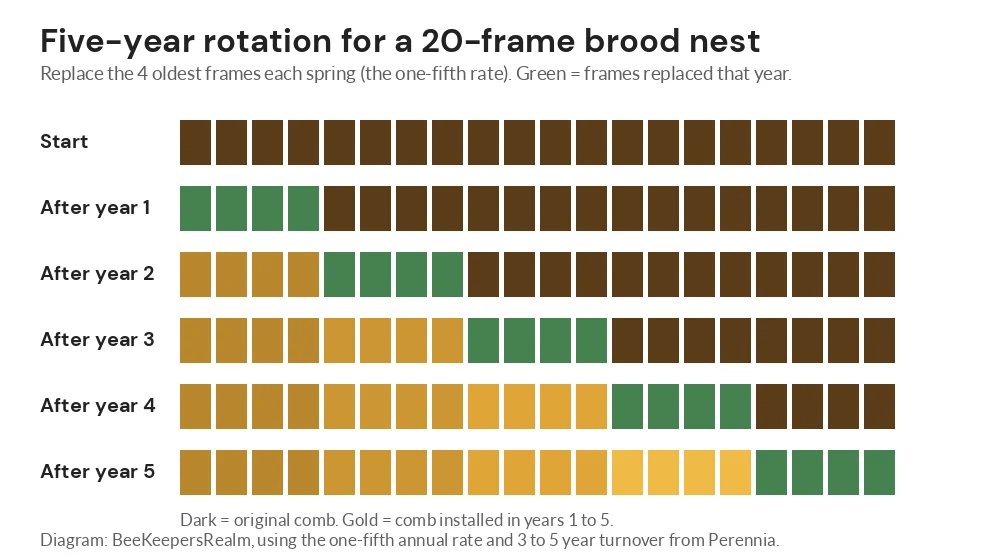
Old comb is the maintenance item that matters most to the bees themselves. Perennia, the agri-food extension organization for Atlantic Canada, defines comb rotation as the regular replacement of older brood frames with fresh foundation or empty drawn frames from honey supers, and sets the target at replacing one-fifth to one-third of the comb each season.
That works out to a full turnover of all brood comb every three to five years, Perennia says. It adds that spores of chalkbrood, nosema and American foulbrood persist in comb, and that wax acts as a sink for fat-soluble pesticides, including residues left by miticides and antibiotics used in the hive.
Why the residue argument holds up
The most-cited US data is a 2010 survey in PLoS ONE led by Christopher Mullin. The team analyzed wax, pollen, bees and brood from colonies across North America in 2007 and 2008. In the 259 wax samples, they found 87 pesticides and metabolites, averaging eight different residues per sample, and only one of the wax samples had no detectable pesticide (Mullin et al., High Levels of Miticides and Agrochemicals in North American Apiaries, PLoS ONE, 2010).
Utah State University Extension adds a disease angle: research shows chalkbrood and nosema are spread by old comb, and it cites a study finding old brood comb to be more heavily infested with varroa than new comb. Its fact sheet puts the figure at four times more likely to carry mites (Meredith, Parkinson and Walker Bravo, Utah State University Extension).
Turning a fraction into a frame count
One-fifth to one-third is easier to plan as frames. This table is our arithmetic from Perennia’s fractions, rounded to whole frames:
| Brood setup | Brood frames | Replace each year (1/5 to 1/3) |
|---|---|---|
| One 10-frame deep | 10 | 2 to 3 |
| Two 8-frame deeps | 16 | 3 to 5 |
| Two 10-frame deeps | 20 | 4 to 7 |
Timing matters as much as count. Perennia recommends doing it when the hive holds the least brood and food, early in spring before buildup, and early enough that bees can still draw out new wax. It also advises writing the month and year on the top bar of every new frame. If you scrape old comb off a frame and reuse the foundation, the date on the bar no longer tells the truth, so replace the foundation or update the date. Perennia also notes that wax costs bees five times its weight in honey, which is why they draw most of their wax during a honey flow.
For the how-to, see how often to replace old brood comb, the brood comb age guide and numbering frames for comb rotation. To renew comb in one move instead, compare the shook swarm method.
Cleaning and Sterilizing Equipment
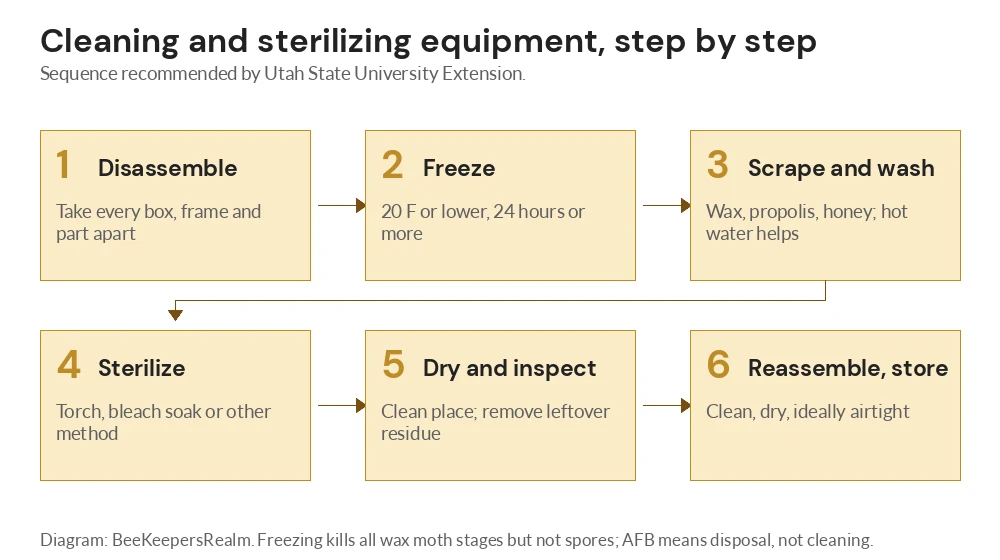
Utah State University Extension separates two jobs that beekeepers often blur. Cleaning removes visible dirt, wax and propolis. Sterilizing eradicates microbes, including spores, bacteria, viruses and fungi. Both matter, and sterilizing is the step that actually lowers disease risk. USU says hive tools, frame holders and gloves should be cleaned thoroughly after each use so they do not carry disease or parasites between colonies.
The sequence USU recommends
- Disassemble everything so debris cannot hide in corners.
- Freeze at 20°F or lower for at least 24 hours. This kills all stages of wax moths but not bacteria, viruses or spores.
- Scrape and wash off wax, propolis and honey; hot or boiling water helps loosen residue.
- Sterilize by heat or chemical method (below).
- Dry and inspect in a clean place, then clean off any remaining residue, because spores can hide under it.
- Reassemble and store in a clean, dry spot, ideally an airtight container.
| Method | How USU describes it | Limit |
|---|---|---|
| Torch (tools) | Heat tools red-hot, cool, then scrub with a bleach wipe | Fire hazard; debris must be removed first |
| Torch (wood boxes) | Char the inside surfaces and reach every corner without letting the box catch fire | USU calls the research on what it eliminates inconclusive |
| Bleach soak | 1 part household bleach to 5 parts water, fully submerged for about 10 minutes, then rinsed | Does not kill American foulbrood spores |
| Washing soda boil | About 1:5 soda to water, 5 to 10 minutes, for tools | Not effective against American or European foulbrood |
| Acetic acid fumes | 80% acid in a dish in a sealed stack for about a week | Needs a respirator and goggles; no effect on AFB |
One limit overrides the table. USU states that the only way to get rid of American foulbrood is to euthanize the infected colony and dispose of everything it has contacted, and that anyone who knows or suspects AFB should work with their apiary inspector. Our guides to burning comb after American foulbrood and disinfecting wooden equipment after disease cover that situation.
When to sterilize, and tool care
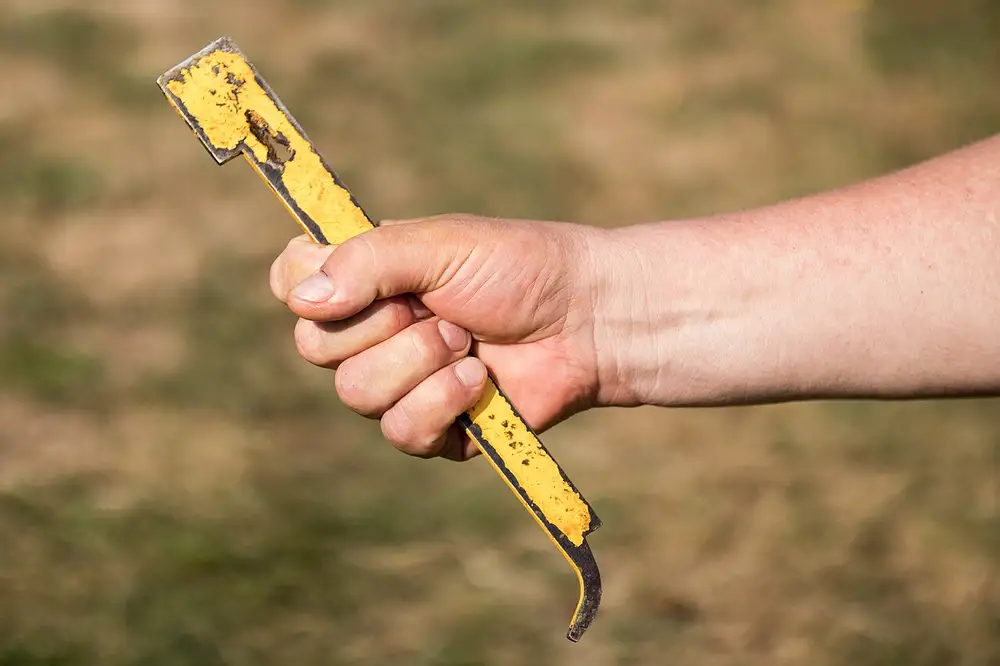
USU’s triggers are specific: before the first use each season, when moving tools from one apiary to another, whenever a colony dies (even if the colony was not diseased), after buying second-hand equipment, and any time you suspect exposure to pathogens. For hive tools, it recommends wiping after every use and a thorough cleaning at least monthly, either by torching until red-hot and scrubbing with a bleach wipe, or by soaking in a 10% bleach solution overnight. Chemicals must air dry before the tool goes back near bees.
For the details, use hive cleaning: how to scrape, sanitize and store frames and bleach vs flame for hive tools. After a loss, follow how to clean a deadout for reuse. Extractors have their own routine in cleaning and maintaining honey extractors.
Pest-Proofing: Mice, Beetles and Wax Moths
Mouse guards
Mice are a cold-weather hive pest. Montana State’s calendar schedules the mouse guard in September and October for northern states, and suggests a low-cost version: drive a few finish nails through the opening of the entrance reducer, spaced to form bars that let bees through but not mice. Whatever style you use, the opening has to stay under the size a mouse can squeeze through, and our guide to mouse guard hole size explains why 3/8 inch is the ceiling.
Small hive beetle and wax moth
For beetles, hive beetle traps that actually work compares trap types and placement. For moths, the maintenance fix is mostly storage discipline: freeze comb, keep it dry, and check it regularly (how to stop wax moth infestations).
Ventilation and Moisture Upkeep
Moisture is a maintenance problem as well as a bee problem: it rots wood, molds stored comb and drips on the cluster. Montana State’s northern-tier advice is to insulate the top heavily so condensation does not drip on the bees, and to drill several 1/4-inch holes in the upper brood box, which together with the small bottom entrance give enough airflow to keep the hive dry. It also suggests wrapping hives in fall with sheets of 1-inch Styrofoam.
For the full treatment, see how to reduce moisture inside winter hives and the beginner’s guide to hive ventilation.
Storing Drawn Comb and Idle Equipment
Drawn comb saves bees a great deal of work, so storage is part of maintenance. USU advises storing equipment in a clean, dry place, in an airtight container if possible, with a clean, well-ventilated space as the next best choice, and checking it regularly for pests. It also notes that frames holding honey are the best frames to save when sorting, since saving drawn wax and honey always carries a higher risk of harboring pathogens and insects.
In practice: freeze comb for at least 24 hours at 20°F or lower before it goes into storage, stack it with air flow, and look at it on a schedule rather than only when you need it. Two guides cover the choices: storing supers between honey flows and storing drawn comb without a freezer.
Seasonal Maintenance Checklist With Sources
The table below lists equipment and hive-protection tasks with a reason and a source for each. Timing follows Montana State’s northern-tier calendar where that source gives months, so shift it earlier in the South and later in short-season mountain areas. For region-specific tasks and dates, use our seasonal beekeeping calendar for the USA and the seasonal hive care guide by US region.
| Task | When | Why | Source |
|---|---|---|---|
| Repair or replace broken boxes and frames; clean dirty equipment | Nov to Feb (northern tier) | Winter is the low-work season; fix gear before the bees need it | Montana State Extension |
| Clear the entrance of ice and snow | Nov to Mar (northern tier) | Bees need open entrances for cleansing flights and airflow | Montana State Extension |
| Replace 1/5 to 1/3 of brood comb; date new top bars | Early spring, before buildup | Least brood and food in the hive; time left to draw wax | Perennia |
| Sterilize tools, boxes and frames before first use of the season | Before first use each season | Disease and parasites spread through equipment | Utah State Extension |
| Wipe hive tools after every use; sterilize monthly | All season | Tools carry disease between colonies | Utah State Extension |
| Check food reserves by hefting or lifting an edge | Feb to May and Sep to Oct | Light hives need feed before they starve | Montana State Extension |
| Sterilize after any colony dies | Right after the loss | Applies even if the dead colony was not diseased | Utah State Extension |
| Harvest, then freeze and store drawn comb | Aug to Sep (northern tier) | Kills all wax moth stages; freezing does not kill spores | Utah State Extension; Montana State Extension |
| Add mouse guard; reduce entrance; add upper vent holes; wrap | Sep to Oct (northern tier) | Keeps mice out; reduces heat loss and condensation | Montana State Extension |
| Repaint outer surfaces (2 to 3 coats) | Every 3 to 5 years | Water is the biggest threat to hive woodenware | University of Florida IFAS |
| Check stored comb and stored equipment for pests | Regularly through storage | One moth infestation can force a full re-clean | Utah State Extension |
In cold climates, pair this with winterizing beehives in northern states.
What to Check on Every Hive Visit
Equipment upkeep runs best when it rides along with normal inspections. Each visit, check and note:
- Box condition: gaps at joints, soft wood, a tilted stand, or a cover that no longer sheds water.
- Frames: tag dark, thick or irregular comb for next spring’s rotation, and mark new frames with the month and year.
- Entrance and pests: blockages, beetles, moth webbing and mouse damage. Reading a brood frame shows what healthy brood looks like.
- Tools: wipe the hive tool before moving to the next hive.
Frequently Asked Questions
Do beehives need maintenance?
Yes. Wood boxes need sealed joints, exterior paint and repairs, and brood comb needs periodic replacement. Montana State describes upkeep as a yearly cycle of feeding, adjusting components, repairs, harvesting and winterizing.
How often should you replace brood comb?
Perennia recommends replacing one-fifth to one-third of brood comb each season, which turns over all of it every three to five years.
What paint is safe for beehives?
University of Florida extension recommends a non-toxic paint registered for outdoor use, applied in two to three coats to outer surfaces only. Our review of exterior paint for bee hives compares options.
Should you paint the inside of a beehive?
No. The Florida guide says the inside surfaces of supers and the inner cover should not be painted, because painting traps moisture inside the hive. The one exception it gives is the bottom board, which should be painted completely.
How often should you repaint a hive?
Every three to five years if it is economically feasible, according to University of Florida IFAS Extension.
How do you sterilize beekeeping equipment?
Freeze at 20°F or lower for at least 24 hours, scrape and wash, then sterilize by torching, bleach soak or another method, and dry. USU lists bleach at 1 part to 5 parts water for about 10 minutes, with a note that it does not kill American foulbrood.
Can you scorch a beehive box?
USU says torching can be used on hive boxes if you only char the wood and reach every corner, but it warns of fire risk and calls the research on what it eliminates inconclusive. For confirmed disease, follow your apiary inspector’s advice.
How should you store hive boxes and drawn comb over winter?
Freeze comb first, then store it clean and dry, ideally in an airtight container, and check it regularly for wax moths. See storing supers between honey flows for the full methods.
The Bottom Line
Seal the joints, paint the outside, rotate a fifth of the brood comb each year, sterilize on a schedule and store drawn comb cold and dry. This week, write the month and year on every brood frame you handle, so next spring’s rotation is a matter of reading the bars.