Winter bee survival hinges more on moisture control than just cold. Bees generate large amounts of vapor through respiration and honey use, creating a warm, humid dome above the cluster. When that air meets a cold inner cover, condensation forms and can drip back onto the colony, chilling bees and wasting heat.
Good management balances gentle ventilation with top insulation. A warmed ceiling or an insulated inner cover moves condensation to hive walls where bees can access water on mild days. Quilt boxes and moisture boards wick vapor while wraps and windbreaks stabilize temperatures.
This guide explains practical setups for U.S. climates, from humid coasts to dry interiors. Expect clear steps, materials like the BeeSmart Duo and moisture boards, and tips on sights that signal a problem.
For detailed methods and tested configurations, see our practical resource managing moisture in winter hives.
Key Takeaways
- Prevent condensation above the cluster to avoid chilling bees.
- Use top insulation so vapor condenses on walls, not the ceiling.
- Quilt boxes and moisture boards act as vapor buffers.
- A small, controlled top exit can let humid air escape without chilling.
- Windbreaks and wraps reduce energy loss and protect stores.
Why Moisture Threatens Winter Hives in the Present Season
Winter losses often trace back to condensation that falls onto the cluster rather than to simple cold. The winter cluster holds core heat near 77–97°F when brood exists and drops to about 64–70°F during broodless periods. This gradient pushes warm, humid air upward.
Cold vs. wet: why condensation and “wet bees” kill colonies
Warm air carrying water vapor meets a cold inner cover or uninsulated lid and turns into liquid. That drip-back can douse the cluster.
Wet bees lose their insulating fluff. Their bodies become waterlogged, heat loss rises, and the colony burns stores faster. A colony that is dry often survives lower temperatures; a wet one can fail even in milder weather.
How warm air, water vapor, and hive surfaces create drip-back
The physics is simple: warm air holds more moisture until it hits a colder surface. Inner cover tops, frame bars, and metal lids are common cold planes where condensation forms and can freeze, then melt and flood the cluster.
| Site | Risk | Why it matters |
|---|---|---|
| Inner cover | High | Primary condensation plane for rising moist air |
| Frame top bars | Medium | Drip can fall between frames and soak bees |
| Hive walls | Low | Condensation here is often usable water when bees can access it |
| Uninsulated lid | High | Metal lids cool fast and create ice that later melts onto the cluster |
- Early signs: droplets on the inner cover, streaking on walls, or ice slabs.
- Prevent horizontal drafts; they break the cluster’s temperature gradient more than vertical exits.
- For practical ventilation options and tested setups, see this ventilation guide.
Moisture Management Principles: Heat, Airflow, Insulation, and Condensation
A clear strategy lines up heat, insulation, and gentle upward airflow so condensation lands where it won’t harm the colony.
Ventilation without drafts
Definition: controlled upward movement of air that lets humid air exit at the top while preventing cold lateral drafts across the winter cluster.
Top venting allows warm, moist air to leave before it forms drops on the inner cover. A small, baffled upper opening is often enough.
The condensing-hive approach
Here, heavy top insulation (rigid foam or a BeeSmart Duo style cover) keeps the ceiling warm. Vapor then moves outward and condenses on walls rather than above the cluster.
“When vapor condenses on insulated walls, latent heat returns to the microclimate instead of being lost outdoors.”
Balancing energy and air
Over-ventilating forces out heat, CO2, and latent energy. That raises activity, increases honey use, and heightens loss risk if stores run low.
- Match modest upper ventilation with good top R-value, or
- Use a condensing setup and wrapped walls to stabilize temperature and save stores.
- Control varroa before winter; energy conservation matters most once mites are managed.

For tested upper options, see upper ventilation options.
How to Reduce Moisture Inside Winter Hives
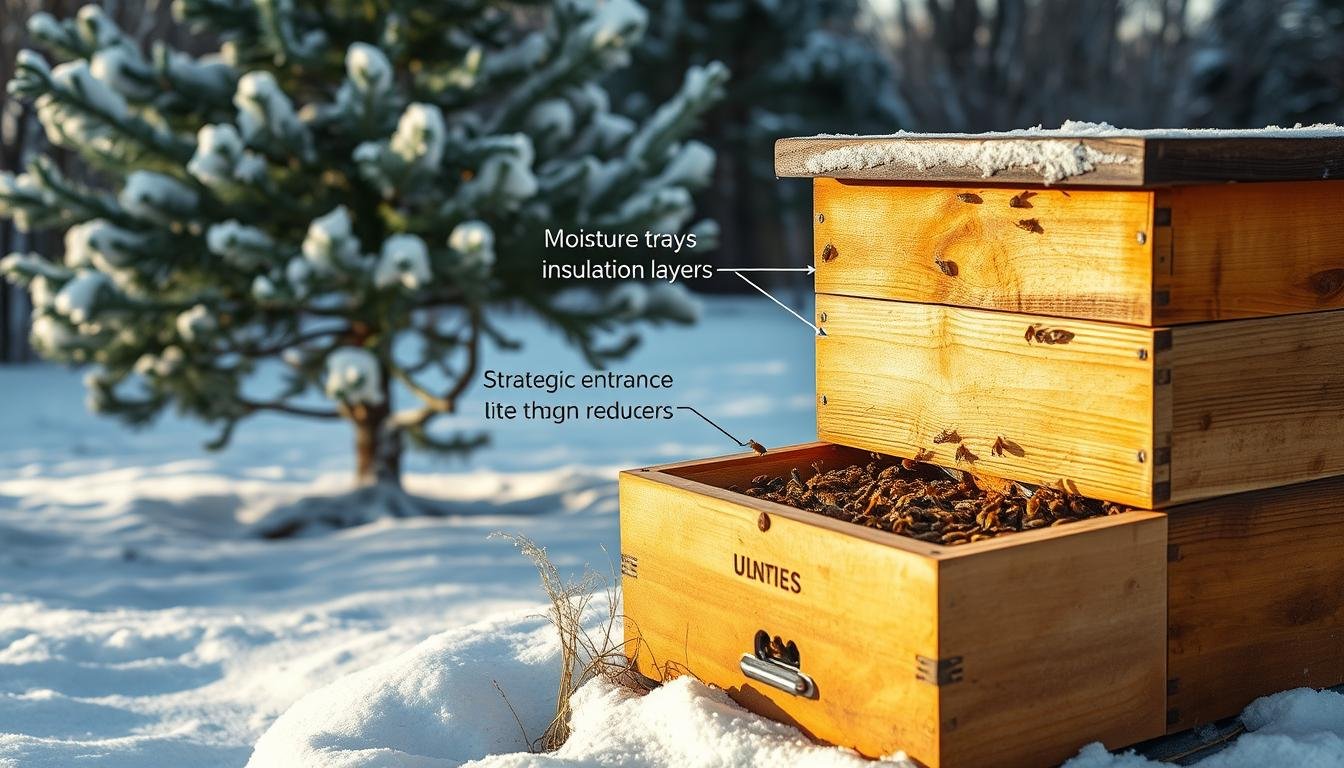
Start with the roof: good insulation plus an absorbent layer keeps bees dry. Place an insulated inner cover topped by a moisture board or a quilt box. Materials like wood shavings, burlap, or compressed fiber work well as a vapor buffer and lower the chance of drip-back above the cluster.
Set the top right: insulated inner cover, moisture board, or quilt box
Install an insulated inner cover and add a dedicated moisture layer. A quilt box or moisture board absorbs vapor and evens humidity swings. This setup offers a simple, passive way to protect the brood and conserve heat.
Create a controlled upper exit or condense-by-design — choosing your strategy
For a venting plan, fit a small notch inner cover or modest top entrance aligned with the lower entrance. That encourages upward airflow and reduces crosswise drafts. Alternatively, run a condensing-style top: thick ceiling insulation and a snug outer cover force condensation onto walls where bees can access water.
Eliminate horizontal drafts and tilt the hive slightly forward
Seal gaps between boxes and tighten joints so cold air does not blow across the cluster. Tilt the hive a few degrees forward so condensate runs toward the front rather than dripping on bees.
Prepare before first frost: seal gaps, align boxes, and confirm cover fit
Decide on screened bottom boards before deep freeze: close or add trays in windy, cold areas; leave partial openness in milder climates. Avoid non-breathable plastic wraps that trap humidity; pair wraps with planned ventilation or a heavy, insulated top.
- Quick actions: install quilt or moisture board; add a small upper exit or insulate the top; seal box joints; tilt hive forward.
- Further reading: practical setups and tests in managing moisture in winter hives and seasonal prep at seasonal beekeeping tasks.
Tools, Configurations, and Materials That Help Manage Humidity
Practical tools and well-chosen materials make humidity control manageable rather than guessing work. Use absorbent tops and planned vents as a system rather than single fixes.

Quilt boxes and moisture boards filled with wood shavings, straw, or compressed fiber capture vapor while adding R-value at the top. They buffer spikes in humidity and keep liquid from forming directly above the cluster.
Upper entrances and notched inner covers provide a controlled escape for warm air and serve as emergency exits when snow or debris blocks lower holes. Size a notch around 3/4–1″ and place it forward of the cluster for best results.
- Screened bottom boards: leave open in mild, dry climates for gentle air exchange. Close with an insert in cold, windy regions to prevent drafts.
- Insulation: wraps, rigid foam, and windbreaks raise top R-value; prefer breathable wraps or pair tight insulation with planned ventilation.
Tip: Check absorbent layers after warm spells; saturated shavings may need replacing. For regional strategies see a practical guide on climate-specific ventilation and a hands-on reference at managing hive humidity.
Adapting to Climate, Hive Style, and Colony Needs
Match venting and absorbent layers with local humidity and your hive’s size for best survival odds.
Damp coastal or Pacific Northwest regions often need layered solutions. Beekeepers there pair quilt boxes or moisture boards with modest upper exits and, sometimes, open screens. This combo soaks excess moisture while allowing gentle airflow.
In dry, cold interiors a simpler plan usually works. A small upper notch plus solid insulation at the top keeps temperature stable and limits vapor buildup. Small clusters benefit from extra top R-value rather than large vents.
Monitor without intrusive inspections
Watch exterior signs rather than opening boxes often. Look for frost under lid rims, water staining, or musty odors. Heavy bearding at upper exits during warm spells or many dead bees near the entrance are red flags of moisture stress.
“Keep entrances clear of snow and ice so warm, humid air can escape and the colony keeps gas exchange.”
| Region | Recommended setup | Key cue to check |
|---|---|---|
| Humid coast | Quilt box + moisture board + small upper exit | Musty smell; saturated shavings |
| Cold-dry interior | Thick top insulation + minor notch vent | Frost under lid edges |
| Windy, exposed sites | Closed bottom insert + strong wrap + modest top vent | Excess dead bees at entrance |
- Adjust for brood and stores: as brood resumes late season, the colony needs warmer temperature and may consume more stores.
- Prepare colonies: control varroa before cold months so bees focus energy on thermoregulation.
- Mid-season check: on a warm day replace saturated absorbents if present.
Conclusion
The best outcomes come from either a modest, protected upper exit or a well-insulated, condensing top that shifts water off the cluster. Aim for balanced moisture management that guides warm air upward or keeps the ceiling warm so condensation forms on walls, not on bees.
Use practical tools: an insulated inner cover with a quilt box or moisture board, breathable wraps, windbreaks, and a small protected entrance. Match ventilation and insulation to your site and colony size to preserve heat and honey stores.
Check hives from the outside, keep the entrance clear, and swap saturated materials on warm days. Smart airflow, good fit, and steady cover insulation cut loss and help colonies reach spring stronger.
FAQ
Why does condensation form in hives and threaten the cluster?
Warm bee bodies and brood generate heat and water vapor. When that moist air meets cold hive surfaces it condenses as droplets. Dripping or wet walls chill bees, reduce insulation value, and increase risk of chilled brood and disease, so managing airflow and surface temperature matters.
Can ventilation be increased without chilling the colony?
Yes. Provide high, protected exits that let humid air escape while avoiding direct drafts across the cluster. A small upper notch or a screened upper vent exchanges air above the cluster; add baffling or an insulated upper chamber so escaping air does not pull heat away from bees.
What is a quilt box or moisture board and how does it help?
A quilt box is an insulated box above the inner cover filled with absorbent material such as wood shavings. It traps vapor, raises the temperature of the top hive ceiling, and prevents drip-back. Moisture boards work similarly as a sacrificial condensing surface above the cluster.
Should I keep screened bottom boards open during cold months?
It depends on climate. In wet, cold areas close or add a removable tray to reduce upward airflow that can chill bees. In cold-dry climates opening a screened bottom can help ventilate stale, humid air. Use a removable option so you can adapt as weather changes.
How important is top insulation versus wrapping hive walls?
Top insulation is most critical because heat rises and the ceiling is where condensation forms. Insulating the top and providing a warm condensing surface reduces drip. Wall insulation and windbreaks reduce convective heat loss and lower honey consumption, but prioritize the top.
Will extra ventilation increase honey consumption or CO2 buildup?
Over-ventilating forces bees to generate more heat, raising energy use and stores consumption. Too little ventilation raises CO2 and humidity. Balance is key: controlled upper vents and passive absorbents let vapor escape without continuous cold drafts that force higher metabolic rates.
What simple steps should I take before the first frost?
Seal obvious gaps, align boxes so seams are tight, confirm the outer cover fits, and add an insulated inner cover or quilt. Ensure frames with food are over the cluster and tilt the hive slightly forward so any condensation drains away from the brood area.
How do I prevent horizontal drafts while keeping air movement above the cluster?
Close cracks at the hive sides and interfaces, use entrance reducers, and provide a single controlled upper outlet. Baffle upper vents with wood blocks or a snug inner cover notch so airflow is vertical and slow rather than blasting across frames.
When should I add absorbents like wood shavings or burlap?
Add absorbents when nights are cold and days warm, causing strong temperature swings and vapor load. Place them in the quilt box or moisture board above the inner cover. Replace or dry materials each season; do not place wet material directly on top of frames.
Are there situations where intentional condensation is useful?
Yes. A condensing-hive approach directs vapor to a warm, sacrificial surface above the cluster where it can evaporate or be absorbed. This prevents drip on the bees and uses latent heat to keep the immediate cluster area drier and warmer.
How should I position the hive to minimize wet bees and drip-back?
Tilt the hive slightly forward to let any condensed water run out the entrance rather than down into frames. Place hives under a light overhang to reduce direct rain on the outer cover. Keep entrances unobstructed to allow ventilation and drainage.
What materials work best for top insulation and quilt fill?
Closed-cell foam or rigid foam boards provide good R-value for tops. For quilt fill, use coarse wood shavings, straw, or clean burlap with inner shavings; avoid fine dust or damp materials that compact and lose absorbency quickly.
How do I monitor moisture stress without opening the hive in winter?
Watch for external signs: frost patterns on the outer cover, frequent bees fanning at the entrance, melted snow under the front, or sticky outer covers from internal condensation. Weight checks on a hanging scale also indicate food loss from increased consumption.
Do different hive styles change moisture management choices?
Yes. Langstroth, Warre, and top-bar designs have different airflow and insulation characteristics. Langstroth boxes accept quilt boxes and inner-cover mods easily. Adapt strategies for your style—focus on creating a warm condensing zone above the cluster and controlled upper ventilation for best results.