Simple planning and steady routines make inspections less taxing for both you and your colony.
Regular checks in active months every seven to ten days, and much less in winter, help spot issues early without needless disturbance. Choose late morning to early afternoon on warm, sunny days so foragers are out and fewer bees are in the hive.
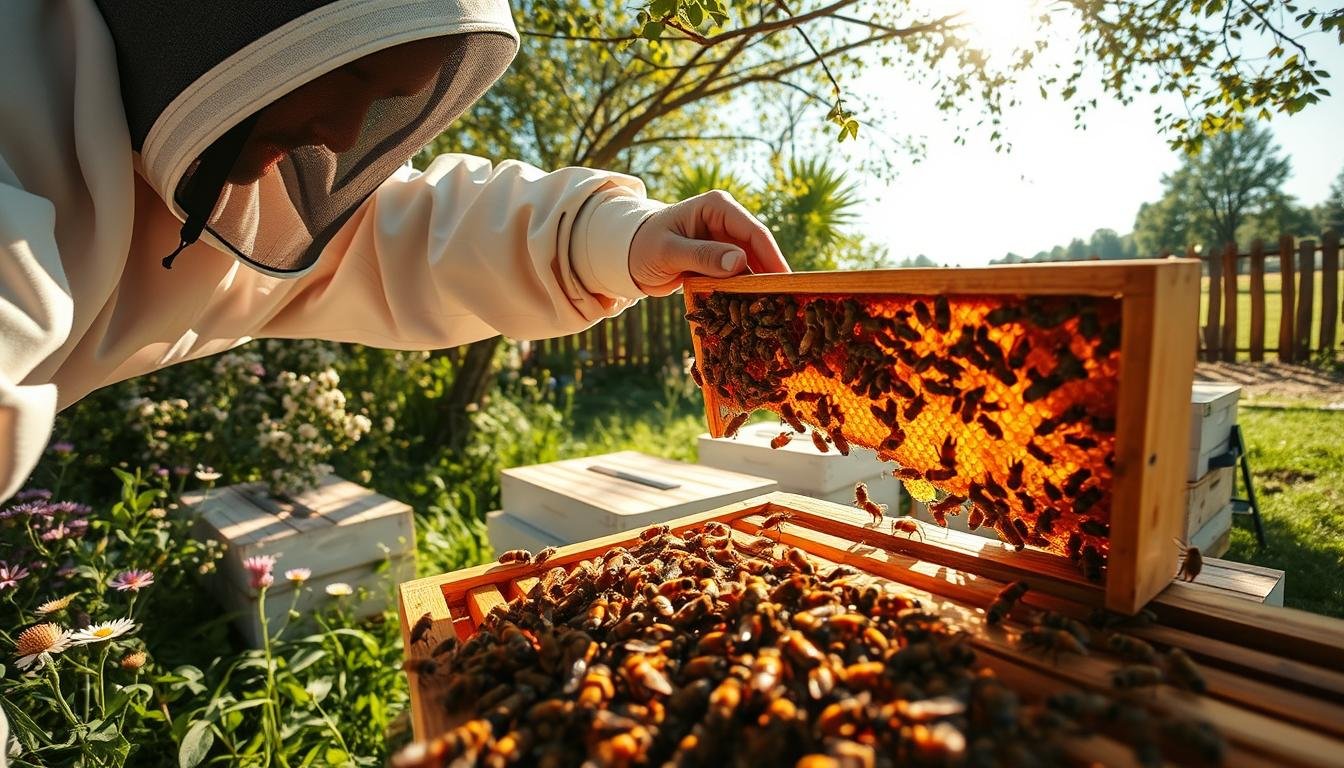
Gear up with veil, gloves, and a suit or jacket, and stage essential tools—smoker, hive tool, and a bee brush or feather—before you open any boxes. Light the smoker ahead of time and keep a clear plan for what frames and boxes need review.
Move slowly, avoid blocking the entrance flight path, and focus on high-value checks: brood pattern, stores, queen status, and space. Record findings with notes, photos, or video to cut repeat openings and support long-term bee health.
For practical inspection tips and equipment ideas, see practical hive inspection tips and guidance on scaling your setup at beekeeping expansion tips.
Key Takeaways
- Plan each inspection and limit scope so the hive is open for minimal time.
- Use late morning to early afternoon on warm days for calmer bees.
- Prepare protective clothing and essential tools before starting.
- Focus checks on brood, stores, queen, and space to avoid extra handling.
- Record notes and images to prevent unnecessary revisits.
Why Reducing Stress Matters for Your Hive, Bees, and You
A quiet, efficient inspection keeps bees focused on brood care and nectar work rather than alarm responses. Frequent checks catch pests and disease early—wax moths and Varroa are easier to manage when spotted before they spread.
Calm handling protects brood pattern and temperature. Over-handling frames can chill larvae or crush workers and raise alarm pheromones that trigger defensive behavior or absconding.
Read bee behavior with your eye: steady movement and even buzzing signal a calm colony. Rapid, high-pitched buzzing, head-butting, or massing on top bars warn that you should pause or close the hive.
Keep frame order and limit manipulation so established patterns resume quickly after you close boxes. Early detection is only useful when the inspection itself doesn’t create new problems.
- Lower-impact checks preserve brood care, nectar processing, and temperature regulation.
- Spotty brood pattern can indicate queen or health problems and should guide follow-up work.
- In cooler months, shorten the inspection and prioritize vital frames to avoid chilling the cluster.
For detailed guidance on recordkeeping and scheduled checks, see the importance of recordkeeping for healthy colonies.
How to Reduce Stress During Hive Inspections
Start with a concise plan. Create an inspection checklist that defines goals, scope, and clear exit criteria. Decide which boxes and frames need review for brood, stores, space, and queen signs. This keeps the hive open only as long as necessary.
Prepare protective gear and tools before you walk up. Make sure clothing fits and feels comfortable. Stage the smoker, hive tool, feather or bee brush, and your recording method so you work without fumbling.
Light the smoker in advance and give minimal, well-timed puffs at the entrance and under the cover. Apply a small puff to gloves or tool heads if alarm pheromones appear.
Move steadily and keep your body out of the flight path. Lift frames gently and avoid sudden shifts that can crush bees or damage comb. Use a feather for delicate patches of brood or eggs.
Know when to stop. If workers mass on top bars, make loud buzzing, or repeatedly bump your veil, pause. A quick puff of smoke and an early exit protect the colony and limit further inspection needs.

Quick checklist
| Action | When | Why | Effect |
|---|---|---|---|
| Set goals & exit criteria | Before approach | Limits scope | Shorter open time |
| Light smoker & stage tools | At stand, before opening | Mask alarms | Calmer bees |
| Gentle frame handling | Frame by frame | Protect comb & brood | Less agitation |
For a sample inspection checklist and practical beekeeping safety precautions, review those guides before your next visit.
Time It Right: Weather, Time of Day, and Seasonal Frequency
Pick a warm, sunny morning when foragers are flying and the colony inside is quieter than at dawn or dusk. This timing lowers on-hive bee density and shortens the session.
Late morning to early afternoon is the recommended slot on calm, clear days. Cloudy or cool weather keeps more guards inside and can make handling longer and more confrontational.
From spring through fall, target checks every seven to ten days. That cadence tracks rapid population change, space needs, and swarm signals without over-handling.
In peak summer, keep visits brief and avoid the hottest hours. In winter months, limit checks to once a month or less and focus on stores, ventilation, and entrance condition.
“Inspect when weather and forage patterns favor calm colonies; a short, well-timed visit beats a long, poorly timed one.”
| Season | Best time of day | Cadence | Primary focus |
|---|---|---|---|
| Spring | Late morning–early afternoon | Every 7–10 days | Brood, space, swarm signs |
| Summer | Morning or late morning, avoid midday heat | 7–10 days or as needed | Ventilation, stores, queen activity |
| Winter | Midday when warmest | Monthly or less | Honey stores, insulation, entrance |
- Consider local weather and postpone visits if winds or fronts are expected.
- Track notes on time, weather, and temperament so future scheduling improves; a simple log helps beekeepers align visits with calmer conditions.
- When uncertain, a shorter, well-timed visit is almost always better for both bees and you.
For seasonal task planning and a schedule you can adapt, see seasonal beekeeping tasks.
A Low-Disturbance Inspection Workflow from Entrance to Covers
Begin each session at the entrance with a gentle puff, then use the outer cover as a tidy work platform. This keeps boxes shaded and helps maintain stable temperature while you work.

Open, cover, and stack: place the outer cover upside down on the ground and set lifted boxes on it. Keep non-working boxes covered to limit light and protect comb and brood.
Remove the first frame to create a working gap. Slide subsequent frames into that space in order, inspect, and return each frame to the same gap. This preserves pattern and prevents rolling bees.
- Give a light puff at the entrance and under the cover, then use the outer cover as your clean base.
- Use a cloth inner cover to shade frames you are not handling and keep boxes stacked covered.
- Handle each frame by the lugs, hold it vertical, and avoid twisting that will break wax bridges.
- Use a hive tool sparingly for propolis and remove burr comb only when it disrupts spacing.
- When re-seating boxes, touch corners first and rotate about 45° as you lower to avoid squishing bees.
“Keep movement smooth and predictable; a calm routine is the best way to protect brood and honey stores.”
| Step | Purpose | Effect |
|---|---|---|
| Light puff at entrance | Calm guards | Fewer clashes at first frames |
| Use outer cover as base | Shade and clean platform | Stable temperature, tidy work area |
| Remove first frame | Create gap for handling | Less rolling, preserved comb |
| Rotate boxes 45° when lowering | Reduce crushes | Smoother reassembly |
Finish by aligning equipment precisely and sealing covers. That helps the colony recover and resume normal work quickly.
Tools, Equipment, and Pro Tips That Keep Bees Calm
Bring a compact kit and work with purpose. Stage a few essential tools near the stand so you move without hesitation and keep the session short.
Cover as you go. Use the outer cover for stacked hives and a cloth inner cover on the active box. This keeps light low, stabilizes temperature, and lowers robbing pressure.
Feather vs. brush
A goose feather is gentler on brood and eggs than a stiff bee brush. Use the feather for delicate frame work and the brush for larger cleanups.
Sugar spray and scented supplements
Keep a spray bottle of 1:1 syrup. A fine mist, with supplements like HiveAlive or Honey-B-Healthy, can mask alarm pheromones and draw attention away from gear.
Box rotation, space, and records
Rotate boxes ~45° when lowering them. That small motion reduces crushing at edges.
Apply the 70% rule: when roughly seven of ten frames hold brood or nectar, add a box to prevent congestion and swarm signals.
Record notes, photos, or short video of key frames. Clear records cut repeat openings and help spot queen or comb issues earlier.
“Simple gear choices and tidy habits make inspections faster, safer, and less disruptive for beekeepers and bees.”
| Tip | Why it works | Quick effect |
|---|---|---|
| Cover active box with cloth inner cover | Blocks light and retains heat | Calmer bees, less robbing |
| Use goose feather for brood checks | Gentle movement over delicate areas | Fewer crushed bees, clearer views |
| Spray 1:1 syrup with supplement | Masks alarm pheromone and attracts attention | Lower agitation, focused activity |
| Rotate boxes 45° when lowering | Gives bees exit time from crush zones | Reduced squashed bees |
Conclusion
Finish by closing boxes gently, aligning frames, and logging observations for future checks.
Keep visits brief and focused on queen status, brood pattern, and stores. Choose late morning or early afternoon on warm days and follow a seven–ten day cadence in active months. In winter months, limit checks to essential food and ventilation checks.
Make sure minimal smoke is used and tools remain staged so handling stays calm. Rotate boxes about 45° when lowering and reseat covers carefully to avoid crushing bees or creating gaps.
Record notes, photos, or short video clips. For an expanded hive inspections guide and ventilation advice, see this beehive ventilation guide.
FAQ
Why does minimizing colony agitation matter for brood pattern and honey production?
Agitation triggers defensive behavior and diverts worker bees from brood care and foraging. Repeated disturbance reduces nursing, disrupts the brood pattern, and can cut honey stores. Calm inspections keep workers focused on colony tasks and support steady honey yields.
When is the best time of day and weather for inspections?
Aim for late morning to early afternoon on warm, sunny days when foragers are out. Cool, wet, or windy conditions make bees defensive and increase the risk of crushing. Good timing reduces agitation and speeds inspections.
How often should I check hives in spring, summer, and winter months?
In spring and summer, follow a seven- to ten-day cadence for key checks like queen status, brood pattern, and space. In winter, limit interference to essential checks only and focus on verifying honey stores and ventilation to avoid heat loss.
What signs show I’m over-stressing the colony and should stop the inspection?
Stop if bees show tight clustering around frames, persistent alarm fanning, loud continuous buzzing, or increased stinging attempts. Rapidly rising bee numbers at the entrance or piling on frames are also clear exit cues.
What protective gear and tools help keep bees calm while I work?
Use a well-fitting veil, gloves if preferred, and a light-colored jacket. Essential tools include a charged smoker, a sturdy hive tool, a feather or soft bee brush, and a notebook or camera. Proper gear lets you work confidently and gently.
How should I use a smoker effectively without over-smoking the hive?
Light the smoker ahead of time so it produces cool, steady smoke. Deliver short, well-timed puffs at the entrance and under the cover to mask alarm pheromones. Avoid constant smoking; too much can chill brood and coat comb with tar.
What frame-handling techniques reduce the chance of crushing bees?
Create working space by gently easing adjacent frames with your hive tool before lifting. Lift slowly, keep frames vertical, and maintain orientation. Replace frames in the same order to preserve traffic patterns and avoid crushes.
Are there gentler alternatives to a bee brush for clearing bees from comb?
Yes. A soft feather or a light fanning with a hive tool edge often moves bees without damage. Sugar water misting also makes bees groom rather than fly and can be less stressful than brushing.
How does recordkeeping reduce inspection time and colony disturbance?
Notes, photos, and video let you track queen performance, brood patterns, and issues remotely. Clear records focus inspections on problem areas, shortening hive time and lowering disturbance across seasons.
What is the 70% rule for space management and how does it prevent swarming?
The 70% rule keeps no box more than about 70% filled with drawn comb and brood when nectar flows begin. Providing space early reduces congestion, discourages swarm preparations, and keeps workers calm through spring and summer.
How can I limit light and temperature shock when opening a hive?
Work with the top shaded, keep exposure brief, and use a cloth inner cover or partial cover to block sudden light. Shading the hive bodies and minimizing open time preserves brood temperature and lowers agitation.
What are quick checks I can perform if time is limited?
Peek at the brood pattern, confirm the presence of eggs or young larvae, assess honey and pollen stores, and look for signs of disease or pests. These targeted checks can be done in a few minutes with minimal disturbance.
When should I use scented supplements or sugar spray, and any cautions?
Use light sugar sprays to calm bees during short handling or to mask alarms. Scented supplements that mimic queen pheromone can soothe colonies but use sparingly; overuse may mask real problems and alter normal behavior.
How does rotating boxes 45 degrees help reduce agitation?
Rotating boxes slightly reorients internal pathways and reduces the chance of crushing bees when moving frames. It disperses traffic patterns and lowers direct conflicts on frames during inspections.


