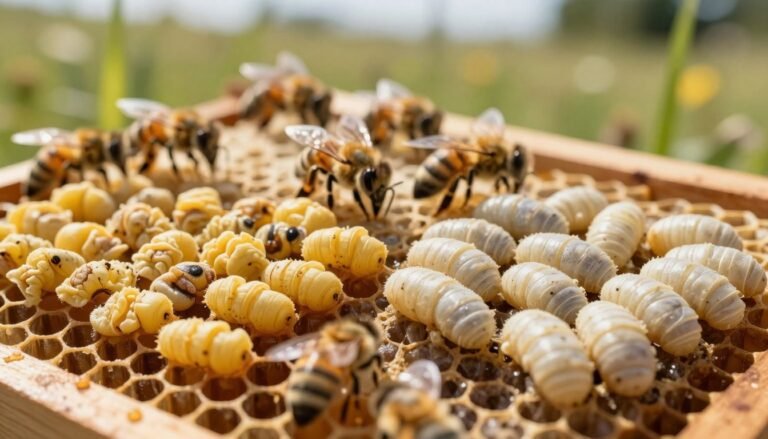
Seeing an uneven brood pattern can alarm any beekeeper. A full frame of sealed brood used to signal strength and a good honey season. In the past, many colonies showed steady, wall-to-wall brood before the autumn equinox.
New queens sometimes take time to settle into a hive. That transition can cause irregular egg placement across frames. Worker numbers, mating success, and local nectar or pollen sources all shaped how the colony recovered.
The biology of laying matters. Queens often start in the center of a frame and move outward in rings. A worker cell stays capped for about 12 days, so short-term gaps may fill in if conditions improve.
This introduction will help you judge whether the pattern is temporary or signals deeper issues. We will outline checks for eggs, larvae, drone cells, and overall worker presence so you can make sensible decisions before winter arrives.
Key Takeaways
- Uneven brood can be a short-term result of a new queen settling into the colony.
- Check eggs, larvae, and worker counts before deciding to intervene.
- Frame center-to-edge laying patterns are normal; gaps may fill in over days.
- Environmental factors like pollen and nectar sources affect laying results.
- Monitor drone cells and sealed brood to spot disease or queen issues early.
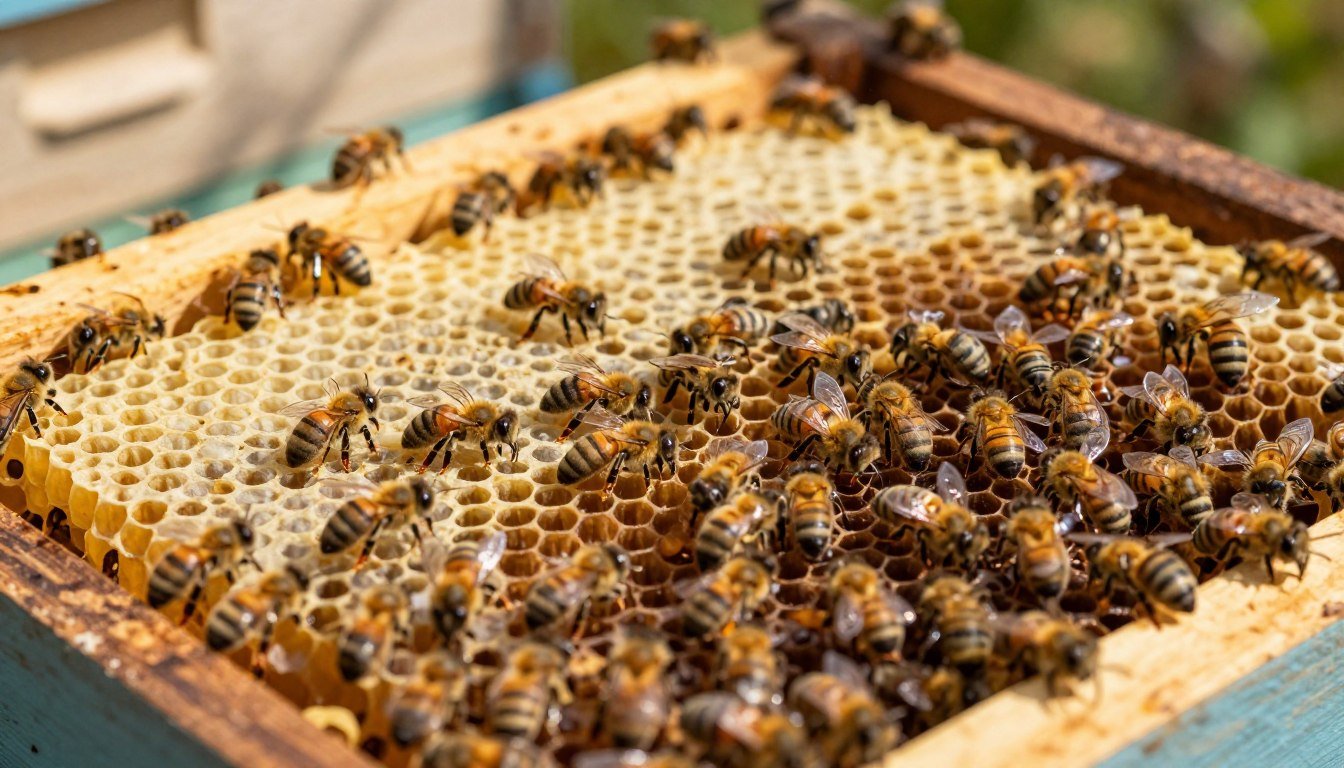
Understanding the Ideal Brood Pattern
Optimal brood distribution looks like a tight, 3D oval running through the central frames. That compact mass helps the colony keep stable temperatures and feeds developing larvae efficiently. In a standard 10-frame Langstroth hive, the queen will favor middle frames so the young stay warm.
The Football Shape
A healthy brood pattern often forms a football-shaped block. This 3D oval spreads through adjacent frames and leaves peripheral cells for stores and larger drone cells. Drone cells usually sit near the lower frame edges where slightly cooler air suits drone development.
The Rainbow Pattern
The rainbow pattern shows brood, pollen, and honey arranged in bands. Pollen sits close to the nest for protein, while honey and nectar are stored above or to the sides. This layout signals good beekeeping and a queen laying enough eggs to maintain colony strength.
- Look for a solid block of capped cells across central frames.
- Count eggs and larvae to confirm steady queen laying over days.
- Keep comb and stores from encroaching on the brood area during inspections.
Why Brood Looks Patchy After a Queen Change
An interrupted laying rhythm may create empty cells and scattered capped areas. This often follows introduction of a new queen while the colony resets its internal cycles.
Common causes include poor mating, larvae loss, and worker failure to prepare cells. Newly drawn comb can show rows of unused cells near supporting wires. Small colonies may also struggle to keep brood warm, producing gaps on frames.
Inspect frames over several days before acting. Count eggs, young larvae, and capped cells to detect improving trends. Look for queen cells on combs; their presence can signal replacement attempts or swarm intent.
- Spotty pattern may come from unfertilized eggs when mating failed.
- Disease or resource shortages reduce queen laying and larval survival.
- Worker behavior can mask queen quality; check for consistent laying over days.

Next steps: monitor capped-cell number, check pollen stores, and assess mating history before requeening. This helps distinguish temporary adjustment from a failing queen.
Distinguishing Between Normal and Abnormal Patterns
Distinct cell and cap features help beekeepers separate normal growth from issues. A quick, calm inspection of central frames will show if the colony follows a steady laying rhythm or if intervention is needed.
Visual Signs of Healthy Development
Smooth, slightly convex caps on sealed cells are a reliable sign. Drone cells are more domed than worker cells, which helps with visual checks.
Sunken or greasy caps often signal disease and need prompt attention. Use a lighted magnifying glass on a headband to spot small eggs and verify egg placement.
Track timing: eggs become larvae in about three days. Worker larvae usually pupate around day nine. Watching these stages over several days tells you if the laying pattern is stable.
- Look for a solid block of eggs, larvae, and sealed cells across central frames.
- Queen cells along the bottom of a frame often mean the colony plans to swarm.
- Compare development timelines to spot slow growth or failed mating.
| Sign | Healthy | Concern |
|---|---|---|
| Cap shape | Smooth, convex | Sunken or greasy |
| Progression | Egg → larva (3 days) → pupa (~9 days) | Missing stages or long delays |
| Cell use | Continuous area across central frames | Scattered empty cells |
Note for beekeepers: if uncertainty remains, consult standard management guidance such as the management booklet for inspection checklists and next steps.
The Role of Foundation and Cell Preparation
Foundation and early cell work shape how evenly eggs appear across frames. The surface, contrast, and rigidity of each frame influence worker behavior and queen laying patterns.

Impact of Foundation Type
Black foundation helps inspectors find tiny eggs quickly. Many professional beekeepers prefer it in the brood box for that reason.
Rigid plastic with beeswax gives strong support for developing comb. Foundationless frames allow natural comb, but they are fragile at first and need careful handling.
Worker Cell Preparation
Workers shape and finish cells before the queen will use them. If wires or uneven foundation remain, bees may avoid those areas until several cycles pass.
Best practices:
- Use wax-coated frames to encourage acceptance.
- Allow new comb to cycle through several brood rounds for stability.
- Handle foundationless frames gently while comb is thin.
For hands-on guidance during inspections, see this short guide on first inspections: your first brood inspection.
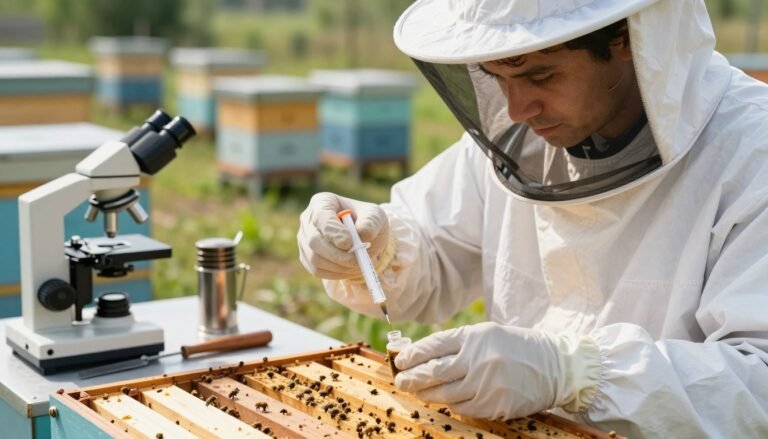
Assessing Queen Quality and Fecundity
Measuring a queen’s reproductive output takes more than one quick inspection. Count eggs and watch the pattern on central frames over several days. This gives a clear signal of steady laying or decline.
Research shows that size and weight do not reliably separate good and poor performers. In practical terms, a spermatheca with fewer than 3 million sperm often indicates poor mating.
Dissection to count viable sperm is a standard test, though unpleasant. Pathogen surveys did not consistently link disease presence to a poor brood pattern. That means colony conditions can drive spotty results.
- Monitor eggs, larvae, and sealed cells for several days.
- Assess pollen and nectar availability before blaming the laying female.
- Remember worker health supports fecundity and overall colony recovery.
Bottom line: combine repeated inspections, resource checks, and, when needed, spermathecal analysis to decide if requeening is required.
Environmental Impacts on Brood Rearing
Severe droughts and mono-floral honey flows can strip a colony of the pollen it needs for steady egg production. When pollen is scarce, workers shift tasks. Foragers search farther, and fewer nurse bees feed larvae.
Protein shortfalls force the queen to reduce laying. That cuts the number of eggs and sealed cells the hive sustains. Over several days this produces a smaller, uneven area of young bees in the central frames.
Some eucalyptus and other high-honey sources yield little pollen. Beekeepers must spot these floral limits and act.

“Feed supplemental pollen or patties during dearths to keep nurses supplied and let the queen maintain steady laying.”
- Monitor returning foragers for pollen loads on their legs.
- Provide pollen substitutes when natural sources fail.
- Plan apiary placement to include diverse floral resources.
For practical guidance on diagnosing cold or stressed larvae, see this short guide on identifying chilled comb: identifying chilled brood.
The Influence of Nectar Flows and Storage Space
A heavy nectar flow can quickly reshape how bees use space inside the hive. When incoming nectar exceeds available super capacity, workers often store it in the brood area.
Backfilling the brood nest reduces the number of free cells the queen can use. That compression creates an irregular pattern and can look like poor laying even when the queen is healthy.
Adding one or two extra supers usually solves the problem. Extra storage gives workers room to move stores away from the frame center and lets the queen regain normal laying coverage.
To test the queen’s true capacity, place a fresh frame of drawn comb into the central frames. If she fills that frame with eggs in a day or two, she is likely fertile and placing eggs at a normal rate.
- During strong flows, workers may prioritize honey storage and reduce available cells for laying.
- Insufficient super space can mimic laying problems; add shelves for honey storage when needed.
- Monitor frames and add drawn comb so the colony can expand without crowding the nest.
Nutritional Deficiencies and Pollen Availability
Bee bread is the colony’s protein bank, stored close to the nest for nurse access. This mix of pollen, nectar, and water fuels royal jelly production and feeds larvae.
Low pollen means fewer larvae supported. When stores run down, nurses cut feeding and the queen will reduce laying to match available protein.
Some flowering sources give plenty of nectar but little pollen. Eucalyptus is a common local example that created seasonal stress in several U.S. apiaries.

Monitoring pollen in frames is vital during inspections. If pollen cells near the central frames are thin, consider supplemental patties or relocating colonies to richer floral sites.
- Nutritional shortfalls can halt brood rearing and shrink colony numbers.
- Nurse bees need steady bee bread to sustain larvae and eggs through development.
- Provide diverse pollen sources or supplements during dearths to keep laying regular.
“A well-fed colony is better equipped to maintain steady brood and resist environmental stressors.”
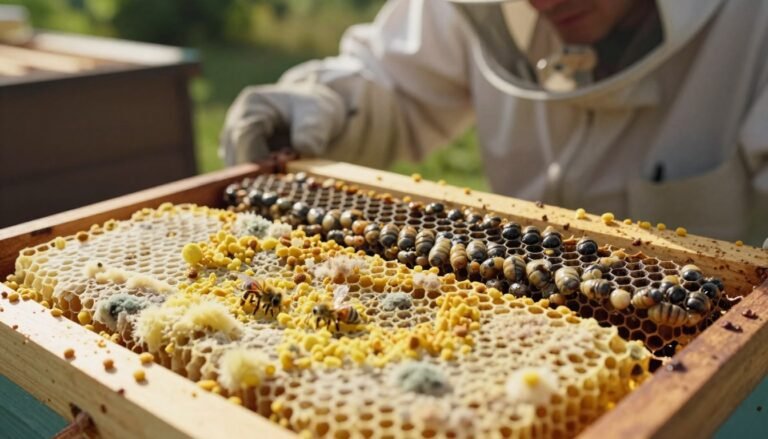
Evaluating Potential Disease Indicators
Routine checks of capped frames reveal many threats before entire colonies fail. Inspecting the nest regularly helps separate poor laying from pathogen issues.
Look for visual cues: sunken or greasy caps, chewed tops, or absent healthy pupae under caps signal concern. American Foulbrood (AFB) can produce a ropy residue when tested with a matchstick.

Use the matchstick test carefully. Gently probe a suspicious cell; ropiness means send samples to your state apiary inspector. Fast diagnosis prevents spread to nearby colonies.
Keep records. Note numbers of eggs and sealed cells over days. Tracking change helps decide if reduced laying or infection is the cause.
“Early detection and clean hives give bees the best chance of recovery.”
- Clean equipment, good nutrition, and routine inspections reduce disease risk.
- Consult local experts for confirmation and follow legal disposal or treatment rules for AFB.
| Sign | Healthy | Indicator | Recommended Action |
|---|---|---|---|
| Cap appearance | Smooth, slightly domed | Sunken, greasy, chewed | Isolate, sample, contact inspector |
| Pupal presence | Solid, light-colored pupae | Missing or dark, collapsed pupae | Check adjacent frames, monitor growth |
| Matchstick test | No ropy residue | Long, sticky rope on probe | Confirm with lab; follow AFB protocol |
| Spread | Localized to few cells | Multiple frames affected | Consider quarantine or destruction per regs |
For precise mapping of problem areas, see the heat mapping resource on heat mapping for brood pattern assessment. Timely action protects your hive and neighboring colonies.
When to Consider Requeening Your Colony
Deciding when to replace the laying female begins with clear, repeatable evidence of decline. If worker numbers fall and egg and larval counts stay low over multiple checks, the colony may need a new queen.
Buy or source the new queen before removing the old one. Many beekeepers wait until they hold a proven, mated new queen to avoid leaving the hive without leadership.
Merging with a stronger colony is common after a successful new-queen introduction. Some keep the old queen in a small nuc to see if she recovers before making a final decision.
Base requeening on whole-colony assessment: check stores, disease signs, worker behavior, and laying rhythm. If problems persist despite good forage and healthy workers, replacement often restores growth and honey production.
For help spotting failure early, review this guide to early signs of a failing laying.

| Trigger | Observation | Recommended Action |
|---|---|---|
| Consistent low egg counts | Few or no eggs across central frames | Hold new queen ready; consider requeening |
| Falling worker numbers | Smaller forager return, thin cluster | Assess disease; if clear, introduce new queen or merge |
| Persistent spotty pattern | No improvement over several checks | Requeen and monitor laying within 7–14 days |
Best Practices for Introducing a New Queen
Careful handling and timing make introductions more likely to succeed. Purchase only a mated female so laying begins promptly and the hive can restore its worker numbers.
Use a queen cage to let workers sample pheromones before release. A slow release reduces fighting and boosts acceptance.
After placing the caged female, wait several days before your first check. This pause minimizes disturbance and lets workers adapt.
For merging two groups, the newspaper method stages contact slowly and lowers risk when you need to unite colonies.

“A patient, staged introduction gives the colony time to accept new pheromones and restores steady laying more often than rushed swaps.”
- Handle the mated female gently and keep her warm in transit.
- Reduce inspections during the first week to avoid alarm among workers.
- Have a backup mated female or plan to merge if acceptance fails.
- Consider extra precautions for aggressive hives to protect the new laying female.
| Step | Why it helps | Timing |
|---|---|---|
| Buy mated female | Starts laying quickly | Before introduction |
| Use queen cage | Gradual pheromone exposure | 3–7 days |
| Wait to inspect | Reduces rejection | 4–7 days |
| Newspaper merge | Safe integration of workers | 24–48 hours between placements |
After initial acceptance, monitor eggs and cells over the next 7–14 days to confirm laying and an improving pattern. For detailed notes on spotting failing stock, consult this guide on failing queens and spotty patterns and tips for swarm preparation at swarm indicators.
Managing Queenless Nucs and Colony Mergers
Bringing two groups of bees together demands simple techniques that reduce fighting. If a queenless nuc needs strength, merge it quickly with a robust colony to protect the workers and nearby stores.
Newspaper method works well for larger merges. Place newspaper between boxes and cut a few slits. The paper delays contact and lets pheromones diffuse so bees accept each other slowly.
When combining only two frames, light smoking and gentle placement usually prevents conflict. Smoke calms returning foragers and masks alarm cues during the transfer.

Repurpose retired-queen juice mixed with lemongrass oil to bait swarms or discourage drifting. Monitor the merged hive closely for signs of rejection or uneven brood development.
“Watch egg and larval counts for 7–14 days to confirm acceptance and steady laying.”
- Merge queenless nucs promptly to maintain population and protect honey stores.
- Choose method by size: newspaper for large groups, smoke for two frames.
- Check workers and brood regularly and be ready to intervene if aggression or collapse appears.
Monitoring Progress After Management Changes
Timed assessments reveal whether interventions restored regular laying and growth. Wait at least 21 days after introducing a new queen before making final judgments. That interval lets new eggs become capped and older brood emerge so you can view a full cycle.
Compare frames from before and after the change. Note the number of capped cells, the spread of the brood pattern, and worker activity near the nursery frames. Keep notes on dates, frame IDs, and visible issues.

- Check counts of eggs, larvae, and sealed cells on day 0, day 10, and day 21.
- Track whether the pattern tightens and capped-cell numbers rise; this shows improved laying.
- If the pattern stays spotty, investigate nutrition, disease, or mating problems with the queen.
- Maintain steady inspections and records to guide future management decisions.
“Patience and regular records are the best tools for judging colony recovery.”
Good monitoring helps ensure the hive is healthy and ready for honey flows and seasonal work.
Lessons from Recent Scientific Research
Recent experiments show the social setting inside a hive can reshape laying outcomes within weeks.
Marla Spivak’s study in Insects tested moving queens between strong and weak colonies. Queens from poor colonies improved when placed into good colonies. Conversely, queens from good colonies showed small declines when moved into weaker groups.
This result emphasizes that the colony environment — worker care, nutrition, and nest conditions — has a measurable impact on the sealed pattern seen by inspectors. The authors conclude that brood pattern alone is an insufficient proxy for queen quality.

“Colony context must be considered before requeening decisions are made.”
Practical takeaways:
- Assess workers and stores before blaming the laying female.
- Try moving frames or improving forage to test if pattern improves.
- For genetic considerations, read about genetic diversity in queen breeding.
| Factor | Study result | Recommended action | Expected result |
|---|---|---|---|
| Colony environment | Strong effect on sealed cells | Improve nutrition and worker conditions | Better pattern in weeks |
| Queen origin | Performance shifts with new colony | Test by transferring frames | Clarifies queen vs. environment |
| Inspection metric | Brood pattern alone insufficient | Use multi-factor assessment | More accurate decisions |
Conclusion
A measured approach lets you separate temporary gaps from true reproductive failure. Start with repeated inspections, clear notes, and a short waiting period to see if the pattern tightens.
Assess both the queen and the colony environment—worker numbers, stores, and nearby forage matter. Check cells and central frames for steady egg progress before requeening.
Keep records of feeding, weather, and hive activity. For feeding tips and troubleshooting low intake, see this practical guide on why bees won’t take sugar syrup.
Regular checks and proper nutrition give the best chance for the brood pattern to recover. When unsure, consult local beekeepers and monitor the hive over time.
FAQ
What causes a patchy brood pattern shortly after introducing a new queen?
A newly introduced queen can produce a scattered egg pattern for several reasons: she may be still orienting after mating, laying intermittently while her sperm stores stabilize, or workers may be backfilling cells with nectar and honey. Varroa, disease, or poor nutrition can worsen the appearance, as can mismatched timing between spring nectar flows and colony population. Inspect frames for eggs, larvae, and stored food to separate laying issues from storage or disease problems.
How should an ideal brood pattern appear in a healthy colony?
An ideal pattern shows mostly continuous, solid areas of sealed brood centered on the brood nest, with open cells of eggs and young larvae around them. Workers form concentric rings of eggs, larvae, and pollen or honey stores. Consistent coverage across several adjacent frames suggests a productive queen and balanced colony conditions rather than scattered, isolated cells.
What is the "football" brood shape and what does it indicate?
The “football” shape is a compact oval of brood that typically indicates a strong, focused laying pattern. It often reflects a good queen and a well-positioned brood nest with available pollen and nectar nearby. Occasional breaks can be normal, but a solid oval across multiple frames suggests healthy reproduction.
What does the rainbow brood pattern mean for my hive?
A rainbow pattern shows brood arcs that curve across the frame, reflecting how the queen moved while laying. This pattern can be normal and often occurs when workers arrange pollen and honey stores around the brood nest. It does not automatically signal a problem unless gaps are large or persistent.
How can I tell if a patchy pattern is normal or a sign of queen failure?
Normal post-introduction variability often improves within 2–4 weeks as the queen settles and more brood cycles complete. Signs of queen failure include many empty cells where larvae should be, spotty capped brood with irregular cell cappings, presence of emergency queen cells, or consistent decrease in egg numbers over successive inspections. Monitor egg presence on multiple frames and timing across the brood cycle.
Could foundation type or cell preparation affect brood distribution?
Yes. Wired wax foundation, plastic foundation, or natural comb size can influence how workers build cells and how the queen lays. Older comb with uneven cell size or frames poorly prepared by workers can create irregular patterns. Ensure frames are appropriate for Apis mellifera standards and replace very old comb to support even laying.
Do worker bees change cells before the queen lays, affecting pattern?
Workers often modify cell walls, clean, and prepare cells for the queen and brood. They may also backfill cells with nectar or pollen when brood rearing slows. This worker activity can create apparent gaps; check for fresh eggs versus filled cells to distinguish worker-driven changes from queen laying problems.
How do I assess queen quality and fecundity quickly?
Look for steady daily egg laying across multiple frames, a consistent number of eggs relative to colony size, and a uniform brood distribution after two brood cycles. A young, well-mated queen usually lays uniformly. If egg numbers remain low, or you find many drone cells in the worker area, consider evaluating mating success or sperm depletion.
What environmental factors disrupt brood rearing and pattern?
Temperature swings, cold snaps, poor foraging conditions, and extreme heat can reduce brood production or lead workers to cluster in ways that leave gaps. Lack of pollen or nectar forces bees to backfill brood nest cells with stores. Local nectar flows, pesticide exposure, and limited storage space also change how much brood the colony sustains.
How does a strong nectar flow affect brood placement and apparent patchiness?
During heavy nectar flows, workers often store honey near the brood nest or fill empty cells, which can push brood into tighter areas or create temporary gaps. If storage space is limited, bees may backfill central brood cells, making the pattern look uneven until the flow subsides or you add supers.
Can pollen shortage lead to poor brood coverage?
Absolutely. Pollen supplies deliver proteins for larval development. When pollen is scarce, nurses reduce rearing, causing fewer eggs to be reared and resulting in scattered or reduced brood. Adding pollen patties or placing hives near better forage can restore brood coverage within weeks.
Which disease signs should I look for when brood is thin or spotty?
Look for sunken or perforated cappings, foul odors, discolored larvae, and patchy sealed brood that doesn’t follow the queen’s laying pattern. American foulbrood and European foulbrood create characteristic larval symptoms. Varroa infestations also correlate with poor brood viability; perform mite counts and disease tests as part of diagnosis.
When is it time to requeen a colony showing persistent patchy patterns?
Consider requeening if poor pattern persists after two brood cycles, you observe declining egg numbers, or lab/field checks reveal queen infertility, high drone laying, or chronic disease linked to queen performance. Also requeen if the colony produces multiple emergency queen cells repeatedly or shows aggressive behavior tied to genetic stock.
What are best practices when introducing a replacement queen to minimize early pattern problems?
Use a gradual introduction method, like a queen cage, and ensure adequate nurse bee population and food stores. Introduce during stable weather and supply pollen and sugar if forage is scarce. Avoid overcrowding frames of brood that limit queen movement. Monitor for acceptance and eggs within a week.
How do I manage queenless nucs and colony mergers to protect brood development?
When merging, use newspaper or other gradual methods to allow scent blending and reduce fighting. Ensure the stronger colony has a healthy queen or introduce one after merging. In queenless nucs, provide ample nurse bees, stores, and brood to support a new queen; otherwise brood rearing stalls and patterns fragment.
What should I monitor after making management changes to track brood recovery?
Inspect every 7–10 days to follow egg presence, larval health, and sealed brood progression. Track changes across several frames and record counts or photos to compare. Expect gradual improvement over 2–4 weeks; if no recovery occurs, reassess nutrition, disease status, or queen quality.
Are there recent research insights that inform diagnosing patchy brood?
Recent studies link sublethal pesticide exposure, varroa-associated viruses, and nutritional stress to reduced queen performance and poor brood patterns. Research also emphasizes colony-level measures—forage diversity, varroa control, and comb management—as more effective than focusing solely on queen traits.