Missing leadership in a hive demands quick, calm action from any serious beekeeper. A report from March 29 showed a hive with no visible queen, no eggs, and empty brood frames. That gap can signal a failed introduction weeks ago.
Start by scanning frames for eggs, larvae, and queen cell activity. Look at the top of frames for drones or signs of laying workers. Spotting a viable queen cell changes the plan; an abandoned cell means requeening may be required.
Professional beekeeping often calls for patience. Try a new queen cage or a sealed queen cell placed in the brood nest, then monitor worker behavior for several days. If calm care appears and eggs show up within a week, the colony likely accepted the new leader.
Key Takeaways
- Act fast when no eggs or brood appear in frames.
- Inspect for queen cell viability before requeening.
- Use a queen cage or sealed cell and place it near brood frames.
- Watch worker behavior and check for eggs over one week.
- One or two failed attempts are common; persistence helps rescue a colony.
- For cage options and methods, see recommended queen cages here: best queen cages for introduction.
Understanding Queen Loss
When a hive lacks a mated female, colony routines collapse and brood care falters. Early recognition helps you act within weeks and rescue larvae and workers before decline deepens.
Common causes include rejection during introduction, violence by workers, or undetected disease on a frame. Drones may linger, but they cannot replace a laying mother.
“The presence of attendants in a cage often increases acceptance time for an introduced queen.”
Post-inspection analysis of brood patterns reveals whether a colony abandoned brood or developed laying workers. Season and past records guide the next step.
| Sign | Likely cause | Immediate action | Timing |
|---|---|---|---|
| No eggs on multiple frames | Absent or killed queen | Inspect frames; check for larvae | Within 7–14 weeks |
| Multiple queen cells | Colony attempting own requeening | Assess cell viability | Days to a week |
| Many drones, aggressive workers | Queenless instability | Isolate problem area; consider requeening | Immediate |
- Check each frame carefully for a hidden laying female.
- Limit attendants inside a cage during introduction; they may delay acceptance.
- Keep concise records—thanks to past notes, season trends become clear.
Assessing the Current State of the Hive
A clear visual audit of each frame gives fast clues about colony stability.
Visual Inspection Techniques
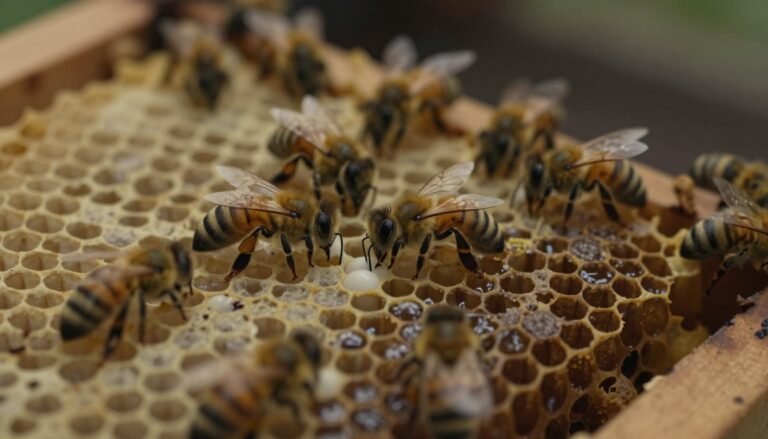
Open the hive calmly and scan frames in sequence. Note worker movement, drone presence, and any odd behavior on comb. On March 29, ianumeda found one of her hives without eggs or a healthy brood pattern. That kind of loss signals a need for quick, careful work.

Visual Inspection Techniques
Check every frame for eggs and larvae. Look for scattered or empty cells that show brood abandonment.
- Inspect the top and center of frames first.
- Note whether workers attend larvae or avoid areas.
- Document findings in a short post-inspection log.
Checking for Brood Patterns
Brood should be compact and regular. A consistent pattern points to a present laying female. Scattered cells or many drone brood may indicate laying workers have taken over.
If no eggs appear within two weeks, plan requeening or a guided reintroduction. For careful reintroduction methods, review a trusted guide on queen introduction.
What to Do If the Queen Disappears After Introduction
A sudden loss of a newly added leader calls for calm inspection and a clear plan.
First, pause and look for eggs. If you see eggs on several frames, the colony is likely queenright and you should not introduce new queen material.
If eggs are absent, allow at least 24 hours of queenless time before you introduce new queen stock. This increases acceptance chance.
If you cannot find the old queen, do not panic. Close the hive and try again when workers are calmer in a few days.
Use a queen cage such as a JzBz caged queen for safer release. Place it near brood and top frames. Monitor workers for one week and check for laying activity or new queen cells.
- Use a frame of eggs from a strong hive to test cell building.
- Watch for many drone cells—this may indicate laying workers and needs a different fix.
- If you’ve done all steps and loss persists, seek a local inspector or experienced beekeeper.
“Patience and careful follow-up often rescue a colony after a failed introduction.”
For more on assessing a queenless colony, see queenless or clueless.
Identifying Signs of Queenlessness
Noticing frantic bees on top frames or scattered brood often points toward absence of a laying female.
Missing fresh eggs across several central frames is the clearest sign. A dwindling amount of worker brood in the center shows loss began weeks ago.
Look for emergency cells tucked along frame edges. If workers built these, the colony tried to replace its mated female.

Drone cells where worker brood should be suggest long-term loss and possible laying workers. Agitation and bees running over top frames also points to instability.
- Use a frame-of-eggs test: if bees build new cells on that frame, queenlessness is confirmed.
- Check any cage found for a eaten candy plug; that shows workers accessed an introduced queen.
- Compare notes from weeks ago to confirm a decline in brood and colony strength.
“A consistent, compact brood pattern remains one of the most reliable checks for a healthy hive.”
The Role of Laying Workers
Extended queenlessness can trigger workers to lay unfertilized eggs. This change often appears weeks after loss and alters brood care quickly.
Behavioral clues include many eggs in single cells and drone brood in worker cells. Workers may ignore a new mated female and act hostile.
Behavioral Differences in Queenless Colonies
Dee, a practical beekeeping voice, warns that introducing a new leader rarely succeeds when laying workers are active. A tested frame of eggs left in the hive will not prompt queen cells if workers control laying.
- Multiple eggs per cell signal laying workers.
- New queens often face rejection and attack.
- Shaking bees into another strong hive can help small apiaries.
| Sign | Likely state | Recommended action |
|---|---|---|
| Many eggs in one cell | Laying workers present | Merge or replace brood nest quickly |
| Drone brood in worker cells | Long-term loss | Use shake-out or combine with strong hive |
| No queen cells on test frame | Workers dominant | Avoid introducing new leader; consider requeening via merge |
“Laying workers are a nightmare to manage and often require drastic measures.”
Check frames first and act fast. For a related field case, see missing monarch case.
Evaluating Potential Disease Risks
A quick disease screen must come before any requeening effort in a suspect hive.
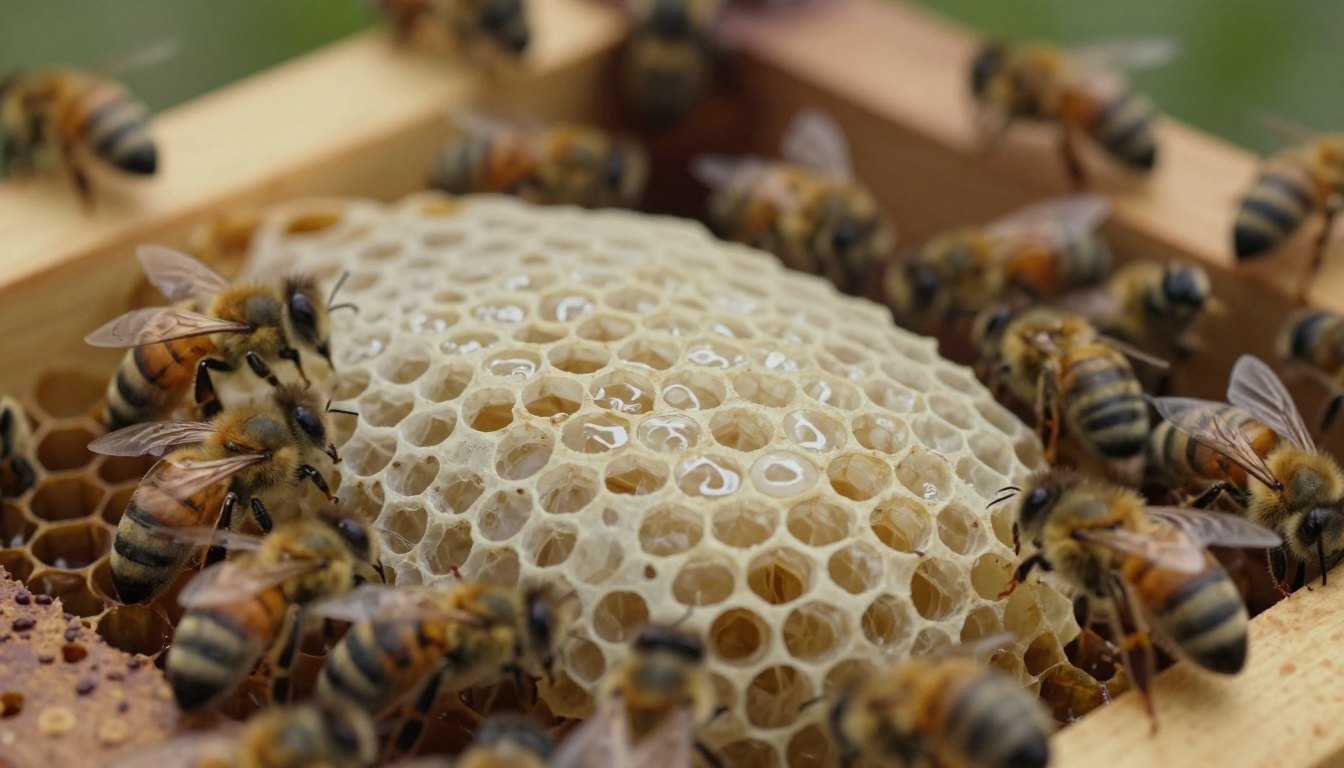
Inspect brood and frames for dead bees, perforated cappings, or gooey larvae. Clean, white larvae mean good health. Dark, sticky remains or a foul odor are red flags.

Dee suggests a simple matchstick check for American Foulbrood (AFB): dip a stick into a suspect cell and pull out slowly. If the contents string out like caramel, contact an inspector at once.
A colony with clear signs of disease will not accept a new queen. Introducing queens or moving frames spreads infection fast. Keep tools sanitized and avoid swapping frames among hives.
- Do not move suspect frames between colonies.
- Call a local bee inspector when you see gooey larvae or foul odors.
- Regular seasonal inspections catch problems before they devastate a lot of stock.
“Dip a matchstick into gooey cells; a long, sticky string suggests AFB.”
For related hive readiness checks, see this swarm warning guide.
Methods for Introducing a New Queen
Successful requeening rests on timing, placement, and a gentle release method. Use a candy-plugged cage so pheromones reach workers slowly over hours and days.
Place the caged new leader in the center of the broodnest, between active frames where brood and larvae receive attention. Remove attendant bees from the shipping cage to lower viral risk before placement.
Hang a JzBz-style cage between frames for easy monitoring. If workers show aggression, leave the candy plug intact for another 24 hours and recheck later.
| Method | Best use | Timing |
|---|---|---|
| Candy-plugged cage | Most gentle; gradual acceptance | Days |
| Immediate release | Strong, calm hives only | Hours |
| Frame-of-brood aid | Small apiaries; helps settle a new leader | Week |
Always check the hive one week after placement for eggs and steady laying. For a detailed guide on methods, see methods of introducing a queen bee.
“A slow, steady introduction is the best way to ensure long-term colony health.”
Using Sealed Queen Cells for Requeening
A sealed cell offers a near-natural route for restoring a laying female in a hive. Choose a cell about 24–48 hours from emergence; those are sturdy and handle transfer best.

Carefully cut the cell with surrounding comb to protect the pupa. Keep the piece generous so workers can tend larvae and maintain warmth.
Place the comb piece vertically in the center of the broodnest, next to capped and emerging brood. That position raises acceptance and mimics swarming behavior.
Check in 48 hours to ensure the virgin has emerged. After mating flights, monitor the colony for eggs and steady brood for several weeks.
- Source a cell from a strong, healthy colony when possible.
- This method often yields high success because workers rear the new laying female internally.
- Use a frame from a donor hive only if disease risk is low.
“A sealed cell requeening mirrors nature and eases acceptance by workers.”
Managing Queen Cages and Attendants
A well-managed cage and careful removal of attendants cut viral risk and reduce hostility. Place the cage securely between two frames in the center of the brood nest for best coverage. Hang reusable JzBz-style cages so the new queen has a sheltered zone while workers adjust to her scent.

Removing Attendant Bees
Remove attendants from a shipping cage before placement. That step lowers chances of spreading viruses such as Deformed Wing Virus between colonies.
If attendants are present, gently brush them off into a safe spot away from the target colony. Use minimal handling when you hold a caged queen; avoid fingers on her body.
Reducing Aggression
Watch worker behavior closely after insertion. If bees bite or jab at the cage, leave it in place for another 24 hours and check again.
- Keep the candy plug fresh so release happens slowly.
- Use a secure hang point so the cage does not shift frames.
- Inspect for calm worker attendance before opening a cap.
Note: careful cage care increases acceptance odds and protects brood. For deeper guidance on assessing queenless hives, see queenlessness in your hive.
“Slow release and careful handling are the best defenses against rejection.”
Utilizing Nicot Cages for Difficult Introductions
When other release methods fail, place a Nicot cage over emerging brood for steady acceptance.
A Nicot cage sits on plastic legs over a patch of emerging brood. Young workers climb up and feed the new laying female while she remains protected. This steady contact helps the rest of the colony accept her scent and presence.
Set the cage on a level frame so it rests flush against comb. Secure it with elastic bands if needed. The legs keep the cage stable and prevent workers from reaching in and harming the new laying female.

- Safe start: Protected laying and gradual exposure promote laying eggs within days.
- Firm fit: Plastic legs hold the cage in place on the frame.
- Good for difficult hives: Emerging workers accept a new leader more readily than older bees.
For guidance on causes of rejection and tactics when acceptance stalls, read this short guide on why bees reject a queen.
“A Nicot cage often converts a hostile hive into one that embraces a new laying female in a few days.”
Deciding Between Merging or Requeening
Consider disease risk, stores, and workforce size before choosing a path. A weak hive with few workers often struggles to raise brood or defend a new laying female.
Merging suits small, queenless colonies when a strong neighbor exists. Use the newspaper method to unite hives safely. That approach gives bees time to adjust and cuts fighting risk.
Requeening fits when a colony is healthy, free of disease, and has enough bees to tend brood. A reliable source for a new queen is essential. Use a candy-plugged cage or a nucleus build-up if you need more time.

Practical note: never merge suspect frames with healthy stock. Merging can spread pathogens; requeening can fail when laying workers dominate.
| Option | Best when | Key step |
|---|---|---|
| Merge | Weak hive, low brood | Newspaper method |
| Requeen | Healthy colony, enough workers | Cage release or nucleus |
“Careful assessment of strength and disease risk guides the right call.”
Seeking Professional Inspection
Calling a local inspector often clears mystery around a struggling hive fast. Dawn_SD recommends contacting a bee inspector; many will inspect at no cost and offer clear advice.

A trained inspector can spot disease signs, confirm whether eggs or brood are present, and test for AFB. They also identify laying workers, broken brood patterns, or hidden cells that an amateur might miss.
If you cannot find your laying female or a colony shows decline, an objective assessment helps decide between requeening, merging, or humane removal. Inspectors bring tools and lab contacts for fast diagnosis.
“A pro inspection can be the difference between saving bees and losing a hive.”
- Ask about tests for disease and guidance on handling suspect frames.
- Get an honest read on whether a cage, sealed cell, or merge offers best odds.
- Learn practical steps you can repeat next season.
For more reading on rescue steps and field tests, see a short guide on losing your hive’s queen and tips for identifying chilled brood.
Monitoring Hive Recovery Progress
After a new queen arrives, set a simple schedule for checks so you can confirm recovery without overhandling bees. Start with a brief visit one week after placement and look for calm workers, fresh eggs, and young larvae on central frames.

A clear brood pattern and steady egg laying indicate the colony is stabilizing. If eggs appear and brood looks compact, continue light checks at weekly intervals for a few weeks.
Give the new queen time to spread pheromones. Avoid heavy disturbance during this period. Use a cage only when needed and remove it per your introduction plan.
- Check frames after one week for eggs and larvae.
- Note worker behavior: calm attendance suggests acceptance.
- Record findings each visit so trends become clear over time.
If no eggs show after two weeks, investigate further. A lost or rejected queen needs a different path, so act quickly but calmly. Regular, gentle monitoring helps protect brood and lets your colony recover.
“Patient observation often saves a struggling hive more than repeated interventions.”
Conclusion
Finish strong by focusing on steady observation, gentle intervention, and clear records.
Successfully managing a queenless hive requires patience and careful work. Inspect frames for eggs and larvae, note brood pattern, then act based on what you find. Keep checks regular and brief so bees stay calm.
Decide between introducing a new queen, merging hives, or using a cage release based on colony strength and disease risk. Seek local help when unsure.
Track visits, label problem cells, and use tools like heat-mapping for brood to read patterns well — see a practical guide on heat-mapping for brood. With steady care, your hive and bees can recover and rebuild steady brood and healthy frames.
FAQ
What signs show a colony lost its queen soon after an introduction?
Look for no fresh eggs, scattered brood, and increased queen cells. Workers may act frantic, and drone production can rise. Inspect frames for capped worker brood and spotty brood patterns within a week.
How can I inspect a hive without stressing bees during a suspected queen loss?
Open the hive on calm, warm days and lift one frame at a time. Use a soft smoker and gentle movements. Check brood frames first for eggs or larvae, then scan for queen cells along frame bottoms and edges.
How quickly should I expect to find eggs if a laying queen is present?
A laying queen should leave fresh, tiny eggs in cells within 48–72 hours of a visit. If no eggs appear after three full inspections on separate days, assume no active laying queen is present.
When is it appropriate to introduce a new mated queen after losing the original?
Introduce a mated queen within a few days once you confirm queenlessness. Use a cage or Nicot for gradual release. If brood remains and workers are calm, proceed; if laying workers exist, address them first.
What steps for using a sealed queen cell for requeening are best?
Move the sealed cell into the center of a strong brood frame, secure it upright, then return the frame to the hive. Monitor daily; let the new queen emerge and mate. Avoid immediately removing rival cells.
How do I tell laying worker activity apart from normal worker behavior?
Laying workers leave many eggs per cell, often multiple tiny eggs tilted to cell sides. Drone brood appears in worker cells. Laying workers increase over weeks and make requeening difficult without breaking the colony into nucleus hives.
What disease risks should I consider when requeening or merging colonies?
Watch for foul brood, chalkbrood, and Nosema. Inspect brood cappings and larvae condition. Avoid moving queens or frames between infected and healthy hives. Consult state extension or an experienced inspector if disease signs appear.
How should I manage a caged queen and her attendants during introduction?
Keep attendants inside the cage until release; that provides pheromone continuity. Remove extra attending workers only if they become aggressive when placing the cage. Feed candy plugs for timed release and check the cage in 5–7 days.
When are Nicot cages preferable for introductions?
Use Nicot cages when you need controlled, slow release and want to protect a queen from immediate rejection. They work well in strong, defensive colonies or during cooler weather when gradual acceptance helps survival.
What methods reduce aggression when installing a new queen?
Introduce the queen during low-foraging hours, use a queen cage or Nicot, and add frames of familiar brood and honey to mask new scents. Spray light sugar syrup on the frames and avoid crushing bees during placement.
How long should I wait before removing the queen cage after introducing a new queen?
Leave the cage for 3–7 days. Check after a week: if attendants remain and workers are calm, release or carefully open the cage. If aggression persists, extend the period and reassess brood and worker behavior.
What options exist when multiple queen cells appear after introduction?
Allow cells to develop if you prefer a natural requeening, or select one healthy sealed cell and remove the rest to prevent supercedure fights. Evaluate cell placement and timing; emerging virgin queens may fight if introduced simultaneously.
When should I choose merging two colonies versus requeening one?
Merge when one colony is weak and lacks brood or stores, or when disease is absent and genetic diversity helps. Requeen when you want a specific genetics line, control temperament, or when workers show laying behavior that needs a mated queen.
How can I confirm a successfully mated, laying queen after introduction?
Within 7–14 days you should see a steady brood pattern with eggs and young larvae. After three weeks expect worker brood capped normally. Persistent spotty brood or absence of eggs indicates issues with mating, survival, or laying workers.
What should I do if I suspect a queen was lost weeks ago and workers are producing drones?
Inspect for multiple eggs per cell and drone brood in worker cells. If laying workers exist, consider shaking the bees into a nuc with a new mated queen or replacing frames of drone brood and introducing a nucleus containing a mated queen.
When is it wise to seek a professional inspection from an experienced beekeeper or inspector?
Call a pro if disease signs appear, if repeated requeening fails, or when large numbers of colonies show brood problems. Professional inspectors can diagnose foul brood, advise on legal steps, and help with safe requeening or merges.
How often should I monitor a hive recovering from queen loss?
Inspect every 4–7 days for the first three weeks after introducing a queen or cell. Check for eggs, new larvae, and decreased queen cell construction. Keep small, focused visits to limit stress and maintain stable colony progress.