Ancient writers warned beekeepers about pests that attack comb and stored honey. Aristotle and Virgil noted the bee enemy centuries ago, and modern keepers still face similar threats in their hives.
Distinguishing signs matter. Silk-lined tunnels, webbing, and granular frass point toward a moth infestation, while mummified brood often signals fungal or bacterial issues. Learn what each sign looks like so you can act quickly.
Wax moth larvae prefer dark, neglected combs and stored frames. They tunnel through comb and leave cocoons in crevices. Strong colonies resist these pests by cleaning and removing debris.
Regular inspections, prompt frame rotation, and proper storage reduce the chance of serious loss. For detailed control steps and storage advice, see preventing infestations in stored comb.
Key Takeaways
- Silk webbing and frass usually indicate a moth problem, not brood illness.
- Weak colonies and dark combs invite larval tunneling and comb loss.
- Keep equipment dry, ventilated, and rotate frames often.
- Inspect brood and pollen combs first for early signs.
- Strong bee colonies are the best defense against infestation.
Understanding the Threat of Wax Moths
Historic accounts from Langstroth and Huber show this pest has troubled hives for centuries. That history matters because the risk remains today for commercial and hobby operations across the United States.
The cost is real. Commercial beekeeping loses millions annually when larvae ruin stored frames and drawn combs. Bees produce about eight pounds of honey for one pound of beeswax, so protecting comb is an economic priority.
Adult moths inside a hive often signal a weak colony or another underlying issue. A strong honey bee colony usually fends off invaders, but stressed colonies invite infestation.
“Stored supers kept in warm, dark, poorly ventilated areas become prime targets.”
- Protect drawn combs with good ventilation and regular rotation.
- Inspect stored supers often and remove debris promptly.
- Act early: presence of moths is rarely the initial cause, but a symptom.
For guidance on managing stored frames and preventing losses, see this resource for beekeepers.
How to Recognize Wax Moth Damage vs Disease
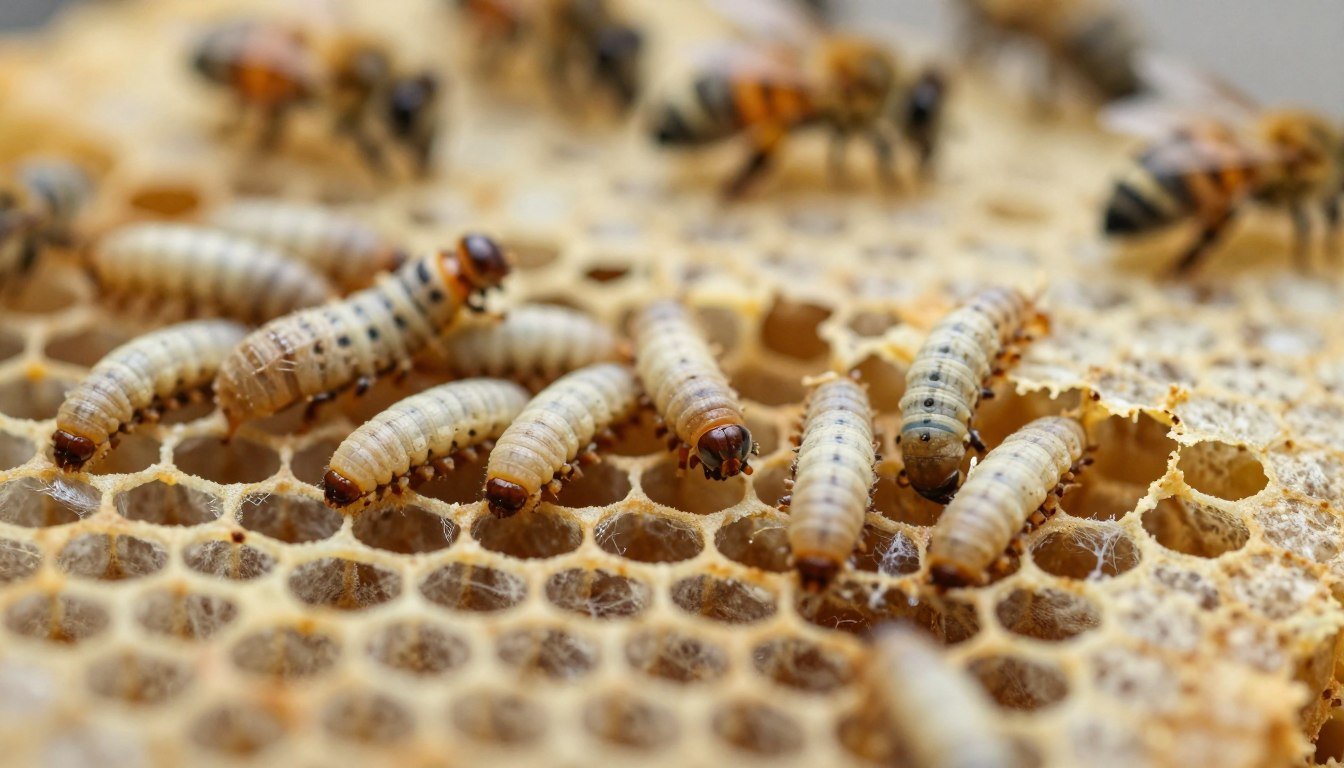
Visual clues matter. Look for layers of silky webbing and scattered frass first; these are clear signs of larval feeding in comb and stored frames.
Signs of Webbing
Silk-lined tunnels running across comb, balls of webbing in crevices, and trapped pupae are classic indications of an insect infestation.
Check bottom boards and frame edges for loose web and dark granular droppings. The larvae also consume pollen and wax, leaving a mess that bees cannot tidy.

Recognizing Brood Issues
By contrast, brood problems like chalkbrood produce hard, mummified larvae that stay stuck in cells. Nurse bees often struggle to remove these bodies.
If more than 10% of a frame shows chalkbrood, cut that area out and support colony hygiene. That step helps recovery and limits spread.
- Webbing and frass = likely insect activity.
- Hard, chalky mummies = brood illness, not webbing.
- Inspect bottom boards early; moth larvae often appear there first.
For further regional guidance on managing this specific threat, review this control and ID resource.
Identifying the Greater and Lesser Wax Moth
Two species share the name but differ in size, appetite, and threat level to stored comb.
Galleria mellonella (greater) and Achroia grisella (lesser) are the primary culprits. Adult moths are nocturnal and slip into cracks to lay eggs. A single female can deposit up to 600 tiny eggs, each about 0.5mm across.
At warm temperatures—about 84.2°F–95°F—eggs hatch in roughly 3–5 days. The life cycle then runs eggs → larva → pupa → adult. Development speed varies with heat and available comb or debris.
- Greater larvae grow as large as 1 inch and chew through frames and beeswax.
- Lesser larvae top out near 1/2 inch and prefer leftover debris and old comb.
Larvae burrow immediately when eggs hatch, often ruining drawn comb and stored supers in a short time. Adult stages do not feed; their role is mating and laying eggs.
Common Bee Diseases Often Mistaken for Pests
White, chalky larvae in cells often point at a fungal problem rather than an insect attack. Novice keepers can confuse these mummies with comb feeding or webbing.
Chalkbrood arises when chilled brood fails to develop. Cold clusters or poor ventilation let the fungus take hold. Infected larvae harden and look like chalk inside cells.

Chalkbrood and chilled brood
Chilled brood happens when a colony cannot hold steady temperature. That stress invites fungal growth and produces the chalky remains.
- Chalkbrood creates mummified brood that nurses may struggle to remove.
- While wax moth larvae consume comb and pollen, chalkbrood affects developing brood directly.
- A disease outbreak can attract a second wave of pests, including wax moths, drawn by remains.
- Strong colonies that keep brood warm are the best prevention.
“Identify the root cause rather than treating surface signs.”
The Role of Hive Strength in Pest Defense
Strong colonies seal cracks and patrol entrances, making it hard for intruders to settle in drawn comb. A high bee-to-comb ratio means every frame sees regular activity. That keeps larvae and debris from accumulating.
When numbers fall after swarming or illness, the hive loses that guard. Weak colonies cannot cover all combs, and moths or other pests find quiet corners. Over-handling by the beekeeper also raises stress and lowers defense.
Practical steps raise resilience. Screen crown board holes as Gerald Nickel recommends. Store supers on strong colonies for cleanup when possible. A healthy colony clears waste and removes invaders without chemicals.
| Action | Benefit | Notes |
|---|---|---|
| Maintain high bee-to-comb ratio | Continuous patrol of comb | Rotate frames and avoid excess drawn comb |
| Screen crown board holes | Blocks entry from above | Simple, low-cost upgrade |
| Use strong colonies for supers | Natural cleanup of residues | Reduces need for chemical control |
For early field signs and inspection tips, consult this early signs guide.
Visual Indicators of Larval Infestation
Look closely at comb texture: silk tunnels and chewed cells leave an unmistakable trail. These signs are among the clearest indicators of a silk-feeding pest in your hive.

Watch for bald brood. Worker bees often uncap cells and remove pupae when tunnels cross brood areas. That uncapping can appear as scattered empty cells across a frame.
- Silk-lined tunnels running between combs show active larval feeding.
- Dark, cylindrical frass on the bottom board points at larvae presence.
- Cocoons attached to wooden frames indicate the pupal stage and an advancing infestation.
- Adult insects hiding under the inner cover or in frame corners often mean eggs were laid in quiet spots.
- Larvae can trap developing bees in cells with silken threads, preventing emergence.
Temperature matters: reproduction peaks around 82°F–86°F, making warm months higher risk. Regular inspections of frames and the bottom board catch early signs and protect stored combs.
“Early detection keeps losses small; find webbing or cocoons and act fast.”
Distinguishing Between Wax Moth Larvae and Hive Beetles
A clear ID matters when pests share the same hive space. A short, calm inspection can reveal which critter is present and guide the right response.
Physical Differences
Look at legs and body texture. Both beetle grubs and caterpillar-like larvae have three pairs of thoracic legs. Only the caterpillar-style pest shows uniform prolegs along much of its body.
The caterpillar body is soft and fleshy and may reach about 28mm. A smaller species often tops out near 13mm. Beetle grubs feel firmer and more rigid when handled gently.
Behavioral Traits
Silk creation is a major clue. Larvae that burrow through comb often leave webbing and a messy mix of pollen and wax crumbs. Beetles do not spin silk.
- Find webbing and you likely have caterpillar-style larvae.
- Loose debris and tunneling across frames point at feeding by such larvae.
- Beetles and caterpillars can coexist; check the bottom board for both types.
“Proper identification is the first step in choosing the right treatment.”
Environmental Factors Influencing Hive Health
Microclimates within honey boxes shape pest risk and colony resilience.
Temperature is critical. The greater wax moth can produce metabolic heat that raises local temperature by up to 25°C. That extra warmth speeds development of moth larvae and shortens life cycles in warm pockets.
Poor ventilation and trapped heat make the hive a prime site for moths and for stored comb to break down.
Humidity and light also matter. High moisture favors rapid egg hatch and fungal growth. Dark, warm corners—especially between the inner cover and the top bars—are most attractive.

- Ventilate colonies and stored supers to lower internal heat.
- Inspect more often during hot months; moths are less active in winter.
- Manage comb placement so dark voids are minimized.
“Understanding seasonal temperature shifts helps plan inspections and reduce losses.”
Practical tip: make small airflow changes and schedule maintenance in warm periods. That discourages egg laying and keeps brood and honey safer from pests.
Physical and Biological Control Methods
Cold and heat treatments are proven steps that can neutralize pests without harming beeswax when applied correctly. These methods fit into integrated pest plans and work well for stored comb and frames.
Freezing Techniques
Freezing at 19.4°F (-7°C) for 4.5 hours will kill eggs, larvae, pupae, and adults hidden in comb. Wrap frames if needed and monitor temperature for the full period.
Heat Treatment
Heat at 120°F (49°C) for 40 minutes also eliminates all life stages. Take care: excessive time or higher temperatures can soften beeswax and warp wooden frames.
Biological Controls
B401 (Bacillus Thuringiensis Subspecies Aizawai) is a targeted biological option that is safe for bees and humans when used correctly.
In some southern operations, beekeepers use red imported fire ants (Solenopsis invicta) as a natural predator around stored equipment, but this requires caution and local permitting.
- Maximize light and ventilation in storage to deter infestations of comb and supers.
- Always fully extract honey before applying biological agents; ants and other predators may eat residues and harm frames.
- Both greater wax moth and lesser wax moth respond to these integrated methods without resorting to harsh chemicals.
| Method | Effectiveness | Notes |
|---|---|---|
| Freezing (-7°C, 4.5 hrs) | High | Simple, safe for comb if timed correctly |
| Heat (49°C, 40 min) | High | Watch beeswax melting point and frame integrity |
| B401 or natural predators | Moderate | Use with extracted comb and follow label or local rules |

“Proper application of physical and biological methods keeps equipment clean and saves drawn comb through the off-season.”
For step-by-step storage tips and practical control notes, see this guide.
Best Practices for Stored Comb Protection
Store drawn frames where light reaches them and air moves freely to limit pest activity.
Seal and freeze before storage. Place fully extracted combs in tightly sealed plastic bags and freeze frames for the recommended period to kill any eggs and larvae.
Avoid dark, warm, poorly ventilated spaces for stacked supers. Those microclimates encourage egg laying and fast larval growth.
Keep suspect comb separate. If you find webbing, larvae, or moth eggs, do not mix that comb with clean equipment.
- Prioritize pollen-rich brood frames for early treatment; they attract more pests than honey-filled combs.
- Seal external cracks on stacks with tape to block entry and reduce the chance of eggs in crevices.
- Inspect stored combs at frequent intervals during warm months and again before the new season.
“Protect storage first; small steps now prevent large losses later.”
| Action | Why it works | Notes |
|---|---|---|
| Freeze sealed frames | Kills eggs, larvae, pupae | Follow time/temperature guidelines for safety |
| Use sealed plastic bags | Prevents re-infestation during storage | Remove excess air; label contents and dates |
| Store in cool, ventilated place | Discourages egg laying and rapid development | Avoid attic-like warm dark areas |

For detailed storage steps and extra tips, see this storage guide and practical notes on preventing infestations in stored equipment.
When to Use Chemical Interventions
Reserve chemical control as a last resort. Exhaust physical, biological, and storage options first. Use treatments only when repeated inspections show active infestation that other steps cannot stop.
Paradichlorobenzene (PDB) forms a vapor above 70°F (21°C) and will protect stored comb and supers when used correctly. Stack frames vertically and seal cracks with tape so vapors concentrate where needed.
Never apply PDB in active colonies or on comb honey. Chemical residues can render honey and comb unfit for sale or consumption.

“Equipment treated with chemicals must be aired out for several days before returning to colonies.”
- Aluminum phosphide is effective but highly toxic; handle with extreme caution and follow local rules.
- Vapors kill adults and larvae, but eggs often survive; repeated treatment cycles may be required.
- Read product labels carefully; naphthalene-based mothballs are not approved or safe for this use.
| Chemical | Use | Key precautions |
|---|---|---|
| Paradichlorobenzene (PDB) | Protect stored comb and supers | Do not use on live colonies or comb honey; seal stacks; ventilate before reuse |
| Aluminum phosphide | Strong fumigant for severe infestations | Licensed applicator recommended; toxic to humans and bees |
| Naphthalene products | Not recommended | Not approved; risk of contamination |
For additional practical guidance on safe storage and chemical options, see practical PDB guidance.
Monitoring and Maintenance Schedules
A simple calendar and a set checklist make monitoring colonies efficient and reliable. Keep a seasonal plan that highlights frequent checks during warm months when larvae and adult activity peak.
Join local networks like the Four Corners Bee Association for alerts on regional wax moth activity and shared field notes. Local groups help you spot trends faster than solitary work.
Inspect hives weekly in spring and every 1–2 weeks in summer. Clean bottom boards and scrape old boxes with a hive tool to remove overwintering cocoons. Check frames for signs of webbing, trapped brood, or loose debris.

- Monitor Varroa detector boards — moth eggs or larvae sometimes hide there.
- Separate and destroy heavily infested combs; burning stops spread in small operations.
- Keep records of inspections, treatments, and frame rotations for each apiary.
“A steady maintenance rhythm keeps losses small and lets colonies recover faster.”
| Frequency | Task | Reason |
|---|---|---|
| Weekly (spring) | Quick hive walkthrough, bottom board clean | Catch early signs of larvae, eggs, or other pests |
| Every 1–2 weeks (summer) | Full frame check, record condition | Prevent comb loss and limit infestation spread |
| Annual (storage prep) | Freeze or seal extracted frames, scrape empty boxes | Kill any remaining stages and protect beeswax |
For life-cycle details and warning signs, review the wax moth lifecycle and dangers guide as part of regular training for new beekeepers.
Conclusion
Good colony care and swift action limit threats before they spread. Keep a steady inspection rhythm, support the queen and worker population, and rotate frames so weak spots do not invite an infestation.
Distinguish signs early and respond with targeted steps: physical controls like freezing or heat for stored comb, cleaned equipment, and prompt removal of infected frames. Healthy bees clear many problems themselves.
For practical field guidance and regional notes on hive pests, consult this hive pests resource. With regular checks and good storage, beekeepers protect honey, brood, and long-term colony value.