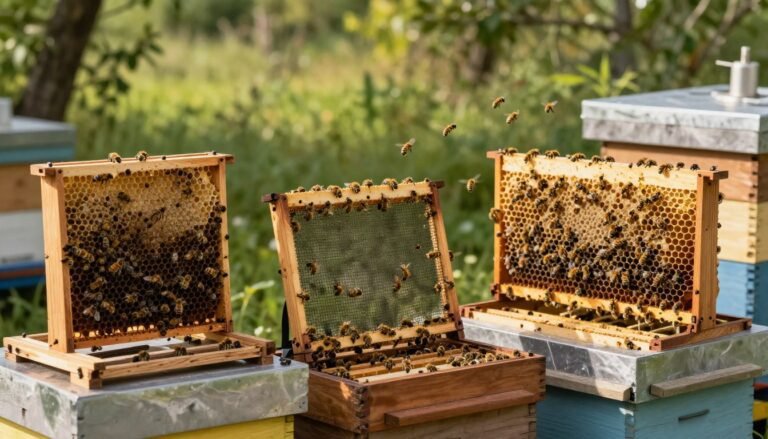
Choosing the proper top for your Langstroth hive sets the tone for healthy colonies and seasonal resilience. Beekeepers face a clear trade-off between protection and portability.
Telescoping covers offer heavy-duty protection against wind and winter dampness. They overhang hive sides and often include metal reinforcement for long-term weather resistance.
By contrast, a migratory style keeps a flush profile so hives stack tightly for transport. That makes it a favorite for commercial operations and pollination work. For hobbyists and stationary apiaries, the extra weather defense is often worth the bulk.
Many beekeepers add an inner cover to stop bees from sealing the outer top with propolis and to manage ventilation. A simple DIY option exists too: you can cut a 3/4″ plywood sheet into eight pieces for a temporary, low-cost top.
Key Takeaways
- Protection vs. portability: Heavy outer tops shield hives in winter; flush tops aid transport.
- Inner covers help prevent propolis sealing and help vent the colony.
- A DIY sheet of 3/4″ plywood can serve as a short-term top for new hives.
- Stationary hobbyists often prefer overhanging tops; commercial beekeepers favor flush designs.
- Learn design differences and real-world uses at this guide.
- For winter wraps and insulation tactics, see practical options at hive wrap recommendations.
Understanding the Role of Hive Covers
What sits atop a hive does more than close it — it sets the microclimate and access routine for bees and keepers alike.
Protection first: The top acts as the main barrier between the hive and harsh weather. It keeps rain, snow, and wind from reaching the frames. A sturdy top reduces moisture and helps the colony survive cold snaps.
Professionals stress durability. A reliable top must stand up to seasonal temperatures and pests. Many beekeepers add an inner cover below the main top to create a dead-air space. That space helps regulate temperature and limits drafts.
The design also affects inspections. Some tops make frame access quick and clean. Others add bulk but boost insulation. Choosing high-quality components improves longevity and keeps bees healthy.
- Durable tops protect brood and stores year-round.
- Inner covers create dead-air insulation and better ventilation control.
- Top design influences handling and inspection speed.
| Feature | Benefit | Beekeeper Tip |
|---|---|---|
| Durability | Resists weather and pests | Use metal-reinforced edges or treated wood |
| Inner cover | Creates dead-air space for temp control | Install under main top for winter and summer management |
| Access design | Faster inspections, less disturbance | Choose a style that matches your apiary routine |
For a practical comparison of primary top styles, see this overview of lid styles. If you are new to beekeeping, a beginner’s guide on selecting a hive can help you match tops to your needs: how to choose a beehive for.
Analyzing the Migratory Lid vs Telescoping Cover Debate
When choosing a top for your hive, think about weather exposure, transport needs and long-term durability.
Design Differences
Telescoping designs add an overhang that shields sides and helps keep rain away from frames. They sit heavier on the hive and often use metal edges for extra life.
Migratory tops are flat and light. That simplicity makes stacking and transport faster for commercial operations. Simpler tops reduce bulk but offer less lateral protection in storms.

Durability and Weather Protection
On Oct. 30 a poll of 20 beekeepers found 10 favored the telescoping option for rain and winter resilience, while 7 chose the flatter style for ease of use.
Roy Fuentes notes the trade-off plainly: extra durability often means heavier equipment and higher cost. Many compare top choice along with bottom boards to keep the entire system ventilated and secure.
- Practical tip: Add an inner cover when you need a dead-air layer and better winter control.
- Consider: If you move hives often, a lighter top can speed setup and transport.
| Feature | Telescoping | Flat top |
|---|---|---|
| Weather protection | High — overhang reduces rain entry | Moderate — less side shielding |
| Weight and cost | Higher — metal edges common | Lower — simple wood construction |
| Transport efficiency | Lower — bulky | Higher — stacks tightly |
| Recommended add-on | Inner cover for extra insulation | Inner cover for ventilation control |
For paint and wrap strategies that improve winter performance, see these hive insulation tips.
Benefits of the Telescoping Outer Cover
An overhanging top gives a hive dependable protection against harsh weather. This design sheds rain and snow away from the frame edges, which helps keep combs dry and brood safe through the cold months.
The extra overlap creates a tight seal and useful dead-air space. That space improves insulation and lets beekeepers add wraps or insulation without compressing the colony.
Why Inner Covers Are Recommended
An inner cover works with the outer top to prevent propolis from locking the top in place. It also makes lid removal cleaner during inspections and reduces disturbance to bees.
- Moisture control: The combined set-up blocks water entry and helps keep the hive dry in winter.
- Temperature stability: The protective seal maintains internal heat and reduces stress on the colony.
- Long-term value: Investing in quality equipment preserves hive health and lowers repair costs.
For a detailed explanation of inner and outer functions, see the functions of inner and outer covers in a.
Advantages of the Migratory Lid for Apiary Management
Flat, stackable tops let commercial operations load more hives per trailer while cutting handling time.
Space Efficiency for Transport
Flat tops maximize space. Because they lack an overhang, teams can stack four hives per pallet. This simple change boosts how many colonies fit on a truck.
This efficiency cuts trips and labor for beekeepers who move boxes across farms and fields.

Cost and Ease of Construction
These tops are cheaper to build. A basic sheet of wood and routine supplies are often enough to make a reliable unit.
Lower material and labor costs mean commercial outfits can replace or add equipment across years without large upfront spend.
Managing Hive Congestion
The shallow interior space gives bees a quiet place to cluster during transit. That can reduce crowding at the entrance and ease stress on the colony.
With correct placement of an inner cover and ventilation holes, a well-managed hive keeps airflow and hygiene intact while on the move.
| Advantage | Benefit | Practical Tip |
|---|---|---|
| Stacking density | 4 hives per pallet | Secure boxes with straps and corner supports |
| Build cost | Lower materials and labor | Use a standard sheet and treated wood for durability |
| Transit comfort | Extra internal space for bees | Add a ventilated inner cover and monitor entrances |
For a deeper look at the benefits and design details, see benefits of the migratory design.
Practical Considerations for Hive Ventilation and Insulation
Simple changes to ventilation and roof insulation can cut condensation and colony stress.
Good airflow keeps a hive dry in winter and reduces mold. Beekeepers debate vents in migratory lids because placement affects performance and seal-up risk.
Russell Goodman and Peter Kaczynski, with 51 years of experience, noted that bees may propolize internal mesh vents if they interfere with normal movement. That can block airflow when you least expect it.
John Tadman recommends adding insulation to the roof to prevent condensation. Use the dead space above frames to place light insulation that won’t compress the cluster during heavy rain or cold snaps.
Screened bottom boards help vent the bottom, but many keepers still find bees will seal any holes in the lid area. Watch entrances and top vents; managing that airflow requires careful, repeated observation.
- Monitor vents for propolizing and adjust placement.
- Add modest roof insulation to reduce condensation.
- Use screened bottom boards and check entrances regularly.
| Focus | Action | Result |
|---|---|---|
| Top vents and meshes | Place away from flight paths; inspect monthly | Reduced propolizing and steady airflow |
| Roof insulation | Use thin material in space above frames | Less condensation and warmer internal temps |
| Bottom boards | Install screened type and monitor debris | Improved ventilation and pest control |
For more details on outer top options and their benefits, see telescoping outer cover advantages.
Conclusion
Your choice should match how you manage colonies and your local climate. Pick the option that fits your routine, whether you move boxes often or face long, cold winters.
For beekeepers in harsh regions, a heavier outer option gives better protection and helps maintain stable temps for bees. Good insulation and ventilation are critical to keep a hive dry and healthy.
Conversely, migratory lids suit teams that transport hives frequently; they save space and speed handling during pollination or seasonal moves.
Both styles have value. Try each as your operation grows, and focus on consistent management, proper ventilation, and routine checks to keep colonies strong and productive.
FAQ
Which top option offers better protection from rain and wind?
Both common designs shield the hive, but one with an overhanging metal edge and a tight fit typically sheds rain and resists wind better. Adding an inner wooden insert and a durable metal or painted plywood outer surface improves weather resistance regardless of the style chosen.
Can I use the same top for winter insulation and summer ventilation?
Yes. Use an inner wooden insert with ventilation holes or a screened bottom board in summer, and add foam or a small entrance reducer for winter insulation. Adapting the top with insulating material or a snug seal helps retain heat when needed.
Which design works best for frequent hive moves and transport?
A compact, low-profile top that nests securely into the upper box helps keep boxes together during transport. Tops with a lip that fits over the uppermost box prevent shifting. Strapping hives adds security for long journeys.
Do I need an inner cover with either top type?
An inner cover is recommended. It creates a ventilation barrier, reduces drafts, and provides a place to feed or place moisture-absorbing material. It also protects bees from direct contact with the outer shell and helps regulate interior airflow.
How do materials affect longevity and maintenance?
Metal-faced tops with sealed edges and painted plywood hold up well to weather. Untreated wood will need yearly inspection and recoating. Choose galvanized or painted surfaces to reduce rot and rust, and replace seals as they wear.
Which option saves the most space when stacking extra boxes during transport?
Designs that sit flush with the top box and avoid external overhangs allow closer stacking and save space on trailers and in storage. A removable inner board that nests inside can also reduce bulk between stacked boxes.
Are there cost differences for beekeepers building their own versus buying factory-made tops?
Homemade options using standard lumber and sheet metal are often cheaper and customizable. Commercial models from brands like Mann Lake or Dadant cost more but come finished and may include features like pre-painted metal and fitted seals.
Will one style lead to more hive congestion or swarming pressure?
Hive congestion relates more to box count, queen strength, and colony size than to the type of top. However, proper ventilation and space management—adding supers or rearranging frames—reduce congestion risks regardless of top design.
How should I handle ventilation to prevent moisture buildup in winter?
Provide a small top vent or use breathable insulation like quilt boxes or moisture-absorbing pads just under the outer shell. Maintain a reduced entrance to limit cold drafts while allowing excess moisture to escape.
Can I retrofit an existing top with additional weatherproofing features?
Yes. Add metal flashing, a drip edge, or sealant to joints. Fit a removable inner panel or pack insulating material between the inner and outer layers to boost winter performance without changing the basic top.