Last Updated September 15, 2026
Getting a new colony off to a strong start matters for every beekeeper. This guide explains timing, handling, and simple checks you can use when the forecast is marginal, so you can protect the queen and maintain cluster health instead of guessing.
The University of Minnesota Bee Lab recommends moving the colony out of the box when temperatures are above 45℉ (7℃). If the forecast shows warmer days ahead, wait a day and keep the cluster in a cool, dark spot at about 70℉ (21℃).
Watch the cluster for clues: a tight, motionless mass means they are too cold. Lots of rapid movement means they are too warm. If you must delay, spray lightly with 1:1 sugar syrup to keep the cluster fed.
Reject any box with a large hole or an inactive queen. Careful timing and a few changes from the standard routine can protect your investment and help the colony thrive.
Key Takeaways
- Aim to move bees into the hive once temperatures exceed 45°F (7°C) — the threshold used by the University of Minnesota Bee Lab’s cold-weather installation guidance.
- If you must wait, hold the package at about 70°F (21°C) indoors and spray lightly with 1:1 sugar syrup twice a day.
- Warm the hive box and frames for 2–4 hours before installing so the colony isn’t shocked by cold wood.
- Use the direct queen-release method and keep the queen cage warm against your body until she’s placed on a center frame — a caged queen can’t reach the cluster for warmth.
- Check the colony the next day to confirm the cluster has settled under the feeder; a cold package can’t travel far for food.
Table of Contents
- Assessing Hive Readiness and Timing
- Warming Your Equipment and Bees
- Modifying Your Installation Technique
- Managing the Queen and Cluster
- Post-Installation Care and Feeding
- Final Thoughts on Cold Weather Beekeeping
- Frequently Asked Questions
Assessing Hive Readiness and Timing
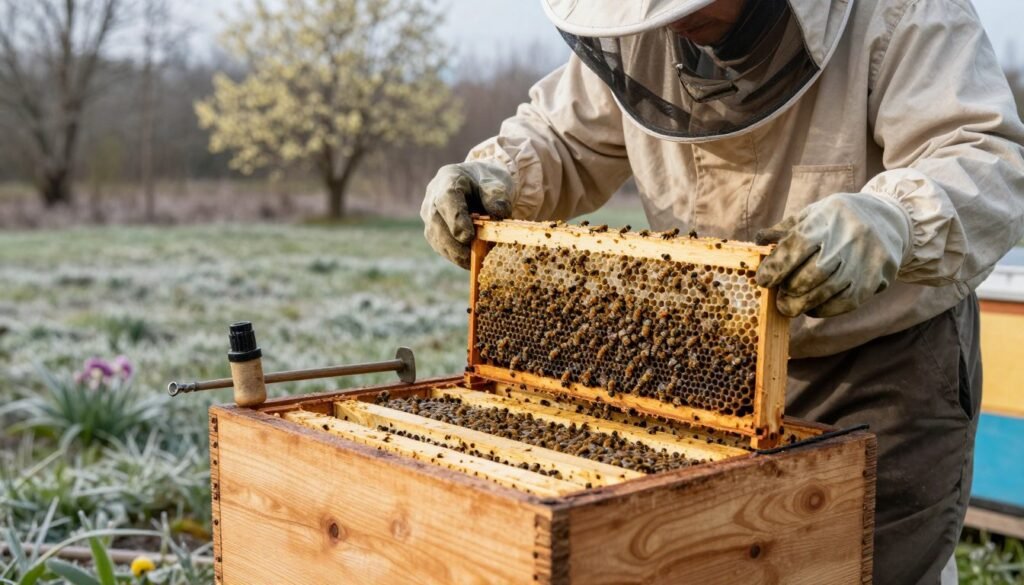
Start by confirming the box and frames are warm and ready to host the colony, and don’t rush the calendar. The University of Minnesota Bee Lab puts the real dividing line at 45℉ (7℃): above that, install using the normal procedure even if the night will turn colder; below it — down to a hard floor of 32℉ (0℃) — switch to the cold-weather modifications below. Remove two frames from each side of the box and spread the remaining frames from the center to create room for the package to sit while it warms.
Determining Optimal Timing
Check the queen’s movement before you accept the box — a lively queen is a good sign of colony health. If you must hold the shipment rather than install right away, keep the package at about 70℉ (21℃) in a dark, sheltered spot and spray it lightly with 1:1 sugar syrup twice a day so the cluster doesn’t run out of food while confined.
Once you’re ready to install, place the package inside the hive box for two to four hours before release, or bring the equipment into a warm building briefly if the box feels frozen. Either approach lets the wood and frames reach a gentler temperature before the bees have to cluster on them.
Creating a Controlled Environment
Use drawn comb from another hive where you can — it gives the new colony a familiar, already-warm surface to cluster on instead of bare foundation. Add a screen over the entrance for ventilation while keeping the group contained, and always confirm the outer cover is seated tightly so the colony isn’t losing heat it can’t spare.
- Warm the box before transfer to avoid shocking the colony.
- Spread frames from the center to create space for the package, then move them back once the bees are dumped in.
- Use drawn comb and a screened entrance for cluster support and ventilation.
- Keep packages in a cool, dark garage or shed if a multi-day delay is unavoidable.
For more detailed staging tips, see this site’s guide to hive preparation, seasonal advice on spring hive readiness, or this site’s seasonal beekeeping tasks guide.
Warming Your Equipment and Bees
Start by warming frames and the hive box several hours before transfer to avoid shocking the colony. Move wood and frames into a garage or shed and let them sit for 2–4 hours so surfaces reach a milder temperature.
This video from Prairie Wind Bee Supply walks through a real cold-weather package installation start to finish — warming the equipment, dumping the cluster, and placing the queen cage without prolonged cold exposure, the same sequence covered in the steps below.
Tuck your sugar syrup sprayer inside a jacket or place it in a bucket of warm water to keep syrup near 80℉ (27℃). Cold syrup can cling to the bee and freeze them when sprayed.
Never leave a sprayer in the snow. Doing so risks spraying near-freezing syrup and chilling the cluster inside the box. Keep handling quick and steady.
Placing the package inside the warmed hive box for a few hours lets the group acclimate. Add frames of drawn comb to give the colony a familiar, warm place to settle for the night.
| Task | Target | Why it matters | Practical tip |
|---|---|---|---|
| Warm hive box | 2–4 hours | Prevents thermal shock to the colony | Use a garage or sheltered shed |
| Keep syrup warm | ~80℉ (27℃) | Easy flow and reduces chilling risk | Tuck sprayer in jacket or warm water |
| Provide drawn comb | 1–2 frames | Supports clustering and warmth | Place near center of frames |
For more on handling shipments during marginal days, read a practical guide to transfers and staging at marginal-condition transfers. If you are timing your first move, see regional advice at best time to start beekeeping.
Modifying Your Installation Technique
Small changes in handling reduce stress during transfer and help the queen stay centered with her workers.
Handling the package screen requires a steady hand. Use a thin screwdriver to pry up the wooden frame holding the screen if you choose to remove it. Removing the screen lets you shake the group into the hive without forcing bees through a small hole.
Avoiding Sugar Syrup Overuse
Avoid spraying sugar syrup when temperatures are low. The liquid can chill the cluster and add stress. Save syrup for warm days or use top feeders when the colony can move freely.
Direct Queen Release
Direct queen release is safer for marginal days. Walk the queen into the entrance or place her cage on a center frame so she remains with the cluster.
- Keep the queen cage in an inside shirt pocket until release to maintain warmth.
- Make sure queen and workers stay together for at least three days before full release.
- Walking the queen into the entrance reduces cross-comb problems compared to candy plugs.
| Step | Action | Why it helps |
|---|---|---|
| Screen removal | Use thin screwdriver to lift frame | Faster transfer; less stress through a small hole |
| Syrup use | Limit sprays on cool days | Prevents chilling and wasted food |
| Queen placement | Place cage on a center frame or walk to entrance | Keeps queen with cluster; lowers comb disruption |
For step-by-step guidance on installing a new package or seasonal checks and how to winterize beehives, see those resources for more detail.
Managing the Queen and Cluster
Ensure the queen is placed on a center frame so the colony can surround her quickly. Dump the group close to that frame and keep them together so they form a warm cluster without wandering across the hive.
“A caged queen can’t move to where the bees are clustered.”
— University of Minnesota Bee Lab, Hiving a Package in the Cold
In marginal weather, a caged queen left away from the cluster risks getting chilled and isolated. Release her directly onto the frame rather than leaving her confined at the edge of the box.
Keep the dumped group tight. Bees scattered far from the main cluster may fail to join and can perish. If the queen flies away, there is very little chance she will return.
- Place the queen on a middle frame so the colony surrounds her quickly.
- Dump the workers as a single group near the queen to speed clustering.
- Check the hive the next day to confirm the cluster sits under the feeder and the queen is central.
Proper queen and cluster management during the first days gives your colony the best chance to establish. For related staging tips, see managing hives in wet climates.
Post-Installation Care and Feeding
On day one post-transfer, your priority is to verify that the cluster sits directly beneath the feeder. This ensures workers and the queen can reach food without long trips that drain energy.

Utilizing Specialized Feeding Systems
Use a Burns Bees Feeding System or a similar top feeder. It keeps sugar water and protein available at the top of the cluster so the colony can feed regardless of low movement.
Check the hive the morning after to confirm the group found the feeder. If they have not, reposition the feeder directly above the cluster and wait another day.
- Keep sugar water and protein accessible; new colonies have limited reserves.
- If nightly lows stay above freezing, move the hive outdoors to its permanent place.
- Secure all parts with a tie-down strap before relocating the hive.
- After a couple days with stable temperatures, you may remove the entrance screen.
Consistent food and quick checks are the best post-installation measures. Proper feeding helps the colony recover from transport and establish steady growth toward honey production.
Final Thoughts on Cold Weather Beekeeping
Short, consistent actions on day one and the days after give your new colony its best chance.
Successful beekeeping during cooler spells needs patience and careful planning. Prioritize the queen; her condition drives colony recovery and growth.
Your bees are most vulnerable the first few days. Keep the queen near the cluster and leave her cage nearby until workers have settled. Provide steady food — use syrup sparingly and position feeders so the hive can reach them without excess movement.
For shelter tips and a practical garage method, see the garage install method. Plan by season with this seasonal beekeeping calendar to align actions with local conditions.
Your steady care now will reward you when the weather warms and the hive begins to thrive. Thank you for committing to responsible beekeeping.
Frequently Asked Questions
What is the best time to introduce a bee package to a hive during a cool spring morning?
Aim for the warmest part of the day when temperatures reach at least the mid-50s°F and rising. Move bees during calm weather and place the box in sun if possible to help the cluster warm up. Avoid night or early-morning transfers when chill stress is highest.
Do I need to warm the bees before removing the queen cage or opening the box?
Yes. Let the package sit in the sun or a warm protected area for 30–60 minutes so bees become more active. This reduces cluster chill and lowers the risk of loss during transfer. Gentle warmth helps them move onto frames more readily.
Should I release the queen immediately or use a cage for delayed release?
Use a queen cage for controlled acceptance unless you are confident the colony is calm and well-fed. In cool conditions, delayed release of 24–72 hours lets workers adjust and reduces drifting. If temperature is close to freezing, consider direct release only if you can promptly inspect and ensure the queen’s safety.
Can I feed sugar syrup right away, and what concentration is best?
Provide a 1:1 sugar-to-water syrup for spring strength. Avoid overusing syrup that can flood frames or chill bees. Use an internal feeder or top feeder with limited access to prevent cold exposure and condensation. Monitor consumption and adjust as the colony warms.
How long should I wait before inspecting frames after placing the bees?
Avoid full inspections for at least 7–10 days to reduce stress and heat loss. Perform a quick external check after 24–48 hours to confirm the queen is alive and bees are clustered on frames. Postpone detailed inspections until local daytime temps stay consistently warm.
What signs indicate the colony is adapting well after transfer?
Look for steady activity at the entrance, bees clustered on frames during checks, and consumption of provided food. Within a week or two, you should observe pollen being stored and, later, capped brood if the queen has started laying. Reduced defensive behavior and even cluster movement are good signs.
Can I keep packages in a garage overnight if the temperature drops?
Yes, short-term shelter in a cool, ventilated garage can prevent lethal chill. Keep the box slightly open for ventilation and provide a shallow water source nearby. Return the bees outdoors at the warmest part of the day for installation.
This connects closely with what we cover in our guide on new package dilemma: starter strips vs full foundation.