This method ranks among the most reliable ways to place a new queen into a colony. Professional beekeepers often prefer the push-in system because it protects the female and lets workers interact through the mesh. The device keeps her safe while pheromones spread and workers calm down.
Careful timing and frame choice matter. Place the unit in the brood area near emerging bees and nurse workers. Monitor behavior for several days and avoid frequent inspections to reduce stress.
Follow proven guidance to reduce rejection risk and help the hive return to full production of brood and honey. For placement tips and technical details, see this installation guide and a roundup of trusted devices.
Learn more: installation guide and best cages review.
Key Takeaways
- Push-in devices act as a protective barrier while workers accept the new female.
- Pick a brood frame near nurse bees to improve acceptance over days.
- Avoid frequent inspections; calm behavior predicts success.
- Use sturdy cages that allow feeding and contact through mesh.
- If problems arise, wait 24–48 hours, re-evaluate queenlessness, then retry.
Understanding the Principles of Queen Introduction
The success of placing a new queen hinges on chemistry as much as technique. Queen Mandibular Pheromone (QMP) is the main chemical signal the colony uses to recognize its mother. Workers read that scent and decide whether to accept the newcomer.
A properly designed queen cage manages that social process. The device forces controlled contact so pheromone transfer is gradual. Surrounding workers can feed and groom the queen, which helps her signature spread through the brood area.
Newly emerged workers have no loyalty to a previous female. That biological fact makes engineering acceptance easier. Choosing sturdy cages and placing them near nurse workers raises the odds of smooth integration.
- Pheromone transfer: gradual scent spread reduces aggression.
- Social contact: feeding and grooming help workers accept the new queen bee.
- Timing: place the unit near brood and nurse bees for best results.
| Principle | Why it Matters | Practical Tip |
|---|---|---|
| QMP signaling | Drives recognition and acceptance | Keep the cage in the brood area |
| Worker grooming | Permits feeding and scent exchange | Use mesh that allows contact |
| Young workers | Have no prior queen loyalty | Introduce during periods of emerging brood |
For reasons bees may reject a new female, review common causes and remedies in this resource: why bees reject a queen.
Preparing Your Colony for a New Queen
Start by confirming the hive is truly without brood-producing stock before any placement. Inspect frames for eggs and freshly laid brood. Remove any visible queen cells so workers won’t raise a rival.
If you can’t find the resident female, add a frame of eggs for 24 hours. If workers build queen cells from that frame, the colony is queenless. If laying workers are present, they will not rear normal queen cells and the situation becomes more complex.
Keep the unit used to hold the new queen in a dark, draft-free location between 65° and 80° F. Do not store cages in rooms treated with pesticides or near NO PEST STRIPS. The candy end must remain clear so bees can eat through and time the release.
Provide food in the shipping box or candy plug to sustain the queen and attendants during transit and early placement. When placing the device between frames, ensure the candy end faces outward and is not blocked by comb or propolis.
For detailed placement techniques and hive setup, consult this installation guide and a practical hive setup resource.

Selecting the Ideal Comb for Queen Introduction
An ideal comb section shows young brood, open cells ready for laying, and nearby food stores. Look for emerging brood because those young workers have no allegiance and will accept the newcomer more readily.
Choose a frame that mixes capped brood and empty cells so the new female can begin laying immediately. Place the push-in cage over an area of empty cells to permit egg deposition once she is released.
Ensure some honey or nectar is accessible near the placement. Food within the comb keeps attendants and the queen well-fed while pheromones spread.
Press the unit firmly into comb so there are no gaps. A tight seal prevents escapes and limits worker confusion. The mesh lets worker bees interact, feed, and groom through the barrier.
- Check for eggs and emerging brood to raise acceptance odds.
- Confirm open cells and small nectar reserves on the chosen frame.
- Consider queen cell development timing before you place the device.
When ready, follow the detailed push-in cage procedure for correct placement and to protect the new queen bee and her attendants.
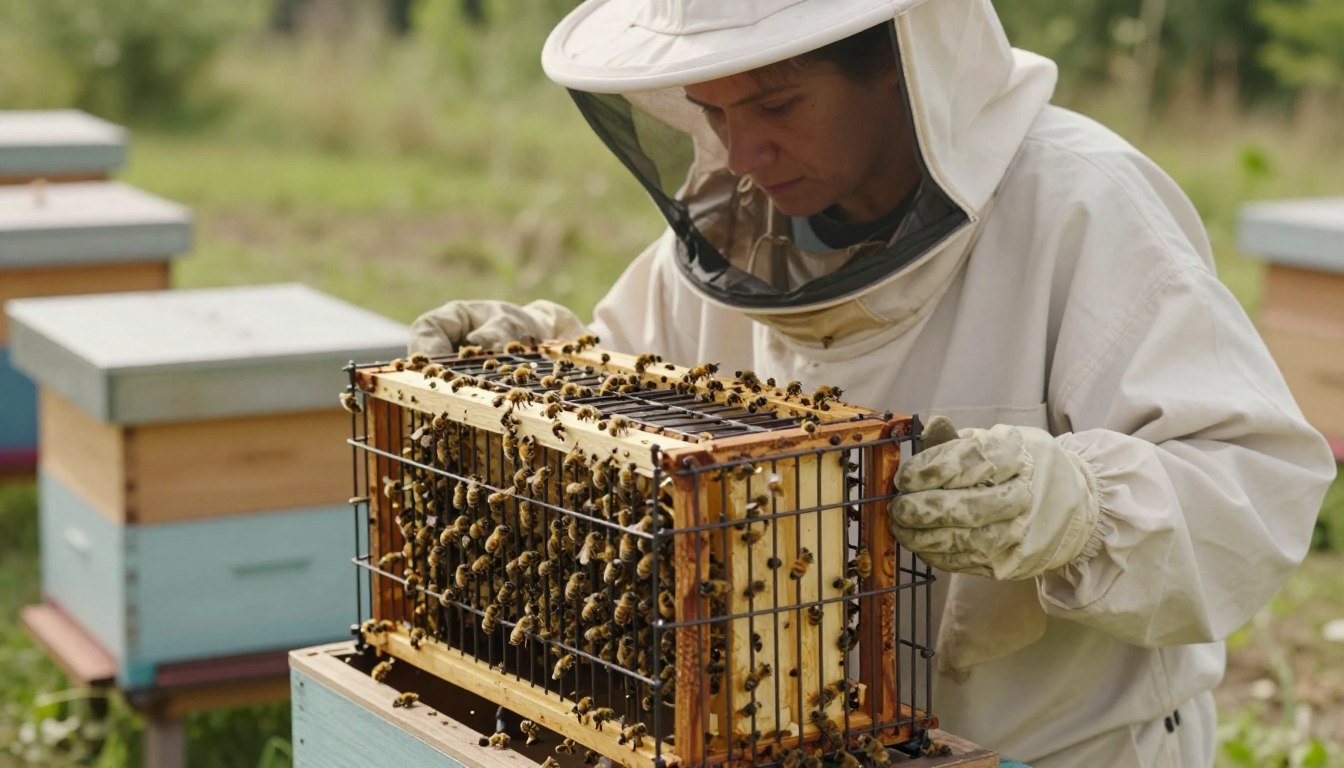
Executing the Queen Introduction with a Push-in Cage Step by Step
Begin the transfer by steadying your hands and confirming the chosen comb holds emerging brood and nearby food. Move calmly to limit hive disturbance. Use gloves if needed, but avoid rough handling.
Handling the New Female Safely
Grip the bee gently by the thorax or legs; never touch the abdomen. Include a few original attendants inside the unit to soothe her. A secured attendant group increases acceptance odds.
Positioning the Device
Place the new female directly on the selected comb and lower the unit immediately. Press it into the comb about 1/4–1/2 inch so escape is impossible.

Securing the Perimeter
Check all sides for gaps. The mesh must allow contact but prevent exits. Set the unit in the core of the brood nest to keep proper temperature for laying eggs.
“A calm, tight fit and minimal checks over the next few days improves acceptance and success.”
- Allow workers to feed and groom through the mesh.
- Monitor the colony for several days for aggression or neglect.
- If laying eggs begins inside the unit, treat that as a positive sign.
For related colony care, see this guide to boost colony population naturally.
| Action | Reason | Target |
|---|---|---|
| Handle gently | Prevent injury | Thorax/legs only |
| Press unit into comb | Prevent escape | 1/4–1/2 inch |
| Place in brood center | Maintain warmth | Mid-nest |
Monitoring for Acceptance and Colony Health
Begin gentle checks after 24–72 hours. Open the hive quietly and scan the selected frame for tiny white eggs at the bottom of cells. This is the first sign the new female has begun laying.
If eggs appear inside the push-in cage, treat that as the clearest signal of acceptance. Bees clinging tightly to the unit usually mean they need more time. Wait rather than force an early release.
Identifying Signs of Success
- Fresh eggs and young larvae on nearby brood confirm productivity.
- Calm workers and no biting or balling after release indicate likely success.
- If laying workers exist, acceptance may fail; confirm true queenlessness before you place a new female.
After confirming laying, gently remove the device and watch for one minute. If no aggression appears, avoid inspections for two weeks while the brood nest stabilizes and pheromone spreads through the colony. For detailed guidelines on acceptance signs, review this acceptance signs guide and the queen rearing basics.
Managing Potential Challenges and Risks
Not every placement succeeds; plan for resistance and document each attempt. Keep clear notes on date, frames used, and behavior for future comparison.
If the colony shows aggression such as biting or stinging the unit, leave the new female caged for another 24 hours. Continued hostility after several days often means the hive is not actually queenless. In that case, stop and reassess.

- Use a candy-plug cage for low-labor introductions when time is limited.
- Consider JzBz cages as a reliable alternative to the push-in method.
- Removing original attendants can reduce virus risk when placing a new queen.
“Always be prepared for failure; even experienced beekeepers keep records and backups.”
| Issue | Action | Why |
|---|---|---|
| Aggression | Delay release 24–48 hours | Gives pheromone balance time |
| Laying workers | Confirm queenlessness before retry | Acceptance is unlikely otherwise |
| Mite-susceptible stock | Choose resistant lines (VSH, Russian, Carniolan) | Reduces long-term colony loss |
Keep options ready: a queen cell can replace a mated female if you have a trusted source. Track outcomes so your methods improve over time. For basic care and background on beekeeping, see this beekeeping basics.
Conclusion
A careful process and patient checks usually yield a healthy, laying female in the nest. Follow correct placement on the chosen frame and watch the brood area for fresh eggs over the next few days. Patience improves acceptance and lowers risk.
Keep records of timing, comb choice, and worker behavior. If you need more technique detail, consult this detailed guide for practical alternatives and timing notes.
There is always some risk, but using proven tools and calm handling raises success rates. For related hive cues and swarming indicators, review the swarm signs resource. Good preparation keeps bees productive all season.
FAQ
How do I prepare a colony before placing a new queen in a push-in cage?
Remove the old queen and wait until most workers show no fresh royal jelly or queen cells. Check frames for eggs and young brood to confirm recent queenless status. Reduce disturbance, move frames so the brood cluster surrounds the chosen comb, and provide sugar syrup for food. This reduces stress and improves acceptance.
What comb is best when using a push-in cage?
Choose a frame with emerging brood, open cells, and stored honey or nectar nearby. Avoid frames with large, sealed queen cells or exclusively old drawn comb. A frame that smells like the colony and contains brood pheromones helps workers accept the newcomer.
How should I handle the bee in the cage to avoid injury?
Keep handling calm and brief. Hold the cage gently by its edge, avoid shaking, and keep it shaded and cool during transfer. If the bee is active, wait for her to calm or use gentle tapping. Always use protective gear to avoid crushing worker bees around the cage.
Where is the best place to push the cage into the comb?
Insert the cage into the comb near the center of the brood area where worker activity is highest. Push it firmly into a frame cell so the mesh sits flush. Position the head end toward open cells so workers can access food and the bee can release pheromones through the cage.
How long should the cage remain in the hive before release?
Leave the cage in place for three to five days in most cases. That gives workers time to accept the new bee by becoming accustomed to her scent. If the colony shows aggression or if feeding stalls, check sooner and act based on worker behavior.
What signs show the colony has accepted the new bee?
Acceptance signs include calm workers clustered around the cage, feeding through the mesh, and minimal biting or tearing. After release, look for the bee moving freely, resumed brood care, and regular egg laying within a week or two.
What if workers attack or chew at the cage persistently?
Persistent aggression indicates rejection. Remove the cage late in the day and either reattempt with a different frame or try a different introduction method. Ensure the hive is truly queenless and free of queen cells that could cause confusion.
Can I introduce a newly mated bee or must she be mature?
Use a healthy, mated bee when possible. Newly emerged or unmated individuals may not lay or produce the pheromones needed for acceptance. A proven breeder or nuc supplied by reputable sources such as Mann Lake, Dadant, or better local suppliers improves success rates.
Should I feed the colony during introduction?
Yes. Provide light sugar syrup or fondant if nectar is scarce. Feeding maintains worker strength and reduces robbing or stress that could lead to rejection. Place food away from the insertion frame so workers tend brood and the caged bee.
How do I reduce the risk of laying workers when planning an introduction?
Remove the old queen promptly, wait until laying workers subside, and combine with a frame of open brood if available. Laying workers often appear in long-queenless colonies; bringing in young brood re-establishes worker brood care and pheromone balance.
Can I reuse a push-in cage for multiple introductions?
Yes, but sanitize between uses. Scrub off wax and propolis, rinse, and dry the cage. Reusing clean equipment prevents disease spread and retains proper airflow for the caged bee.
What timeframe should I expect before seeing new eggs after a successful release?
If the introduced bee is mated and accepted, you may see eggs within a few days. Consistent laying usually appears within one to two weeks. Track brood pattern and egg presence on follow-up inspections.
How do environmental factors like temperature and nectar flow affect acceptance?
Warm weather and strong nectar flow improve acceptance by keeping workers busy and well-fed. Cold, rainy periods or dearths increase stress and reduce success. Plan introductions during mild conditions and active forage periods.
What should I do if the colony raises emergency queen cells after introduction?
Inspect carefully without exposing the hive too long. Emergency cells mean workers still seek a different source. You can remove extra cells and leave the cage, or re-evaluate queen status. If multiple deaths or rejections occur, consider combining the colony with a stronger hive.
How can pheromone and masking techniques improve success?
Using queen pheromone strips or placing a small piece of brood comb near the cage can mask foreign scent and promote acceptance. Apply techniques sparingly and follow manufacturer guidance for synthetic pheromones to avoid confusing workers.
Is it better to introduce into a nuc or full colony?
Nucs offer controlled conditions and usually accept new bees more readily due to limited size and focused brood. Full colonies can succeed but require careful preparation. Choose the environment that best matches your experience and the bee’s condition.