Deciding between a quilt box and a moisture control board is a key step for any beekeeper preparing for colder months. As of September 3, 2025, MayBee Hives reminds beekeepers that managing the hive environment directly affects colony survival. This introduction outlines simple choices to protect your bees today.
Insulation and moisture control work together to keep a hive healthy. A quilt box provides a soft insulating layer, while a candy board gives food and helps reduce damp air. The candy board recipe often uses four pounds of sugar and one cup of water.
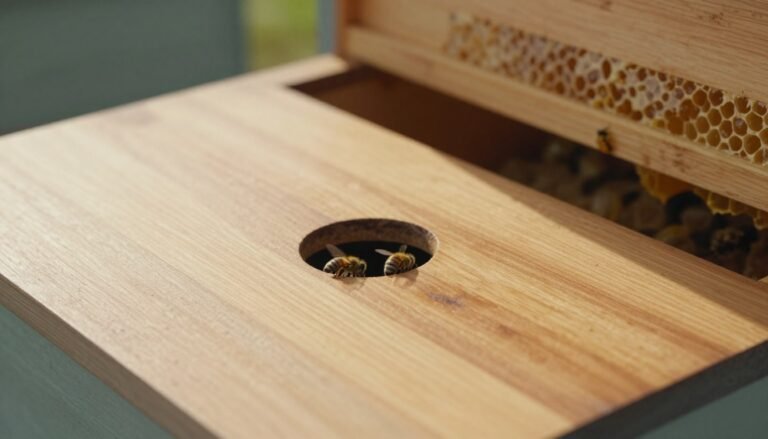
Cedar wood options resist weather and a moisture quilt set in a medium super with a canvas bottom can help manage condensation. Drill a 1/2 inch hole for ventilation near the top to allow air to move without chilling frames. Whether new or experienced, choosing the right equipment helps your bees reach spring strong.
Key Takeaways
- Choice matters: Proper equipment influences colony survival.
- MayBee Hives notes hive environment is essential for bees.
- Candy board can supply food; common mix is 4 lbs sugar + 1 cup water.
- Cedar and canvas options offer weather resistance and moisture control.
- Install a 1/2 inch ventilation hole to balance air and humidity.
- Good insulation plus moisture management helps hives thrive until spring.
Understanding Winter Hive Challenges
In Central Montana’s short growing season, beekeepers must ready their hives for long, cold stretches. Bees cluster tightly to stay warm, but they cannot control every element inside the hive.
Excess moisture under the inner cover turns to condensation and can drip onto bees. That dampness chills the cluster and raises disease risk. A damp environment also reduces the effectiveness of stores and insulation.
A well-built quilt box serves as a buffer between cold air and the cluster. The layer of material inside the quilt helps trap vapor away from the inner cover and gives bees a drier space to maintain heat.
Many beekeepers find quilt boxes the simplest, most reliable way to manage the internal climate through the winter months. For options that focus on keeping the hive dry, see this guide to the best moisture solutions for winter hives: best moisture board for winter hives.
The Role of Moisture Management in Bee Health
Condensation can undermine hive health by dripping onto the cluster and chilling the bees. This problem starts when bees metabolize honey to stay warm. That process releases water vapor into the top of the hive.
Excess moisture inside a hive invites mold and chalkbrood. Damp bees become sluggish and use more stores to keep the colony active in early spring.

The Dangers of Condensation
When vapor hits a cold inner cover it condenses and can drip down onto frames and cluster. A properly installed quilt box lets vapor travel up through the inner cover and be absorbed higher in the stack.
Impact on Bee Metabolism
As bees burn honey to stay warm they add humidity to the air. If that air cannot escape, the colony risks infection and energy loss.
“Managing internal air quality is as vital as ensuring adequate food stores.”
Research from 2024 supports this view. For practical steps on preparing hives, see the winterizing hives guide.
Winter Quilt Box vs Moisture Board: A Comparative Overview
Start by noting how the inner cover reacts when a quilt layer or a candy-style feeding surface sits above it.
Quilt boxes act mainly as an absorbent, insulating layer. They pull vapor away from the inner cover and help keep the top of the hive drier. That reduces dripping and keeps the cluster safer through cold months.
A candy-style board serves a different role. It provides food and can supply emergency honey stores while also offering a modest surface to capture humidity. Beekeepers often place a candy board when supplies are low.
Many experienced beekeepers combine both approaches. Using a quilt box plus a candy board gives the bees insulation and an accessible food source. This dual setup lets the hive maintain a more stable internal climate across the year.
- Inner cover handling: quilt boxes absorb; boards hold food.
- Ventilation impact: both need proper spacing to avoid chilling frames.
- Best practice: consider both for maximum protection in the cold months.
“A combined approach often balances insulation and emergency feeding, helping hives through the cold season.”
For a deeper how-to on wraps and full hive protection, see this ultimate guide to beehive wraps and practical tips to prevent damp in your hives at how to prevent hive moisture.
How a Quilt Box Functions for Colony Insulation
Good top insulation traps vapor away from the inner cover and helps the cluster use less energy. A well-made cedar chamber creates a thermal buffer that keeps the hive temperature steady during cold stretches.

Selecting Absorbent Fillers
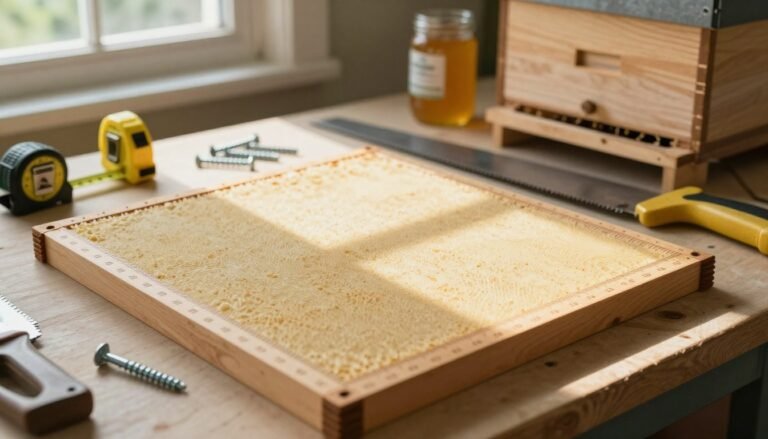
MayBee Hives ships a ready-to-use cedar product that needs no assembly. Fill the space with clean, dry wood shavings to form a thick layer that soaks up rising humidity.
- Use only dry wood shavings to avoid molding.
- Drill small holes for gentle ventilation and to let humid air escape.
- Place the filler above the inner cover, not packed against frames.
“A simple absorbent layer reduces dripping and helps bees conserve energy.”
| Feature | Benefit | Tip |
|---|---|---|
| Cedar construction | Weather-resistant insulation | No assembly; place on top of hive |
| Wood shavings | Absorb humidity | Keep shavings clean and dry |
| Ventilation holes | Controlled air exchange | Small, placed near top |
Benefits of Using a Moisture Board for Winter Feeding
A candy-style board placed over the inner cover gives quick, reliable food while helping control damp air. It sits directly above the frames so bees find stores without needing to move far. This placement also helps the hive keep humidity away from the cluster.
Providing Emergency Food Stores
Make a solid feed block by mixing 4 lbs of sugar with 1 cup of water. Set the hardened slab over frames so the colony can feed when natural stores run low. This method preserves energy for the bees and reduces spring losses.
Wicking Excess Humidity
Besides food, the candy board acts as a wick. It pulls rising vapor toward the top and away from the inner cover, lowering the chance of dripping on the cluster.
“A well-placed candy block can be both a lifeline and a humidity control tool.”
| Function | Benefit | Placement Tip |
|---|---|---|
| Emergency feed | Immediate access for bees | Place directly over frames |
| Humidity wicking | Reduces condensation risk | Combine with an absorbent layer above |
| Dual setup | Food plus insulation | Use with a quilt box to protect stores |
For practical how-to steps on preparing a candy slab and pairing it with an absorbent top layer, see a detailed guide to candy-board insulation and tips to reduce hive moisture today.
Essential Materials for Building Your Own Hive Solutions
Begin with a plan: select a medium super, sturdy canvas for the bottom, and clean wood shavings as the main insulating filler.
Choose durable wood like cedar for any cover or frame you build. Cedar resists rot and lasts more than one year of service. That protects the inner cover and keeps the top drier over time.
Make the candy slab separately and let the sugar fully dry before placing it above frames. Properly cured sugar prevents added damp air inside the hive.
A dedicated beekeeper can assemble these parts quickly. Drill small holes for gentle air flow and avoid packing shavings tight against frames.

“Proper construction of the quilt box and board is vital for maintaining the correct temperature and air flow.”
For extra help on insulating choices, check practical tips on hive painting tips for better insulation.
| Component | Purpose | Practical Tip |
|---|---|---|
| Medium super | Holds the absorbent filler above the inner cover | Use one sized to sit squarely on top of hive |
| Canvas bottom | Keeps shavings contained and allows vapor to rise | Staple securely and avoid gaps that shift filler |
| Clean wood shavings | Absorb humidity and add insulation | Use dry, untreated shavings only |
| Cedar construction | Long-term weather resistance | Good for covers and durable quilt boxes |
| Dried sugar slab | Emergency food without adding wetness | Fully cure before placing over frames |
Strategic Placement Within the Beehive
A clear plan for placement inside the hive cuts condensation risk and helps bees find food without extra effort.
Optimizing Internal Airflow
Place the candy board directly above the top deep super so bees can access honey stores as they move upward. This keeps food within reach and reduces unnecessary movement.
Set the quilt box above the inner cover to trap rising vapor before it condenses on hive walls. That absorbent layer protects frames and the cluster.
Drill a 1/2 inch hole in the side of the super for gentle ventilation. That single opening promotes steady air flow without chilling the bees.
- Check frame spacing so the candy board does not block bee traffic.
- Keep the insulation layer loose enough to allow vapor to travel upward.
- Confirm the cover sits squarely to prevent drafts.
“Strategic placement preserves heat and moves humid air away from the cluster.”
Managing Ventilation During the Coldest Months
Simple changes to the top configuration let humid air escape while preserving heat around the cluster. Proper ventilation prevents a dangerous buildup of moisture that can chill the bees and damage comb.
Use a quilt box with small drilled holes to let stale air out without creating drafts. Keep the holes high so warm air rises and leaves above the inner cover.
Check the inner cover periodically to confirm the path for air remains clear. A packed candy slab or tight insulation can block flow. Make sure the candy board sits with space for movement so bees can breathe and access food.
Monitor hives during cold stretches. Look for signs of condensation on the inner cover and adjust venting if needed. Good placement keeps the cover dry and reduces the chance of dripping on frames.

“Balanced venting lets air move without chilling the cluster.”
| Feature | Purpose | Action |
|---|---|---|
| Drilled holes | Controlled air exit | Place near top; keep small (1/2 inch) |
| Quilt box layer | Absorb rising vapor | Use dry shavings; avoid packing tight |
| Inner cover | Directs airflow | Keep vents clear; check mid-season |
| Candy board placement | Food access without blocking air | Allow clearance above frames |
For more on managing top ventilation and insulation, see this practical guide on managing moisture and ventilation.
Routine Inspections and Maintenance Tips
Schedule brief checks on mild, sunny days to confirm the top layers are dry and functioning. Open the cover just enough to look for damp spots and avoid exposing the cluster to cold air.
Inspect the wood shavings in the quilt box and feel for saturation. Replace any damp shavings promptly so the bees stay dry and healthy inside the hive.
Check the inner cover and the candy board to make sure food and protection remain available. Verify that the candy slab is firm and frames remain easy for the colony to reach.
Maintain ventilation holes and confirm the path for rising air is clear. Small adjustments to the top spacing keep humid air from pooling under the inner cover and reduce the risk of dripping on frames.
Routine care is time-intensive but rewarding. Regular maintenance preserves honey stores and helps the colony use less energy. For practical guidance on managing these parts, review a concise how-to on how to use quilt boxes for.

“Small, consistent checks catch problems early and keep colonies strong.”
Combining Methods for Maximum Hive Protection
A combined top setup gives colonies both steady food access and reliable vapor control when temperatures drop. Use a cured sugar slab with an absorbent layer above the inner cover to cover both needs.
The candy board supplies critical honey-like food and sits where bees can reach it without wasting energy. The absorbent cap soaks up rising vapor and keeps the inner cover drier.
Together they balance air flow and insulation. Drill small holes near the top for gentle ventilation so warm air leaves without chilling frames.
Many beekeepers report that pairing these elements reduces losses and eases spring recovery. This dual approach gives the colony the best chance to conserve stores and stay healthy.

“Combining feed and an absorbent top layer creates a stable environment that supports colony survival.”
| Component | Main Benefit | Quick Tip |
|---|---|---|
| Candy slab | Emergency food close to cluster | Cure fully; place over inner cover |
| Absorbent cap | Wicks vapor away from cover | Use dry shavings; replace if wet |
| Vent holes | Controlled air exchange | 1/2 inch high on the super side |
Common Mistakes to Avoid During Winterization
Small mistakes during hive preparation can undo careful planning and put colonies at risk.
Failing to allow enough ventilation lets warm, humid air collect and drip down. Check vents and keep a small, high opening so air moves without chilling the cluster.
Beekeepers sometimes forget to secure a candy board. If it shifts or falls, it can smother the bees and contaminate frames. Fasten feed slabs and confirm the top sits stable.
Do not block the bottom entrance. Bees use that opening for cleansing flights on mild days and to move air in and out of the hive.
Pack quilt boxes or shavings correctly; overfilling traps air and creates damp pockets. Keep the filler dry and loose so vapor can travel upward and away from bees.
- Check vents for steady air flow.
- Secure feed and verify placement above frames.
- Keep the bottom clear for bee movement and airflow.
Always prioritize the health of your colony today by avoiding these simple errors. For detailed guidance on managing hive humidity, see how to manage hive moisture.

| Mistake | Risk | Quick Fix |
|---|---|---|
| Poor ventilation | Condensation and chilled cluster | Drill a small high hole; check vents |
| Unsecured candy board | Smothering or food loss | Firmly fasten slab; place over frames |
| Blocked bottom | Restricted flights and air exchange | Leave entrance clear; open on warm days |
Conclusion
A thoughtful top setup that balances warmth, ventilation, and emergency stores will improve colony survival.
Protecting your bees requires good insulation, controlled ventilation, and reliable food close to the cluster. Use an absorbent cap and a cured candy slab so the hive stays dry and the colony can feed without long movement.
Routine maintenance and brief inspections on mild days catch issues early. Check shavings, vents, and the feed slab to keep airflow steady and avoid damp spots.
Investing in quality materials and steady care now gives your colony the best chance to emerge strong and productive in spring.