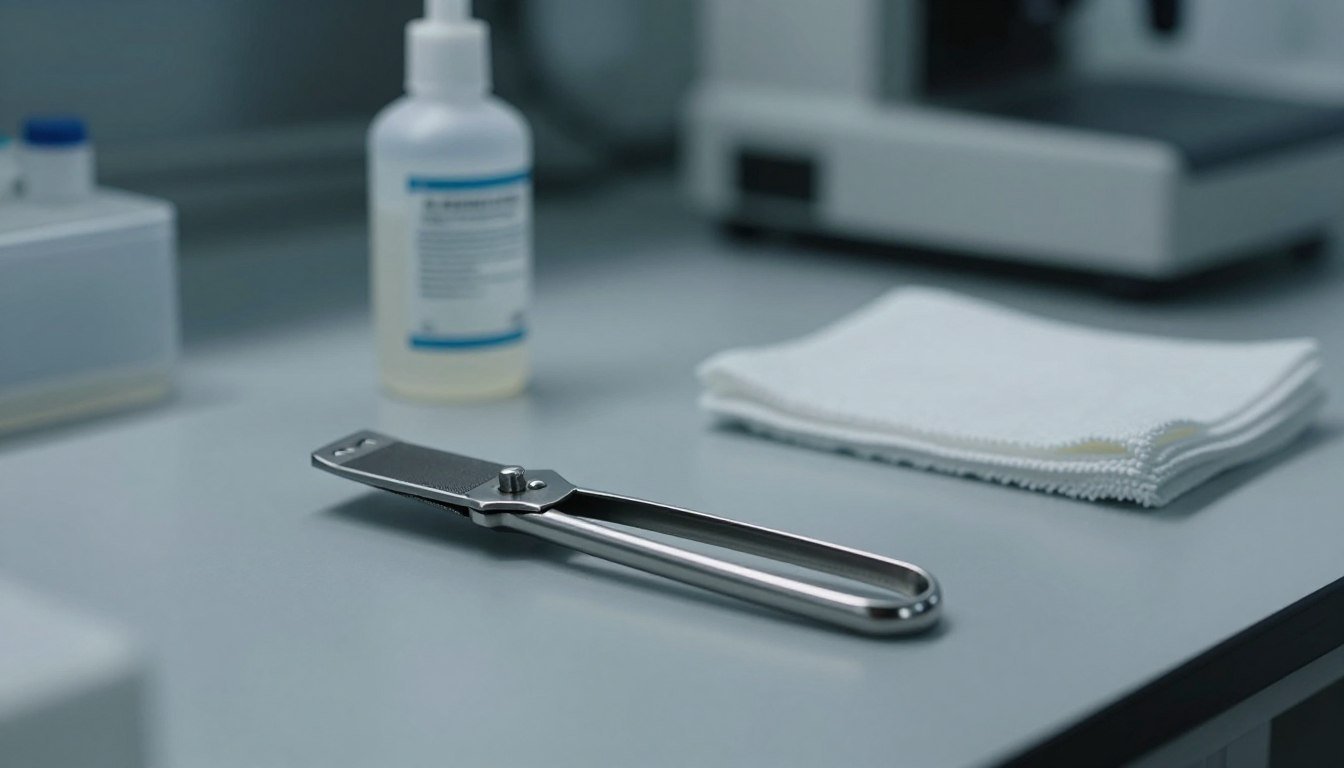
Clean tools make better honey. During harvest, every frame and comb moves through a short, critical process in the room. Proper care of the capping scratcher and related equipment protects cells and keeps wax or debris out of the extractor.
HONESTBEE supplies professional-grade gear for commercial apiaries and distributors who need reliable tools and repeatable results. A hot knife often handles bulk uncapping, while the scratcher finishes edges and opens stubborn cappings.
A single day of poor handling can affect an entire year of production. Keep the box and all tools clear of residues and use careful comb-sorting to avoid contaminants. Learn more about extraction methods in this honey extraction guide and harvesting steps at Beekeeper’s Realm.
Key Takeaways
- Clean tools fast to protect honey quality and bee health.
- Use a hot knife with a scratcher for efficient uncapping.
- Sort combs to prevent pollen and debris in the extractor.
- HONESTBEE provides gear suited for commercial production.
- Small daily steps save time and improve year-long results.
Understanding the Role of the Capping Scratcher
A focused finishing pass can recover honey that large tools leave behind. The capping scratcher is a precision finisher made to open wax cappings that an electric knife or plane can miss.
Uncapping knives, rollers, and planes handle most of the bulk work. The scratcher reaches low spots on a comb and evens out irregular surfaces on each frame.
Many a beekeeper pairs an uncapping fork with the scratcher to make sure honey cells are fully exposed before the frame goes into the extractor. This cuts waste and saves time during the harvest process.
Use capping scratcher tools when you want quality control on every frame. Using a hot knife for primary uncapping works well, but the finishing tool ensures each hive yields pure, high-grade honey.
Practical note: For more on equipment choices, see our review of bee wax extraction equipment.
- The scratcher reaches low spots a knife might miss.
- An uncapping fork helps confirm honey cells are open.
- Finishing tools reduce wasted honey and protect bees.
Best Practices for Capping Scratcher Sanitation Between Batches
Routine cleaning after each run prevents small residues from turning into major quality problems. Keep the workflow simple and repeatable so tools, frames, and the extractor stay hygienic.
Cleaning Protocols
Start with dry removal. Scrape away loose wax and cappings, then rinse warm to remove sticky honey. Wipe every side of a fork and knife head to remove trapped residue.
- Use warm water and a mild, food-safe cleaner to loosen wax.
- Inspect frame edges and comb surfaces for leftover debris.
- Sanitize high-contact tools and let them air dry before reuse.

Preventing Cross-Contamination
Separate loads when a hive shows signs of disease or when frames have many uncapped cells. If you have a lot of uncapped cells, extract them separately, but remember each uncapped cell adds water to your honey.
Experts often use a 10% uncapped threshold as a guide; adjust by how wet the frame honey actually is. Wipe down the extractor and the box after each run to stop moisture and mold over the year.
- Keep dedicated tools for suspect hives to limit spread across lots.
- If a batch is too wet, use a dehumidifier or drying room before processing.
- Record cleaning time and tool checks to keep equipment at the top of its performance.
For detailed steps on handling and storing harvested honey, see our guide on how to extract and store raw.
Preparing Your Workspace for Efficient Extraction
Set up your extraction area so each step flows and you spend less time hunting tools. A clean, logical layout cuts movement and helps protect comb and honey from accidental damage.
Optimizing Tool Placement
Keep high-use items within reach. Position the uncapping knife and scratcher near the uncapping station so you can process each frame quickly. Place the extractor close by to reduce travel and lower contamination risk.
- Good lighting in the room prevents accidental damage to cells while you work.
- Organize equipment on a single workbench to save time during a long day.
- Keep dedicated trays for suspect frames to protect other bees and loads.
| Station | Recommended Item | Benefit |
|---|---|---|
| Uncapping | Uncapping knife, scratcher | Faster, cleaner removal of cappings |
| Transfer | Frame rack, padded tray | Less handling damage to comb |
| Extraction | Extractor, collection bucket | Minimizes frame movement and contamination |
Keep tools clean and organized so your equipment stays reliable. When you work well with your tools, you protect bees and preserve wax and honey quality.
Managing Irregular Comb Surfaces and Low Spots
Irregular comb surfaces demand focused attention to avoid wasted honey. Low spots on a frame hide cells that standard tools can miss. Addressing these areas protects yield and preserves wax.
Use the right finishing tools. A capping scratcher is the most effective way to open honey cells in depressions. An uncapping fork helps reach deep into the comb and pull out stubborn cappings without tearing the wax.
Practice matters. It takes time to learn how to use capping scratcher tools without damaging frames. Start slow, work well with steady strokes, and check the top of the comb often.
“We give our thanks to the bees by leaving as little honey behind as possible.”
Follow a simple routine:
- Inspect each frame for low spots before uncapping.
- Use a knife for bulk work, then finish low areas with a fork or scratcher.
- Handle wax gently to keep comb structure for the next year.

For small-scale methods and tool choices, see small-scale uncapping methods, and for tricky comb layouts read about handling cross-comb.
Maintaining Tool Longevity and Performance
Small, steady care of your tools makes a big difference in long-term honey quality. Regular checks and smart storage keep equipment ready for every harvest and protect the value of each frame you handle.
Regular Inspection
Inspect heating elements and edges daily. Check the knife for consistent heat and clean heating contacts to avoid uneven cuts. Look over the frame racks and comb-handling tools for bends, rust, or residue.
- Test the knife heating element before each session to keep honey production efficient.
- Replace worn tips or bent forks to prevent damage to frames and comb.
Proper Storage
Store all tools in a cool, dry place so metal parts do not corrode. Use padded covers for blades and keep electrical cords coiled and off the floor.
We offer our thanks to those who maintain gear—this effort directly improves honey quality and supports healthy bees.
Managing Heat
Control knife temperature to stop wax buildup on the blade. Too-hot tips can scorch wax and change flavor; too-cool tips clog and slow production.
For guidance on avoiding heat damage while extracting, see how to avoid overheating honey during, and for care of knives and frames consult an essential guide to uncapping beehive.
Handling Wax Cappings and Residual Honey
Processing wax right after uncapping keeps valuable honey from being lost to spills and insects. After you finish uncapping your frames, drain residual honey through a fine strainer so little is wasted. This step recovers extra honey and reduces sticky mess on the floor and tools.

Once the honey is separated, melt collected wax gently and filter it to remove debris and loose cells. Filtered wax is ideal for candles, balms, or polish and adds revenue to a small operation.
- Store large lots of cappings in a clean box until you have enough to process.
- Process quickly to keep ants and other pests away from the extractor area.
- Use recovered wax in value-added products to reduce yearly waste and boost returns.
| Recovery Step | Benefit | Timing |
|---|---|---|
| Strain residual honey | Maximizes yield from frames | Immediately after uncapping |
| Melt and filter wax | Removes debris and loose cells | Same day or stored short-term in a clean box |
| Create products | Adds income and reduces waste | After filtering and cooling |
For details on heating and filtering methods see an essential guide to uncapping and practical melting tips at bee wax extraction. Thanks to careful processing, bees and your operation both benefit.
Troubleshooting Common Extraction Challenges
When tools clog or frames tear, a quick fix can stop major damage to honey and comb.
Keep a damp cloth handy to wipe excess wax from a knife or fork as you work through each frame. This simple cleaning step saves time and prevents buildup that slows the process.
If the hot knife gets coated in wax, turn it off briefly so it cools, then scrape and restart. For an uneven comb or torn cells, switch to an uncapping fork or a precise finishing tool to avoid further damage.
Secure the extraction room to prevent a robbing frenzy. Close doors and limit lights so bees stay out of the area during the run.
- Keep dedicated tools for suspect lots and a separate box for frames that need special care.
- Work one side at a time to reduce stress on the frame and cut repair time later.
“We give our thanks to the beekeepers who share troubleshooting tips, which helps everyone keep hive and honey production at the top level.”
For related equipment planning, see our small industrial mixing tanks guide for ideas on handling liquids and heat control in a processing room.
Conclusion
Consistent care of tools and frames is what keeps honey quality high all season. Small daily steps protect comb, recover more wax, and limit water in the final jar.
Treat each frame with care. Use professional equipment and follow routine checks so your bee work converts into reliable production and better returns.
For tips on how to store frames and avoid pests, see how to store frames to prevent. Honor your bees by keeping tools clean and organized—your harvest will show it all year.