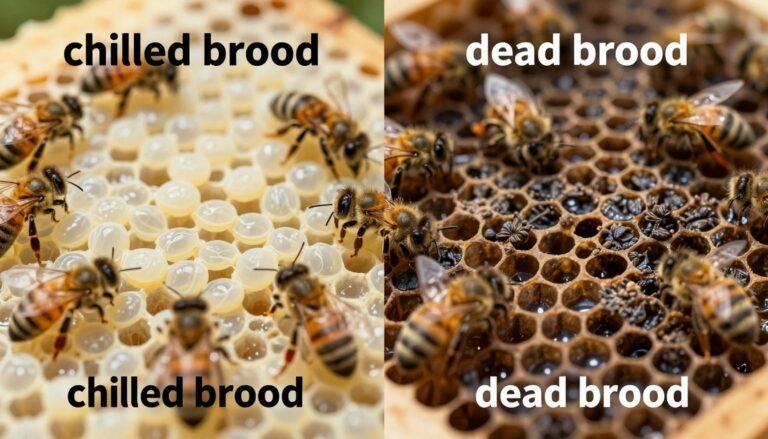
Inspecting hive combs is the first step in keeping colonies healthy. Small changes in larva color, capped cells, or the pattern of worker bees can point to problems early.
Beekeepers should learn to spot the four serious threats: American foulbrood, European foulbrood, chalkbrood, and sacbrood. Regular checks of comb and equipment reduce spread between hives.
If you see unusual cell caps, off-color larvae, or scattered brood cells, submit samples for lab confirmation. The Customer Service Centre is available at 136 186 for help with identification and next steps.
Keep clear photo records to share with apiary officers. A clear photo or two of affected frames speeds diagnosis; see detailed comb references at brood comb photos.
Key Takeaways
- Learn to identify American foulbrood, European foulbrood, chalkbrood, and sacbrood.
- Healthy brood appears pearly white with an orange gut line in each larva.
- Report odd patterns and submit samples when unsure; call 136 186 for support.
- Keep equipment clean to prevent spread between colonies and hives.
- Document unusual frames with clear photos to help apiary officers diagnose issues.
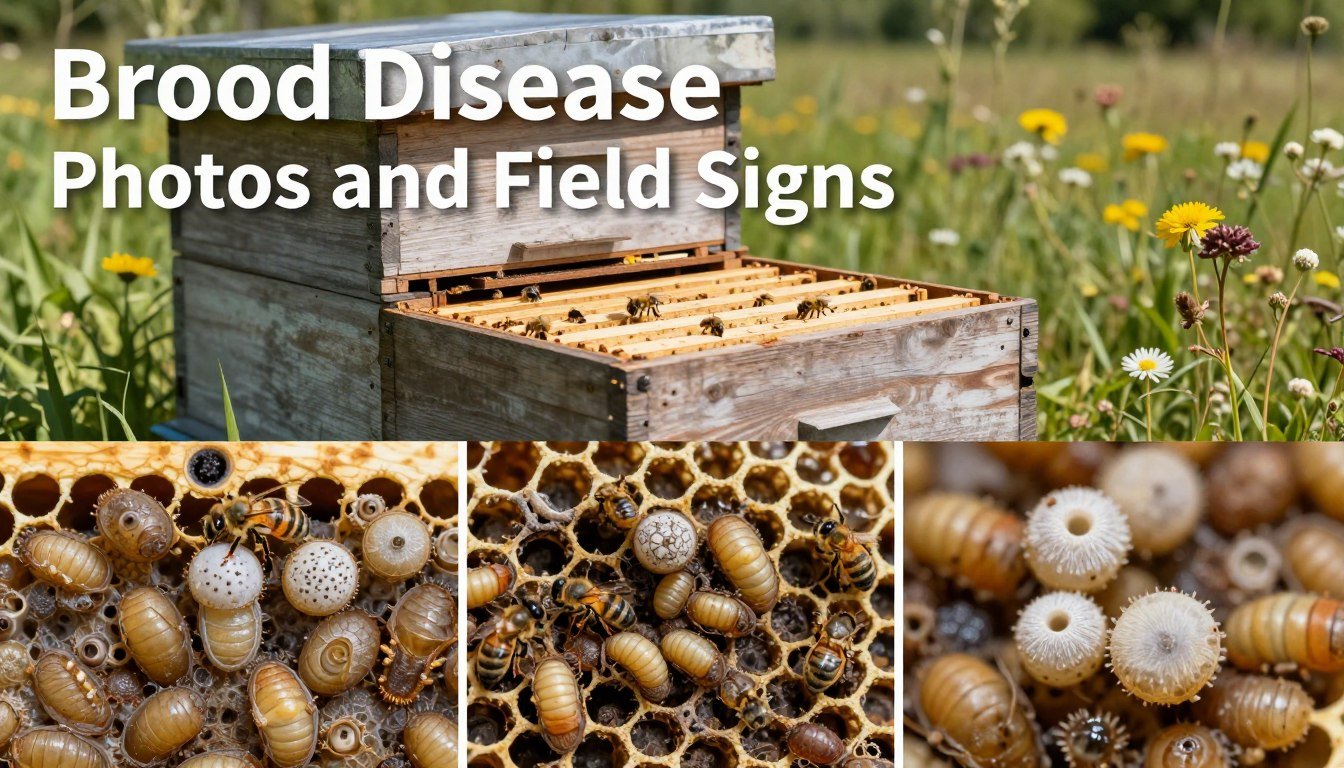
Understanding Brood Disease Photos and Field Signs
Comparing what you find on a frame to a verified picture often reveals early warning cues that are easy to miss.
Visual identification starts with steady lighting and a calm approach. Gently remove frames and scan caps, larvae color, and cell patterns. Take a clear photo to document any odd areas for later review.
Expert image guides — like those provided by Rob Snyder — show subtle differences between conditions. Use these references to check texture, cap shape, and larval posture. A matched image speeds correct action.
Keep a compact reference guide with one high-quality photo per condition. During inspections, compare frames to that guide. If a match appears, follow up with lab testing or consult resources such as identifying chilled brood.
- Photograph suspect frames immediately.
- Use verified images to train your eye.
- Early matches improve chances of saving the colony.
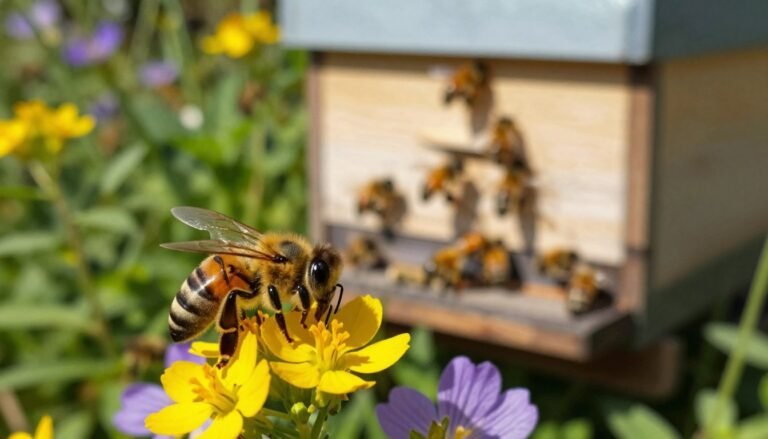
The Importance of Regular Hive Inspections
Inspecting every frame on a set schedule helps spot uneven patterns before they worsen.
Seasonal Inspection Timing
Beekeepers should perform thorough checks in early spring and again in autumn to prepare colonies for growth and winter. These windows reveal queen laying rate and colony strength.
Remove bees gently to view comb and brood cells clearly. Look at cap texture and larval color. Perforated caps or off-color larvae can point to a serious problem and need follow-up.
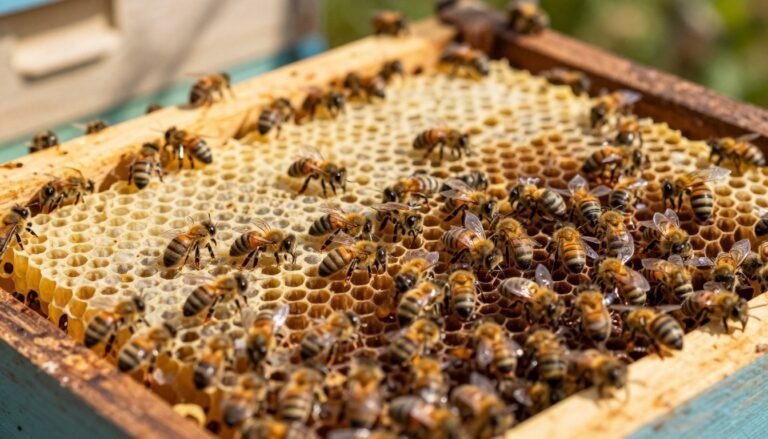
Defining Healthy Brood Patterns
A strong pattern shows nearly all cells in a focused area filled with developing bees. Uniform spacing and few empty cells mean the queen is laying well.
“A clear, consistent pattern is the best quick test of colony health.”

| When | What to Check | Why it Matters |
|---|---|---|
| Early spring | Queen laying, comb occupancy, larvae quality | Prepares colony for nectar flow and growth |
| Autumn | Brood pattern, stores, equipment condition | Ensures survival through winter |
| Every inspection | Perforated caps, off-color larvae, empty cells | Early detection of problems; saves hives |
Keep records and use a high-quality photo as a reference during checks. For guidance on recordkeeping, see hive inspections and recordkeeping. For hygiene and checklist tips, consult this apiary hygiene checklist.
Identifying American Foulbrood
American foulbrood is a severe bacterial infection of developing bees. It is caused by Paenibacillus larvae, which forms hardy spores that persist in equipment for decades. Only the larva stage is susceptible; adult bees remain immune but can spread spores between hives.
Bacterial Characteristics
Paenibacillus larvae produces spores that survive heat and cold. Contaminated frames, tools, or honey can carry spores for 50+ years. To prevent spread, used equipment from a confirmed site must be destroyed or irradiated rather than simply frozen or heated.
Visual Symptoms
Infected larvae die after their cells have been capped. Cappings may appear sunken, greasy, and perforated. The overall brood pattern often becomes spotty as adult bees fail to emerge.
The Ropiness Test
- Use a clean matchstick to probe a suspicious capped cell.
- Gently lift remains—true ropiness pulls out to 25 mm or more.
- Positive results require lab confirmation and reporting.
“American foulbrood is a reportable condition; contact authorities if you suspect an infection.”
| Feature | What to look for | Action |
|---|---|---|
| Caps | Sunken, greasy, perforated | Isolate frames; submit samples |
| Larval remains | Ropy stringing; dark scales | Perform ropiness test; confirm in lab |
| Equipment | May harbor spores for decades | Destroy or irradiate to prevent spread |
Beekeepers who need regional guidance should review american foulbrood guidance and report suspected cases promptly.
Recognizing European Foulbrood
Look for open cells with twisted, molten-looking larvae—this often points to European foulbrood.
European foulbrood is caused by the bacterium Melissococcus plutonius. It typically targets very young larvae before nurse bees cap the cell. Infected larva die in the open cell, producing rubbery scales that adult bees can sometimes remove.

Distinguishing EFB from AFB
The pattern in an affected colony often looks spotty, with dead larvae twisted or curled in exposed cells. Unlike american foulbrood, EFB remains do not rope out in the ropiness test, and scales are easily scraped free.
- Cause: Melissococcus plutonius; early larval stage affected.
- Pattern: Spotty areas, exposed dead larvae; adult bees try to remove remains.
- Action: Use a diagnostic test to confirm; consult a veterinarian or apiary officer since antibiotic use is regulated.
“A clear photo of the molten-looking larva helps confirm EFB and guides management decisions.”
Keep strict tool hygiene and manage equipment to avoid recurrence. For guidance on sterilizing metal tools, see a practical guide on sterilizing hive tools with flame. For official standards and further reading, review the international EFB protocol.
Managing Chalkbrood Infections
Chalkbrood is caused by the fungus Ascosphaera apis. Infected larvae swell inside the cell and harden into chalk-like mummies.
Worker bees often remove these mummies and drop them on the landing board or carry them outside hive entrance. A clear helps confirm the problem; mummies range from white to dark blue-gray.
There is no chemical cure, so focus on hive ventilation and overall colony health. Improve airflow, reduce damp, and elevate hives to limit fungal growth in early spring.
If the issue persists, scrape and clean wooden equipment and replace old brood comb with new foundation. Strong colonies with many worker bees keep the nest cleaner and reduce spread.
- Monitor: check hive entrance for mummies during inspections.
- Manage: improve ventilation and dry the stand.
- Renew: clean equipment and swap old comb when needed.
For prevention steps and detailed guidance, see this practical guide on how to prevent chalkbrood.
Detecting Sacbrood Virus
A telltale curved larva, head raised toward the cell top, helps confirm sacbrood at a glance.
Sacbrood virus causes infected larvae to die in a gondola or banana shape. The larva often turns from white to pale yellow, then light brown and finally dark.
Larvae become filled with a granular fluid and look sac-like before they dry into a dark scale. Nurse bees may uncap cells to remove remains, which can spread the virus through a weak colony.
Symptoms are most common in early spring colonies with a poor brood pattern and scattered, perforated capped cells. Adult bees show no clear signs, but high viral loads can shorten lifespan and weaken the hive.

- Look for the banana-shaped larva and raised head in affected cells.
- Consider requeening to break transmission and introduce resistant stock.
- Sanitize equipment and inspect nearby hives to limit spread.
For detailed inspection steps and when to call an inspector, review sacbrood inspection guidance at sacbrood inspection guidance.
Secondary Conditions and Mimics
Not every odd pattern means a reportable infection. Pests and parasites can produce similar cues on comb, so careful checks save time and equipment.
Bald Brood and Wax Moths
Bald brood results when wax moth larvae tunnel through frames. Worker bees often uncap rows of pupae to remove caterpillars.
Keep hive boxes sealed and store spare comb off-site to stop moth entry. Replace badly damaged comb to restore a healthy pattern.
Parasitic Mite Syndrome
PMS comes from heavy mite loads plus many viruses. Colonies with PMS may show a spotty pattern that mimics european foulbrood.
Advanced PMS shrinks the adult bee population so the queen and larvae receive poor care. A clear photo of affected cells often shows mites on adults or in cells.
“Rule out mites before assuming a bacterial foulbrood.”
- Maintain strong colonies; treat mites promptly.
- Break the brood cycle to disrupt mite reproduction.
- Inspect hive entrance and equipment regularly for pests.
Field Diagnostic Techniques
A reliable matchstick method gives timely clues during routine inspections. Beekeepers should learn this simple test to tell likely bacterial infections apart on-site. Use steady light and clean hands to avoid contamination.

- Open a suspicious capped cell and insert a clean matchstick gently to touch the remains.
- Slowly withdraw the stick while watching the consistency of the residue.
- Measure the thread length: a stretch of about 25 mm or more strongly suggests American foulbrood; much shorter or no stretch points toward european foulbrood.
Document every result with notes and a clear frame photo. If you are unsure, contact your local department of agriculture for lab confirmation. For formal guidance on sampling and in-hive checks, review the field diagnosis guidance.
| Test Result | Likely Cause | Immediate Action |
|---|---|---|
| Thread ≥ 25 mm | American foulbrood likely | Isolate frames, submit samples to lab, follow regional rules |
| No thread or short pull | european foulbrood possible | Keep records, consider lab test, consult inspector for treatment options |
| Unclear or mixed result | Indeterminate | Document, quarantine hive, send sample for confirmation |
“Proper diagnostic technique helps beekeepers act correctly and limit unnecessary losses.”
Best Practices for Disease Prevention
A clear plan that limits material movement between units cuts the chance of an outbreak before it starts.
Implementing a barrier management system means grouping hives into separate units and treating each as a biosecure block. Label boxes and keep tools dedicated to a unit whenever possible.
Implementing a Barrier Management System
Separate equipment and traffic so frames, supers, and protective gear never move freely between units. If you must transfer honey or pollen, only use material that has been properly irradiated.
Never rely on antibiotics to fix american foulbrood. Antibiotics mask symptoms but do not remove tough spores. For confirmed cases, the safest option is to destroy the colony and irradiate or burn contaminated equipment.

- Replace old brood comb every 3–4 years to lower reservoirs of pathogens.
- Clean hive tools between inspections to avoid cross-contamination.
- Keep colonies strong to reduce growth of fungal issues and viral spread.
| Practice | Why it matters | Immediate action |
|---|---|---|
| Unit segregation | Limits material interchange and spore movement | Label hives; assign tools per unit |
| Irradiation | Destroys hardy spores in equipment and honey | Use certified services before reuse |
| Comb renewal | Removes long-term reservoirs in equipment | Replace foundation every 3–4 years |
| Hygiene | Prevents accidental spread during inspections | Sanitize or swap tools between colonies |
“Good beekeeping creates an environment where the honey bee can thrive without preventable threats.”
Conclusion
Timely hive checks and prompt management decisions are the bedrock of responsible apiary care.
Regular inspections let you spot early cues and act before a colony fails. Keep tools clean, separate units where possible, and replace old comb on schedule.
When in doubt, seek expert help. Review official AFB control guidance at AFB control guidance and consult a local apiary officer. For pressure or swarm planning, see this swarm warning guide.
Act fast. Early detection, clean equipment, and barrier management protect productivity and help keep colonies resilient.
FAQ
What should I look for when inspecting comb for abnormal brood patterns?
Check for uneven clusters of capped cells, missing patches of developing bees, and cells with discolored or sunken cappings. Healthy frames show consistent, solid coverage of developing young with few empty cells. Note any unusual odors, sticky residues, or darkened comb that could indicate contamination or infection.
How can I distinguish American foulbrood from other problems in the hive?
American foulbrood presents with sunken, perforated cappings and a sticky, rope-like residue when a dead larva is probed with a wooden stick. The remains often dry into hard, dark scales that stick firmly to the cell bottom. If you suspect this infection, collect a sample for laboratory confirmation and follow local regulations for control.
What is the ropiness test and how reliable is it?
The ropiness test involves probing a suspected infected cell with a sterile stick; infected larvae will stretch into a stringy filament. This quick field check is helpful but not definitive. Always confirm results with professional laboratory testing before taking destructive measures.
How does European foulbrood differ in appearance and progression?
European foulbrood often shows twisted, discolored larvae that are yellow to brown and may lie across the cell. Cappings are usually intact or slightly sunken. Unlike AFB, infected remains do not form hard scales. EFB often responds to improved nutrition and reduced stress, but testing can guide treatment choices.
What are common signs of chalkbrood and how do I manage it?
Chalkbrood produces white, chalky mummies of larvae that may be ejected from the hive. It typically surfaces during cool, wet conditions or when colonies are under stress. Improve ventilation, boost colony strength, and replace heavily mummified comb. Resistant bee strains can reduce recurrence.
How does sacbrood virus present in comb and larvae?
Sacbrood causes larvae to die in a sac-like state, often with a distinct, brownish fluid visible when the body is ruptured. Affected cells may appear sunken or stretched. Good hive nutrition and strong adult populations help reduce impact; there is no direct chemical treatment for the virus.
What other conditions mimic bacterial infections and how do I tell them apart?
Bald brood, wax moth damage, and parasitic mite syndrome can resemble bacterial problems. Bald brood leaves uncapped cells with naked larvae, wax moths leave webbing and tunnelled comb, and mite syndrome shows spotty brood and high bee mortality. Look for moth frass, mite fall on bottom boards, and adult bee symptoms to differentiate causes.
When should I schedule inspections during the year for best detection?
Inspect colonies in early spring after the first warm spell, mid-summer during peak brood production, and again in early fall before wintering preparations. Frequent checks during nectar flows and after weather extremes help catch issues early and limit spread.
What field tools and techniques help diagnose problems on site?
Carry a clean hive tool, sterile probes or toothpicks, bright flashlight, collection vials, and a notepad or phone for photos. Use the ropiness test cautiously, collect samples for lab analysis when uncertain, and wear appropriate protective gear to avoid spreading contaminants.
How can beekeepers prevent spread between colonies and apiaries?
Implement barrier management by reducing drifting—orient entrances away from neighboring hives, use distinct hive markings, and maintain strong, queen-right colonies. Isolate new equipment and bees until inspected, disinfect tools between colonies, and practice controlled movement of frames and supers.
What are best practices for managing contaminated equipment?
Burn or bury heavily contaminated comb when required by regulation. For reusable equipment, use heat sterilization where permitted, or apply approved disinfectants following label directions. Mark and quarantine any suspect boxes until cleared by laboratory results.
When should I send samples to a diagnostic lab and what should I include?
Send samples when field signs are ambiguous, when the ropiness test is positive, or after significant colony loss. Include several affected larvae or scales, clear notes on hive history, inspection date, and recent treatments. Contact a regional diagnostic lab or state entomologist for submission instructions.
How does good nutrition and colony strength reduce vulnerability?
Well-fed, populous colonies maintain cleaner brood rearing and strong nurse bee populations that better groom and remove infected individuals. Provide diverse forage, supplemental feeding during dearths, and replace weak queens to sustain resilience against infections and stressors.
Are there regulatory requirements for handling confirmed American foulbrood?
Many states and countries mandate reporting and specific control actions for confirmed American foulbrood, including destruction of infected comb or entire colonies. Consult your state apiarist or the USDA guidelines for legal obligations and recommended protocols.