Mastering a careful brood check is a core skill for every dedicated beekeeping enthusiast in the United States. Regular inspections on calm, warm days above 15°C (59°F) keep colonies productive during spring. Short, methodical reviews help protect honey stores and spot early signs that need attention.
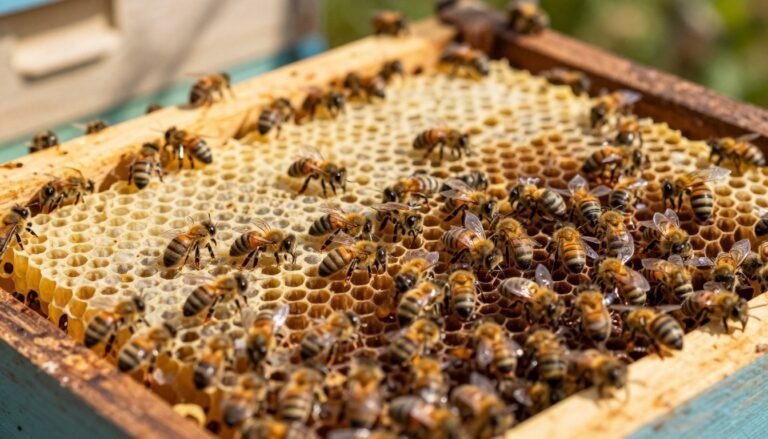
When opening a hive, move slowly and handle frames with care. Look across each frame and cells for healthy larvae and a strong brood pattern. A reliable queen will lay centrally, making it easier to gauge colony vigor during a routine inspection.
Keep a steady schedule—weekly or bi-weekly in busy seasons—and note any odd patches or irregular comb. Proper framing technique reduces harm to comb and lowers stress on bees. This methodical approach helps ensure no hidden problem goes unnoticed.
Key Takeaways
- Choose warm, calm days above 15°C for clear, safe checks.
- Handle frames gently to protect comb and the queen.
- Scan each frame and cells for consistent larvae and brood pattern.
- Keep a regular schedule to maintain honey production and colony health.
- Act quickly when unusual signs appear to limit spread.
Understanding the Importance of Regular Brood Inspections
Regular checks give beekeepers an early warning when colony numbers shift and food stores run low. These routine visits help you see whether colonies are expanding or shrinking. They also show if the nest has enough honey and healthy comb structure.
Experienced beekeepers know that checking hives every 2–3 weeks in active seasons is the best way to protect growth. In spring, frequent reviews catch rapid expansion. In winter, focused checks confirm the cluster has enough reserves.
Good inspections reveal early signs of irregular brood patterns and uneven comb. That gives you time to adjust feed, space, or management before honey production drops or a colony fails.
- Monitor food stores: ensure bees have honey and pollen for lean periods.
- Watch comb: spot warped or damaged frames early.
- Follow the cycle: knowing seasonal needs guides the right intervention.
For practical recordkeeping and a reliable checklist, see this guide on hive inspections and recordkeeping. Organized notes help protect colonies and keep your apiary thriving.
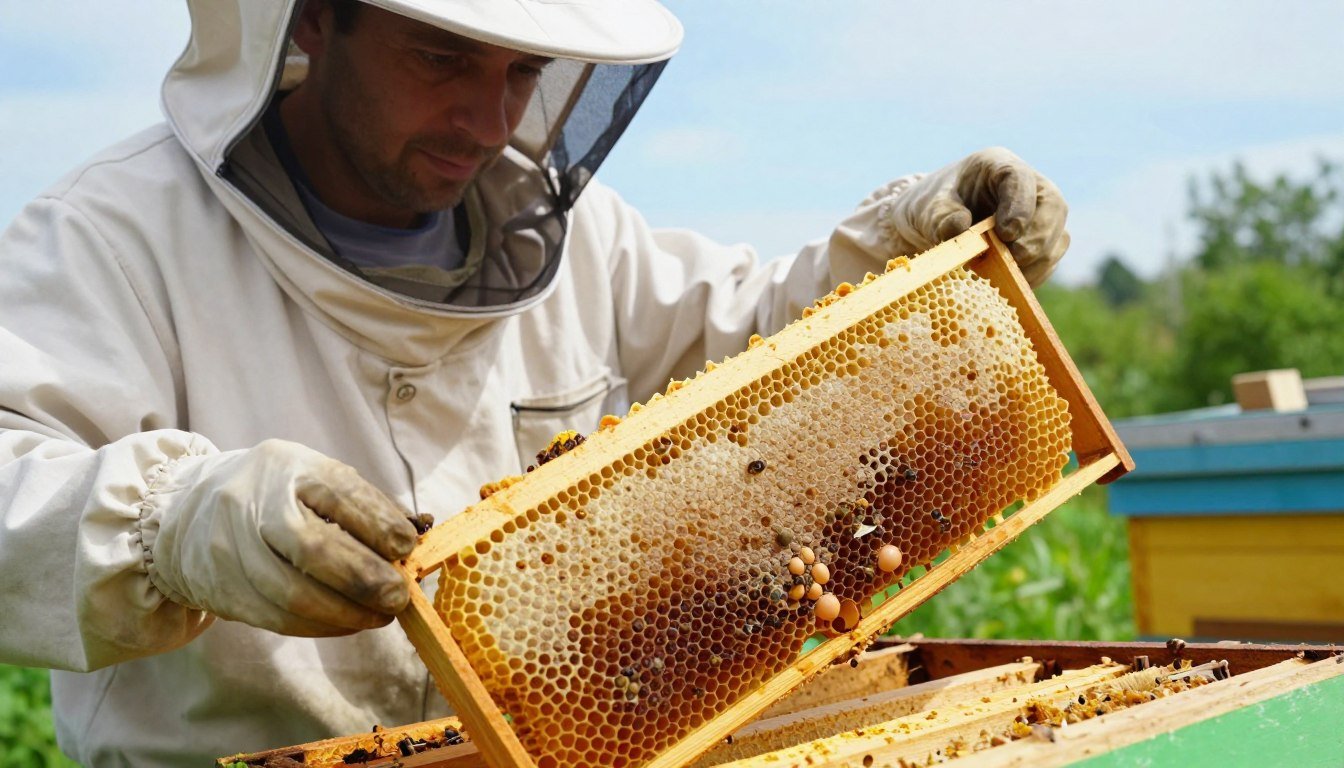
Essential Preparation Before You Open the Hive
A clear checklist and a packed smoker let you move through frames without rushing the bees.
Protective Gear and Tools
Wear a full suit and veil, zipped securely, before approaching any hive. Gloves cut the sting risk but keep fingers nimble. Keep a J-hive tool and brush nearby so you can handle frames with care.
Place your toolbox within reach. A small light and a spare pair of gloves save time when daylight wanes.

Preparing the Smoker
Pack the smoker with dry tinder like scrap newspaper and lightweight material such as dried leaves. Add a few fresh or slightly damp grass clippings on top to keep smoke cooler and gentler on the colony.
- Before opening the hive, make sure your smoker is well lit and has fuel for the full inspection time.
- Give a few puffs of cool smoke at the hive entrance a couple of minutes before lifting the top box.
- Approach the entrance from the side to avoid blocking flight paths during busy days.
When working with multiple colonies, check fuel levels between groups. Careful prep reduces disturbance and helps you finish checks with steady hands and calm bees.
For a practical walkthrough and timing tips, see this primer on your first brood inspection.
How to Inspect Brood for Disease Without Missing Eggs
Use a quick, consistent checklist at every visit so no vital sign is overlooked.
FEDSS — Food, Eggs, Disease, Space, Swarms — guides a focused review of each frame. Start by noting food and pollen stores near the brood. Then hold a frame up to light to confirm the clear presence of eggs in brood cells.
A solid brood pattern signals a healthy queen and even larvae distribution. Check for both worker larvae and any drones. Identifying drones helps assess colony balance and queen status.
Be methodical when checking for disease. Early signs are small and easy to miss. If you see odd cappings or sunken cells, act quickly to protect honey and the rest of the hive.
| FEDSS | Signs to Note | Immediate Action |
|---|---|---|
| Food | Low honey, scarce pollen | Feed or combine frames |
| Eggs | Visible egg presence on frames | Confirm queen is laying |
| Disease | Irregular cappings, discolored larvae | Isolate frames and test |
| Space / Swarms | Compressed brood box, queen cups | Provide more frames or split colony |
For a practical walkthrough and visual tips, consult this first brood inspection guide and a heat-mapping approach at brood pattern heat mapping.
Identifying the Stages of Bee Development
A clear view of each developmental stage helps you judge colony strength fast.
The Role of the Queen
The queen is the heart of the colony. A healthy queen can lay about 2,000 eggs in a single day. She usually begins laying in the lower box on the bottom board and favors the central area of the comb.
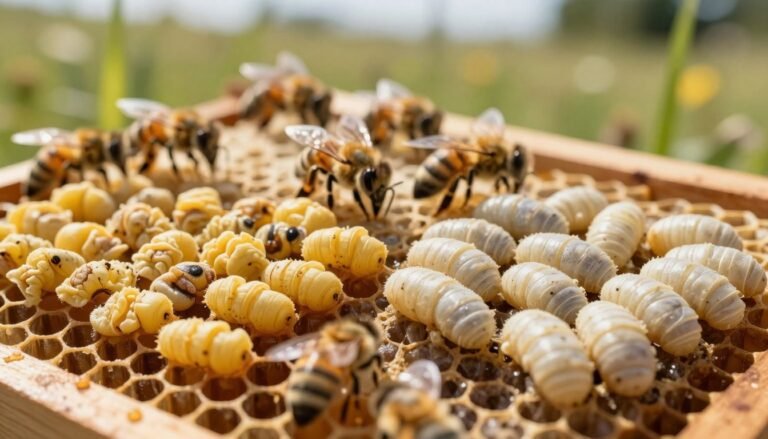
Identifying Eggs and Larvae
Eggs are tiny and upright in cells. Larvae follow, curled in a C-shape and fed by workers. Look in the brood nest frames for these stages to confirm steady production and note any gaps.
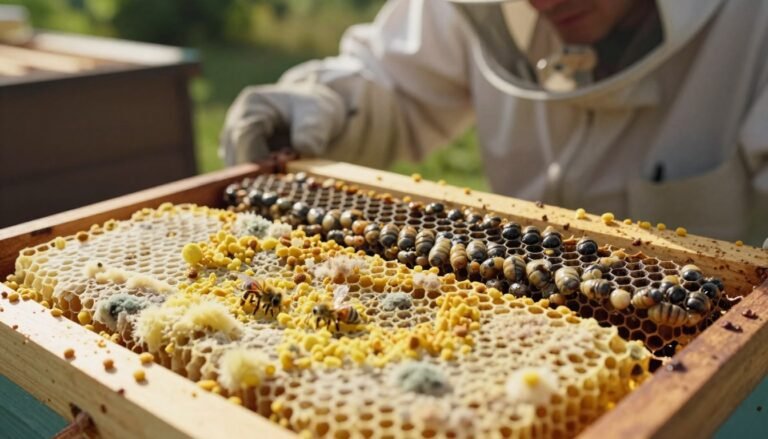
Understanding Capped Brood
Worker bees cap cells once the larva becomes a pupa, often around day nine. Drone cells are larger and have a convex, rougher cap. Queen cells are elongated and signal potential swarming or replacement.
“Observing the transition from egg to larva to capped cell lets you track colony health and timing.”
| Stage | Appearance | What it signals |
|---|---|---|
| Egg | Small, white, upright | Active laying; queen present |
| Larva | C-shaped, creamy white | Good nurse care; healthy nutrition |
| Capped brood | Flat or domed cap | Near-emergence; pupal stage |

For a practical checklist on keeping frames and nest areas clean during checks, consult this apiary hygiene checklist.
Interpreting the Brood Pattern for Colony Health
A clear, dense brood area shaped like a football often marks a vigorous colony.
Look for a solid oval of cells centered on frames. That shape shows the queen favors the middle and keeps larvae close for even warmth.
Pollen is often stored beside the nest while honey sits in the lighter capped cells above. This layout stabilizes temperature at night and supports growth.
- Healthy sign: a continuous run of eggs, larvae, and capped brood across central frames.
- Warning sign: a spotty brood pattern can indicate queen issues or the start of disease.
- Management tip: maintain correct frame order and space in the brood box to avoid stress and reduce swarm drive.
Watch for the rainbow effect where brood is ringed by pollen and capped honey at the top. That pattern shows good resource placement and strong colony rhythm.
For advanced monitoring, consider thermal brood mapping with equipment guides like thermal brood mapping. That method gives a quick visual of nest presence and areas needing attention.
Recognizing Signs of American Foulbrood
Spotting early, specific signs in capped cells protects the rest of the colony from a fast-moving infection.
American Foulbrood (AFB) attacks larvae after workers seal cells. Look for sunken, dark, or perforated caps across frames. These are often the first visible symptoms in a hive.
Tilt the frame toward sunlight to reveal a coffee-brown scale that clings to the lower wall of brood cells. That sticky, hard scale is a definitive sign and can be hard to remove from comb and the frame.

The Matchstick Test
The simple matchstick test helps confirm suspect remains. Gently insert a match or matchstick into a capped cell. If the remains rope out 25 mm or more, that indicates advanced AFB.
Act quickly: AFB spreads fast between frames and hives. Early detection limits loss of larvae and protects honey and comb integrity.
- Watch for sunken or perforated capped brood and discolored larvae.
- Check the lower wall for coffee-brown scale that adheres firmly.
- If you suspect AFB, contact authorities at 136 186 for sample help and confirmation.
- Refer to official guidance on American Foulbrood diagnosis and control.
“Early detection is critical; AFB can quickly destroy the brood nest and spread through colonies if left unchecked.”
For related visual signs and differential notes that help separate chilled or other problems from AFB, see this practical field reference: identifying chilled brood.
Detecting European Foulbrood Symptoms
When larvae sit twisted on cell walls and turn yellow or brown, suspect European Foulbrood (EFB).
EFB most often affects larvae before their cells are capped. Infected larvae may lie curled or bent against the walls of the cell and show a soft, watery texture.
Use the matchstick test: remains will usually stretch only about 18mm before breaking. That contrasts with other infections and helps guide a quick field check.
- Larvae often dry into a rubbery scale that is yellow‑brown.
- Scales from EFB are usually removable without harming comb or frames.
- Irregular patterns across frames and boxes may appear as the problem spreads through colonies.
Distinguish EFB from other threats by noting the twisted posture and the easy removal of scales. If you are unsure, contact local apiary officers for confirmation and next steps.
Managing Chalkbrood and Sacbrood Infections
Small, stiff mummies on frames or the bottom board often signal a fungal problem that needs quick attention.

Chalkbrood turns larvae into hard, chalk-like scales. Colors range from white to dark blue‑grey or black. You will often find these mummies on the bottom board or near the entrance as workers clean the hive.
Recognizing sacbrood virus
Sacbrood causes larvae to gape into a gondola or banana shape, the head raised toward the cell opening. Infected larvae may appear fluid-filled and sit at the top of capped cells.
| Infection | Key sign | Where found | Action |
|---|---|---|---|
| Chalkbrood | Hard, chalk-like mummies | Bottom board, entrance, frames | Improve ventilation; remove affected frames |
| Sacbrood | Gondola-shaped larvae in cells | Capped cells in brood area | Maintain good nutrition; monitor queen |
| Both | Irregular brood pattern, torn queen cells | Brood nest and adjacent comb | Provide space; reduce stress |
Management tips: Keep the nest well ventilated and avoid crowding. Regular checks of frames let you spot symptoms early and protect honey and comb. For official guidance, see the official fact sheet on infections and practical prevention ideas at preventing chalkbrood.
Assessing Hive Space and Swarm Indicators
Check signs of crowding every visit; limited space drives colonies toward swarming.
Scan frame edges for elongated queen cells along the bottom. These cells are a strong signal the queen and workers are preparing a split.
Note the number of drones near the hive entrance. A large drone presence often accompanies overcrowding and rising swarm intent.
If the brood box is full, add a second box or extra frames to give the queen room for laying. More space calms bees and keeps focus on stores rather than leaving the nest.
Always examine the edges of frames; queen cells most often start there. Early action — splitting the colony or adding equipment — reduces loss and keeps honey production steady.

- Assess box capacity and rearrange frames if brood pattern is tight.
- Watch entrance activity for many drones or rapid congregation.
- Act quickly: splits or added boxes are practical, proven responses.
For detailed visual cues and management steps, see a guide on diagnosing the signs and symptoms and notes about preparing to swarm.
Best Practices for Replacing Frames and Closing the Hive
Finish each visit by returning frames in the exact order the colony expects; this keeps the internal layout intact.
Maintaining frame order preserves comb orientation, the brood pattern, and the routes bees use every day. Gently lower each frame back into the box so you do not crush bees or disturb cells.
Before seating the inner cover, check that the queen excluder sits correctly between the brood box and any honey super. A misaligned excluder causes traffic jams and stresses the queen.

Always sweep the bottom board and clear debris before closing. Make sure the inner cover is seated evenly and the top is secure. This reduces moisture and drafts that harm the colony.
- Respect original frame order to protect comb and brood pattern.
- Carefully lower frames to avoid damaging cells or harming the queen.
- Confirm the queen excluder is placed between the brood box and super.
- Secure the roof so honey stores and nest remain dry and safe.
“Taking the time to close the hive gently keeps bees calm and preserves the structure they built.”
Conclusion
Short, focused reviews of frames keep your hive organized and your bees calm.
Regular brood inspections are the most effective step beekeepers can take to protect colony health and productivity. A steady schedule helps catch AFB or EFB early, so action can be taken before major loss.
Prioritize safety and good prep each visit: suit, smoker, and gentle movements reduce stress. Monitor space and swarm signs, and watch the brood pattern for clues about the queen and nest strength.
With practice, confidence grows. For practical timing and field tips, see this first brood inspection guide.
FAQ
What is the key goal when examining brood and frames?
The primary goal is to confirm a healthy, continuous brood pattern and spot early signs of illness while preserving eggs, larvae, capped brood, comb and adult bees. Work methodically through frames, keep them level, and avoid flipping or jarring frames so eggs and young larvae remain intact.
When is the best time during the year to check brood and colony health?
Inspect in spring and early summer when the queen lays actively and the colony builds population. Avoid deep winter disturbance unless there’s a clear emergency at the hive entrance or bottom board. Regular checks every 7–14 days during active season help catch problems early.
What protective gear and tools should be ready before opening a hive?
Wear a well-fitted veil, gloves, and a jacket or suit. Bring a smoker, hive tool, frame grip, a clean spare frame, spare box, and an inspection board. Keep a notebook or phone for records and a small brush for gentle bee movement.
How should the smoker be prepared for an effective inspection?
Use clean, cool smoke. Start with bright embers and add fuel like burlap, pine needles or wood shavings. Puff once at the entrance and a few gentle puffs near the top of the frames after opening. Avoid over-smoking; excess smoke stresses bees and can obscure signs on comb.
What sequence is best when removing frames to avoid missing eggs or brood?
Work from the outer frames inward, removing one frame at a time and holding it over the hive box to catch falling bees. Keep frames in the same order and orientation and scan both sides at eye level for eggs, larvae, capped brood, honey and pollen before replacing.
How can I reliably spot eggs and young larvae?
Eggs sit upright at the bottom of cells and look like tiny grains of rice. Use good light and tilt the frame slightly so shadows reveal depth. Young larvae lie curled in a white, shiny bed of royal jelly or brood food. Move slowly; sudden motions can make bees cluster and hide brood.
What indicates a good brood pattern and a productive queen?
A solid, mostly continuous patch of brood with few empty cells suggests a healthy queen. Capped brood should be evenly spaced. Spotty or scattered brood, many empty cells within the brood area, or an abundance of drone cells in worker area can indicate queen or health issues.
What are classic symptoms of American foulbrood to watch for?
Look for sunken, perforated cappings, foul odor, discolored or ropy larval remains and patchy brood pattern. If you suspect American foulbrood, minimize movement, isolate the hive, and contact your state apiarist or a local beekeeping association immediately for testing and legal removal options.
How is the matchstick test used for foulbrood diagnosis?
Gently probe a suspected cell with a sterile matchstick; if infected brood pulls into a sticky, ropy strand, that indicates American foulbrood. Disinfect tools afterward and avoid using the matchstick across hives. Follow local guidelines for confirmation and mandatory reporting.
What signs point to European foulbrood in larvae?
European foulbrood often produces twisted, discolored larvae that lie partly out of their cells, with sour odor but less ropiness than AFB. It commonly affects younger larvae and appears as irregular brood patches; stress from cold or poor nutrition often contributes.
How do I recognize chalkbrood and sacbrood infections on frames?
Chalkbrood produces gray or white “mummies” that can be ejected from brood cells and seen on bottom boards or at the hive entrance. Sacbrood presents as elongated, fluid-filled larvae that dry into a sac shape. Note presence, count affected cells, and adjust management accordingly.
What management steps help with chalkbrood or sacbrood?
Improve ventilation, reduce stressors, ensure adequate forage and nutrition, and replace heavily infected frames with clean combs. Requeen if the colony shows chronic susceptibility. For severe cases consult extension services for targeted advice and treatment options.
How can I assess whether the hive has enough space or is preparing to swarm?
Check for congestion: many bees, crowded brood frames, rich nectar stores overflowing into upper boxes, and numerous queen cups or swarm cells along frame edges. A sudden drop in queen-laid eggs or increased drone production can also signal swarming intent.
What are the best practices when replacing frames and closing the hive?
Return frames in their original order and orientation. Gently lower the frames into place and keep the brood nest centered with adjacent honey and pollen cells. Replace inner cover and snug roof, reduce entrances if needed, and make minimal, quiet movements to lower stress on the colony.
How should I maintain frame order during inspections?
Use a marking system on the top bars or keep a sketch or photo of frame layout before removal. Place each frame on a stand or edge in sequence and replace them in the same order to preserve brood nest structure and queen pheromone distribution.