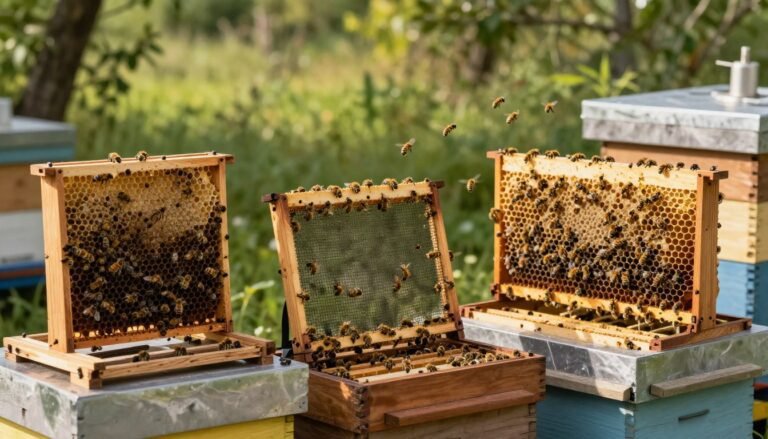
Summer in southeast Georgia often brings a sudden stop to the nectar flow. When natural food sources fade, a hive can become an easy target. Protecting your colony with a quality robbing screen for beehives helps keep honey stores safe.
These protective devices give guard bees a chance to spot and repel intruders. A well-designed mesh style encourages congestion at the entrance so guards can watch suspect flight patterns and act.
This short guide explains why installing effective screens matters and how the right gateway placement and airflow improve defense. You will learn practical steps to build and fit a barrier that keeps your bees secure throughout the year. For detailed design insights, see this study on modern designs that work with a colony’s guard behavior: robbing screens design.
Key Takeaways
- Install a quality protective device before the summer dearth to guard stores.
- Small, central gateways at brood level and shaded entries help guard recognition.
- Mesh-type barriers often misdirect scent plumes and reduce intruder success.
- Congestion and visible investigatory flight trigger guard-bee activation.
- Combine a proper barrier with active colony defense for year-round protection.
Understanding the Threat of Hive Robbing
When nectar dries up in July, empty foragers set off a chain reaction that can endanger weaker colonies. This shift makes hives attractive targets as hungry insects seek stored honey.
The nectar dearth lowers food availability and raises pressure in the apiary. Scouts that find a vulnerable hive return and recruit others. A single scout can lead to a coordinated attack in a short time.
The Nectar Dearth
The scent of ripening honey acts as a powerful attractant. When foragers come back empty, they are more likely to join raids. Loss of a queen or a weak population speeds decline if the attack continues.
How Robber Bees Recruit
- Scout bees mark a target and signal home, bringing robbers to the entrance.
- Guard forces try to defend stores but can be overwhelmed by numbers.
- Well-placed devices and tactics can disrupt scent trails and confuse intruders.
Beekeepers who recognize these behaviors can act quickly. For practical prevention steps, see preventing robbing behavior.
Identifying Signs of a Robbed Colony
Early detection of raid behavior gives you the best chance to save a struggling colony. Watch the landing board and the area around the hive entrance closely during dry, hot spells.
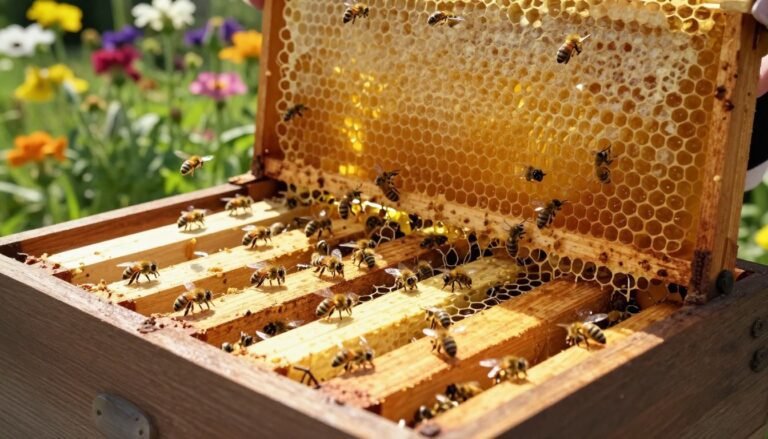
Common signs include bees fighting at the entrance and multiple attackers harassing a single worker. These bouts often look like spinning or chaotic skirmishes on the landing board.
A large number of dead bees near the front is a clear warning. You may also find wax flakes on the bottom board or torn cappings where intruders have opened stores.

Temperatures above 86F and no rain raise the chance of attacks that can collapse a weak hive. If you see these behaviors, act quickly to reduce the entrance and add protection.
- Monitor hives daily during summer droughts.
- Look for fighting at the entrance and dead bees on the ground.
- Check for torn wax cappings and wax flakes on the bottom board.
| Sign | What to Look For | Immediate Action |
|---|---|---|
| Entrance fighting | Spinning bees, scuffles at the landing board | Reduce the entrance, observe guard behavior |
| Dead bees | Many corpses near the hive | Clear board, tighten entry, check colony strength |
| Torn cappings | Wax flakes or opened cells | Install a protective device and limit access |
| Weather trigger | Temps >86F and no rain | Increase monitoring and reduce entrances |
For practical answers to common cases, see this robbing bees Q&A.
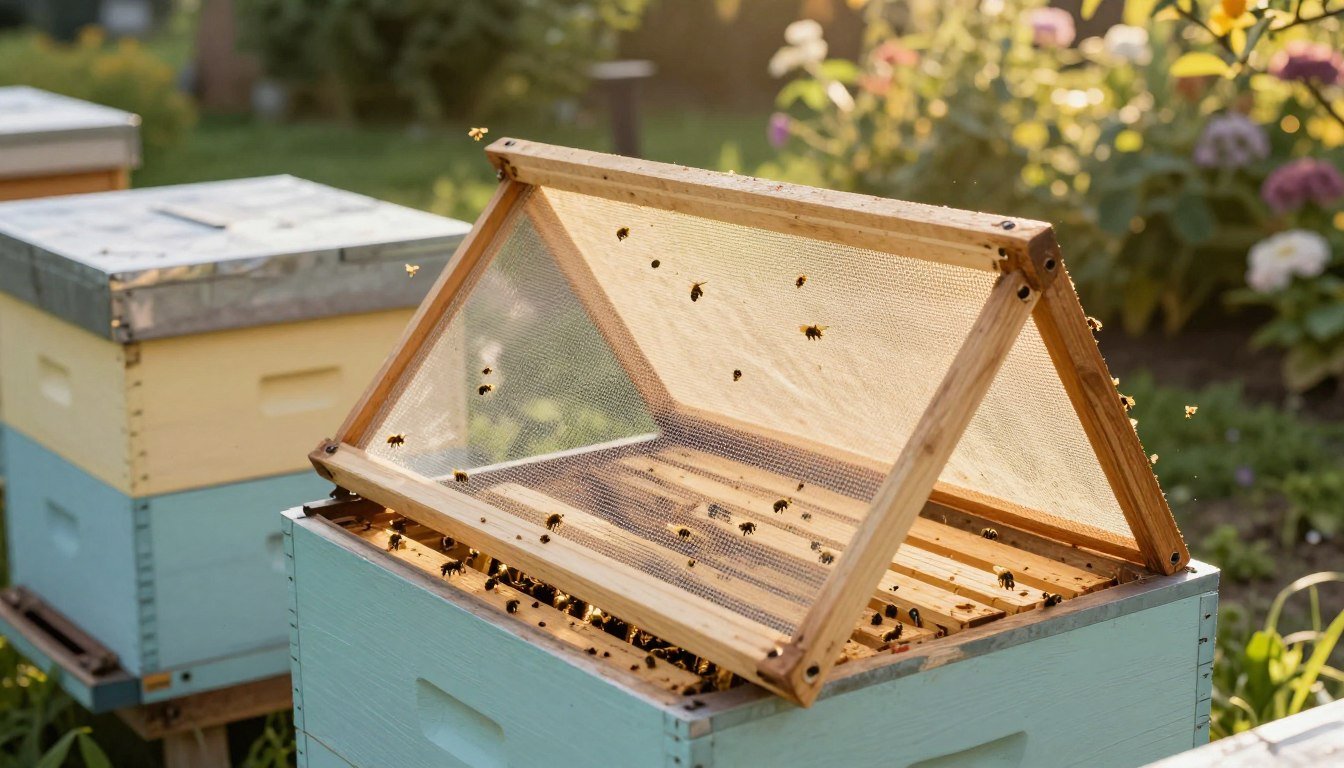
How a Robbing Screen for Beehives Functions
By altering flight paths, a well-built mesh device confuses would-be intruders before they find the opening.
A robbing screen works on bee behavior. Intruders follow the scent of honey and head straight to where they expect an entrance. The mesh forces these robbers to collide with the barrier while resident bees use pheromone trails to locate the actual entry.
Good screen design places the true entrance out of line with the scent plume. The smell is pulled toward the top of the barrier, sending robbers on a false path.
- Confusion: Robbers hit the mesh and fail to find the hive.
- Pheromone advantage: Resident bees follow familiar trails to the entrance.
- Ventilation: The device keeps airflow so the colony breathes normally.
- Year-round protection: It is a time-tested way to help prevent robbing and protect honey stores.
Understanding this simple mechanism helps every beekeeper choose and fit the best device to protect their hive and let guard bees do their job.
The Role of Guard Bees in Hive Defense
Guard bees act as a living security system, using scent and motion cues to sort friends from foes. These individuals patrol the entrance and assess each visitor. Their vigilance is the first line of defense against attacks on honey stores.
Activation depends on context. Research shows guards respond to the smell of non-nestmates and to jerky, swaying movements at the front. During a strong nectar flow they relax. In a dearth, they tighten control and reject outsiders more often.

Activating the Guard Force
- Randy Oliver’s studies highlight that scent and motion trigger guard action; see Randy Oliver’s research.
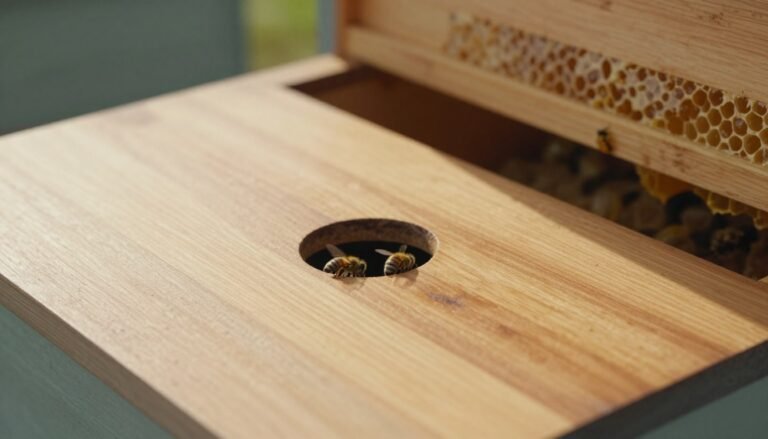
- Using an inner cover as a bottom board creates a smaller entrance that concentrates the guards.
- The protective device should complement guards so resident bees can identify and intercept intruders.
- Guard numbers shift through the year with nectar flow and colony strength; support them to improve survival.
Practical note: Learn how to spot early signs of attack and how guard behavior changes at this guide to identify robbing behavior early.
Essential Tools for Building Your Own Screen
A simple set of tools and a clear plan are all you need to build a protective entrance that fits your hive. Gather a staple gun with staples, a measuring tape, pencil, hammer, saw, and nails before you start.
The main materials are window screen and furring strips. These cost under $10 at most hardware stores, far less than a $15–$20 store-bought unit.
Design tips: cut side pieces and top and bottom boards to match the hive opening. Fit the frame snugly against the bottom board so no gaps remain.
- Measure twice and mark with your pencil before cutting the wood.
- Staple the metal mesh tightly and add a central support brace to prevent sagging.
- Use common nails or screws to fasten boards; a tight fit keeps out intruders while allowing airflow.
Build one well and you get a durable, low-cost robber screen that protects stores and complements your colony’s guard behavior for years.
Measuring and Cutting Your Materials
Accurate dimensions are the foundation of a durable frame; measure the side rails on the bottom board first. Use a tape and mark both rails so the frame will sit flush against the hive entrance.
Cut two long pieces from furring strips for the sides and two shorter pieces for the top and bottom boards. Use a saw and keep cuts square so the frame is stable.
Leave an entrance notch about 3/4 to 1 inch wide in the bottom piece so bees can pass freely. Double-check that the wood width matches the hive opening before you cut.
- Measure twice and mark the rails to avoid wasted material.
- Cut the metal mesh slightly larger than the frame so it can be pulled tight and stapled securely.
- Use the side rails of the bottom board as your guide to ensure a snug fit.

Proper preparation of these boards makes assembly smooth and ensures the finished unit protects stores while allowing ventilation. For related tips on finishing and preserving a cover, see hive cover painting tips.
Assembling the Frame and Mesh
Start by squaring the frame so the mesh will sit tight and hold tension under stress. Lay the long side boards and short end pieces on a flat surface. Nail the short pieces to the long sides, checking that each corner is square and the structure is sturdy.
Stapling the Screen
Carefully stretch the metal window mesh over the finished frame. Use a staple gun and high-quality staples to secure the mesh to the wood.
Pull the mesh taut as you work. Tight tension prevents gaps and keeps insects from pushing through. Staple along one long side, then the opposite side, finally working the short edges.
Attaching Support Braces
Attach a bottom support brace to the board at the base of the mesh. This brace keeps the mesh from sagging and lets you adjust tension if the fit is not snug.
- Fasten the top board securely to the side pieces to complete the frame.
- Use a bottom brace to fine-tune mesh tension and block gaps.
- Inspect all staples and joints; replace any that feel loose.
Proper assembly and the right materials give you a durable robber screen that complements colony defense and lasts through heavy use. For a step-by-step plan, see the building plan.
| Step | Action | Why it matters |
|---|---|---|
| Frame assembly | Nail short pieces to long boards; check squareness | Ensures snug fit and even tension on mesh |
| Stapling mesh | Stretch metal mesh, staple along edges with quality staples | Prevents gaps and resists weather or heavy activity |
| Bottom brace | Attach support at bottom; use to adjust tension | Stops sagging and maintains barrier integrity |
Installing the Screen for Maximum Effectiveness
Fitting the barrier at night reduces daytime chaos and helps the colony adapt quickly. Install after dusk so returning foragers wake to a single, familiar opening by morning.
Position the unit so it sits snug against the hive with only a narrow passage for resident bees to use. A tight fit stops gaps at the sides and reduces chances that robbers slip through.
If the frame does not clamp perfectly, secure it with bungee cords to hold the top and bottom firmly to the bottom board. This temporary hold prevents shifting while guards re-learn the new path.
The device works by forcing intruders to search for the true entrance while your guards patrol the front and sort friends from strangers. Proper placement also pulls the scent plume away from the opening, confusing would-be attackers.
Check the attachment regularly through the year and after heavy weather. Small maintenance visits keep the fit tight and help you prevent robbing during droughts.

For safe feeding methods that reduce colony stress and lower attack risk, see feeding bees without causing robbing.
Managing Congestion and Forager Confusion
A new entrance device often causes a few days of traffic jams as bees relearn the way in and out. Expect a short adjustment period when you add a protective screen at the hive opening. Many foragers will hesitate, and a few may drift to nearby hives.
This brief confusion is normal and rarely long‑lasting. Most workers find the new hive entrance within two to three days and resume normal collecting. The temporary crowd can actually help by making the front look busy and intimidating to any would‑be robber.
Monitor activity each day. If confusion persists beyond a week, slightly shift the unit or widen the visible opening so guards can better guide incoming bees. Balance security with easy passage to keep the colony strong through the nectar dearth and the rest of the year.

- Expect short-term congestion as bees adapt.
- Some drifting may occur, but most return quickly.
- Adjust placement if problems continue to ensure safe access.
For a deeper look at the threat and mitigation tactics, read this guide on the threat of robbing.
Advanced Design Considerations for Apiary Security
Small changes in entrance layout can make a big difference in colony security. Use proven design elements to help guards identify friends and block intruders.

Optimizing Entrance Placement
Dr. Harry Laidlaw’s original robbing screen concept still guides modern design.
Research by Butler and Free (1952) shows guards flag robbers by a swaying flight pattern near the opening. Place a small, central entrance at bottom board level so resident bees can sort traffic quickly.
- Shading: Keep the entrance out of direct light so guards see the primary way into the nest.
- Scent control: Design the unit to pull the scent of honey away from the opening.
- Materials: Use durable metal mesh and rot‑resistant wood to last through the year.
| Feature | Benefit | Action |
|---|---|---|
| Central, low entrance | Better guard control | Place at bottom board level |
| Shaded opening | Clear visual cue | Use an overhang or cover |
| Adjustable fit | Seasonal tuning | Allow removable braces or slots |
Tip: Refine settings across the year to prevent robbing while keeping ventilation and access steady.
Seasonal Maintenance and Storage
Routine attention to the frame and mesh prevents rust, rot, and unexpected gaps.

Inspect each unit at the start and end of the active year. Check wood boards and the bottom board for splits and loose fasteners. Tighten staples and replace any corroded mesh.
Adjust the entrance depending on season. Use a wide opening in summer to aid ventilation and honey ripening. Switch to a restricted setting during winter to conserve heat and boost colony defense.
Cleanliness matters. Remove debris and wax buildup to keep airflow steady and scent trails clear. Store screens in a dry, protected spot to avoid rot and rust and extend service life.
A short checklist helps:
- Inspect frame, mesh, and boards for damage.
- Set wide in summer; restrict in winter.
- Clean before storage; keep in a dry area.
| Season | Setting | Key Action |
|---|---|---|
| Summer | Wide entrance | Maximize ventilation; check mesh tension |
| Fall | Transition | Repair damage; prepare storage |
| Winter | Restricted opening | Improve insulation; guard support |
Conclusion
Small, practical changes at the hive entrance deliver outsized protection during dry spells. A proper robbing screen helps guards sort friends from robbers and reduces scent trails that draw attacks.
Protecting colonies is central to good beekeeping. Keep the opening tight, balance ventilation, and choose a simple design that the colony can learn quickly.
Routine checks and timely maintenance keep honey stores secure and stop problems before they spread. If you want alternatives to a basic reducer, see hive entrance reducer alternatives.
Thank you for tending your colony. With care, the queen, guards, and workers can keep the front strong and your hives productive all year.
FAQ
What is the primary purpose of a robbing screen?
A guard device placed at the hive entrance helps prevent aggressive bees from invading a weaker colony and stealing honey during a nectar dearth. It creates a single-file opening that lets colony foragers pass while confusing and deterring intruders.
When should I install a screen on my hives?
Fit the device when local nectar flows end, during prolonged dry spells, or any time you see heightened activity at the entrance that suggests a robbery attempt. Early installation protects nectar stores and gives the resident colony time to adjust.
How does the screen affect my colony’s guard bees?
The screen reduces the workload on guards by forcing visitors to approach through a narrow opening. This gives guards an advantage to inspect arriving bees and reject unfamiliar individuals, helping preserve the queen’s colony and stored honey.
Will a screen confuse my own foragers and reduce foraging efficiency?
There is an adjustment period. Foragers may hesitate briefly but soon learn the new entrance route. Properly sized openings and clear access minimize disruption so the colony resumes normal foraging during the next nectar flow.
What materials do beekeepers typically use to build a screen?
Common supplies include untreated wood for the frame, metal mesh or heavy-duty plastic mesh for the barrier, staples or screws to fasten components, and optional support braces. Choose durable, weather-resistant materials for long-term use in the apiary.
How do I measure and cut materials to fit my bottom board or inner cover?
Measure the hive entrance width and depth, then cut the frame to match those dimensions so the unit sits flush. Allow small clearance for expansion in hot weather. Accurate, straight cuts ensure a tight fit and prevent gaps that robber bees could exploit.
What’s the recommended opening size in the screen design?
Use a narrow, single-file opening wide enough for a single worker bee. This creates a choke point that slows intruders and enables guards to inspect arrivals while letting resident bees pass. Avoid overly large holes that defeat the screen’s purpose.
How should I attach the mesh to the frame?
Stretch the mesh taut and secure it with staples or small screws at regular intervals. Add support braces across the frame if the mesh sags. A tidy, even attachment prevents gaps and reduces places where bees can get stuck or squeeze through.
Can I install the device on any type of bottom board or inner cover?
Yes. Most designs adapt to standard Langstroth bottom boards and inner covers. Ensure the unit mounts firmly and aligns with the hive entrance so bees don’t bypass it by slipping around the sides or under the bottom board.
How do I manage congestion at the entrance after installation?
Monitor the hive during the first few days and widen or smooth the opening slightly if resident traffic backs up. Encourage scouts to find the new route by keeping the landing area clear and avoiding excessive disturbance near the entrance.
Will a screen stop all intruders, including wasps or hornets?
It helps against many small invaders by limiting access, but persistent predators may still probe or try from other angles. Combine the device with good apiary hygiene, reduced honey exposure, and trapping where necessary for broader protection.
How do I optimize entrance placement and orientation in the apiary?
Position hives with entrances away from prevailing winds and direct sun when possible. Orientations that reduce scent dispersion toward neighboring colonies lower the chance of attracting robbers. Small adjustments can improve defense and forager navigation.
What seasonal maintenance does a screen require?
Inspect for wear, replace corroded metal, re-staple loose mesh, and clean accumulations of propolis or debris. Store wooden frames in a dry place during the off-season and treat exposed wood with a safe preservative if desired to extend service life.
Should I remove the device during strong nectar flows?
Many beekeepers remove or open screens once a robust nectar flow returns and colonies expand. At that point the risk of robbery drops and unrestricted traffic improves foraging efficiency. Monitor colony condition and reinstate protection if trouble resumes.