Clear inspection tools make routine hive checks faster and less stressful for colony members. A reliable lens helps you focus on tiny details of the comb and confirm the queen’s laying pattern without guesswork.
Good equipment includes a handy handheld tool and a lens that gives steady magnification and a bright, clear view. Pay attention to handle color and spacing to reduce glare and eye fatigue during field inspections.
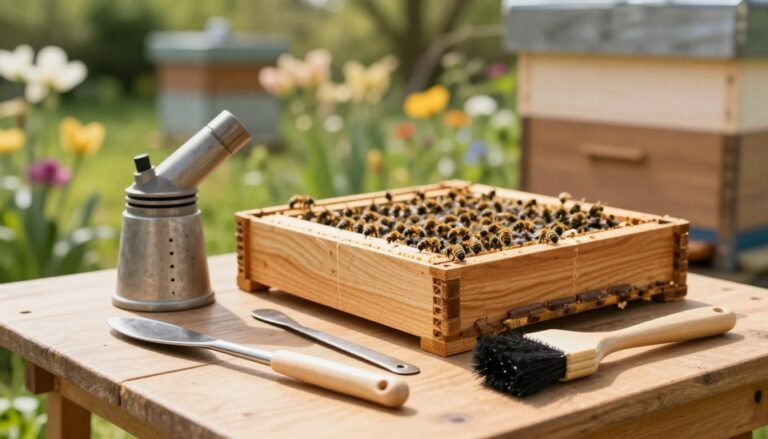
Combining a suitable hive tool, a lighted lens, and a simple brush can save time and protect brood health. For tips on brood mapping and using visual aids during checks, see this practical guide on brood pattern assessment.
Key Takeaways
- Choose a lens with steady magnification and comfortable handle design.
- Use compact tools to reduce disturbance during frame inspections.
- Lighting and spacing affect how clearly you view comb details.
- Plastic or metal parts change tool weight and durability.
- Combine a lens with a simple hive tool and brush for efficient checks.
Why Precision Matters in Apiary Management
Precision keeps colonies productive and lowers the chance of sudden collapse. Close, careful checks let you spot issues that casual looks miss. This is critical when a beekeeper has reduced vision, as in the case of Gerald Nickel, who lost the retina in his left eye in 2012 and now relies on visual aids to continue safe beekeeping.
The Role of Visual Verification
Visual verification confirms queen presence and laying patterns without guesswork. A clear lens lets you focus on comb details and judge if cells hold healthy brood or show irregular signs. Proper use of a hand tool, brush, and lens speeds inspections and reduces stress on the bees.
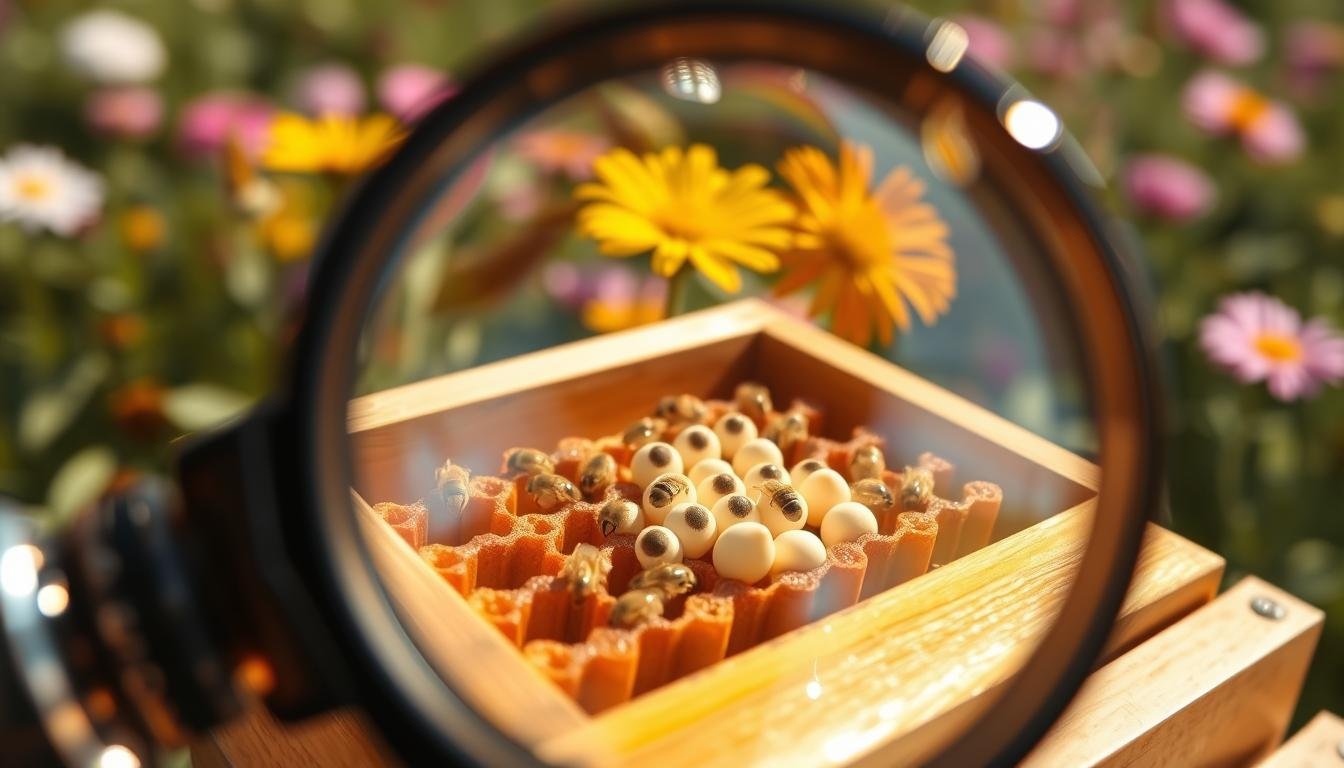
Identifying Elusive Eggs
Elusive eggs can hide in cell corners or under shadowed comb. A steady hand and the right lens reveal centered eggs versus scattered laying. Whether you use a wooden box or a plastic frame, this close view helps you decide if a re-queening or closer monitoring is needed.
Use controlled spacing and good lighting to improve distance and focus. Small accessories, like a compact hive tool or a lightweight brush, complete the kit and keep inspections quick.
- Start with steady lighting and minimal hive disturbance.
- Hold the lens close to the comb, then adjust distance to sharpen the view.
- Record patterns so you can track changes over time.
| Tool Type | Primary Advantage | Common Field Use |
|---|---|---|
| Handheld lens | Fast, targeted magnification | Quick checks of egg placement and comb details |
| Head-mounted visor | Hands-free inspection, adjustable distance | Extended frame reviews and brood mapping |
| Lighted lens accessory | Improved view in shaded boxes | Early morning or late inspections in the field |
For a deeper look at why a magnifying glass is a useful tool in colony checks, see why a magnifying glass matters.
Finding the Best Magnifier for Spotting Eggs in Frames
A precise hand lens with the right grip transforms routine hive checks into reliable, low-stress tasks. For many beekeepers, this choice makes close work in the field faster and more accurate.
A magnifying glass is a useful tool to inspect the bottom of a cell when you cannot find the queen. A quality lens gives clear magnification and a steady view of the comb and honey stores.
Comfort matters. Pick a device with a handle that fits your hand for long frame checks. Consider head-mounted types and lighted options when you need both hands free.

Think about spacing and distance. Iron-framed loupes offer durability while plastic visors are lighter for extended use. An example of a fast inspection: use a head lens to confirm eggs and note laying patterns, then move on without stressing the colony.
For related visual detection tips, see this practical guide on plant pest detection with a magnifying.
- Choose stable magnification that suits your eye and field conditions.
- Match handle, color, and weight to reduce glare and fatigue.
- Test spacing to find the best distance and clear focus on comb details.
Key Features to Look for in Beekeeping Magnification
Adjustable illumination and clear lenses make it easier to read the subtle signs on a frame. Good features cut inspection time and lower hive stress.
Adjustable Lighting
Brightness control on head-mounted visors helps when you inspect deep cells or shaded comb. Professional models let you dim or boost the lamp to match field light.
Magnification Levels
Choose gear with variable magnification so you can shift from a wide field view to tight focus on the queen or eggs.
“Head-mounted visors feature four levels of magnification to ensure you don’t miss a thing during your hive inspections.”
Comfort and Fit
Look for a lens with an adjustable handle or a comfortable headband that fits over a veil. Color, weight, and handle shape all affect fatigue during long checks.
- Durable glass or plastic lenses keep a clear focus.
- Pairs well with a compact hive tool and simple accessories.
- Adjustable features let you tailor inspections to each frame and hive.
| Feature | Why it matters | Typical use |
|---|---|---|
| Adjustable lamp | Improves contrast in dark cells | Late inspections, deep comb |
| Multiple magnification | See broad patterns or fine detail | Queen checks, brood assessment |
| Comfort fit | Reduces eye and neck strain | Extended field work |
Comparing Head-Mounted Visors and Handheld Lenses
A head-mounted visor often wins on convenience. Araluen bought an illuminated multi-power LED head magnifier for $9 on Amazon and found it helped him see eggs and larvae without tying up a hand.
Visors let you flip the lens up to view the whole hive, then flip down for close work on a frame. That flip feature speeds checks and keeps your hands free to use a hive tool or move comb gently.

Handheld lenses give a direct glass view, but one hand is occupied. That can slow you during busy inspections or when handling a queen and a brush.
- Hands-free use: visor keeps both hands free for tools and frames.
- Consistent focus: head-mounted lenses hold a steady magnification in the field.
- Durability: compare plastic and metal frames for long-term service.
| Feature | Head Visor | Handheld Lens |
|---|---|---|
| Hands-free | Yes | No |
| Flip view | Flip-up/down | Not available |
| Best for | Quick field checks and brood mapping | Targeted close inspection |
“The visor helped me keep focus on the queen and laying patterns while I worked,” said one beekeeper.
Assessing Queen Productivity and Hive Health
Close inspection with a steady lens reveals the queen’s recent activity and flags trouble early.
Regular checks let you confirm that honeybee eggs hatch within three days, so finding a tiny egg proves the queen was active very recently. Use a clear glass or plastic lens and a simple tool to inspect each frame with care.
Detecting Irregular Laying Patterns
Look for clustered or multiple eggs per cell. These signs can mean a failing queen or laying worker. A reliable lens and steady magnification make these faults visible in the field and save time.
- Verify brood coverage across the frame to judge productivity.
- Note gaps or scattered cells; they often precede swarming or decline.
- Record patterns and act quickly to protect the hive.
| Indicator | What it suggests | Immediate action |
|---|---|---|
| Single egg per cell | Normal queen laying | Monitor weekly |
| Multiple eggs in a cell | Laying worker or failing queen | Inspect queen presence; consider intervention |
| Patchy brood | Reduced productivity or disease | Check resources, consult beekeeping basics |
Avoiding Common Pitfalls During Inspections
Watch for tunnel vision. Staring through a lens can make you miss the hive’s wider signs, like activity at the entrance or stores of honey.
A magnifying glass is a useful tool, but don’t let close detail replace a quick scan of colony temperament and resource levels in the field.

When you check a frame, step back and take a full view every few minutes. An example good practice is to use your lens to confirm the queen and then close the hive promptly.
Avoid long inspections of a single frame; prolonged handling stresses the bee population and may disrupt laying patterns.
- Keep tools and glass clean and stored safely while working in the field.
- Use a clear, steady lens to see eggs and judge queen movement without lingering.
- Balance detail work with quick hive-wide checks to protect overall health.
For tips on field tool care and simple setups that speed inspections, see field tool safety and minimalist kit ideas at minimalist beekeeping setups.
Conclusion
, Clear optics and simple tools speed inspections and help you act sooner on hive issues. Using a steady lens with the right magnification keeps checks fast and reduces stress on bees.
HONESTBEE offers a range of products that pair durable glass or plastic lenses with practical tools and sensible color choices to cut glare. Pick a device that fits your hand or head so you can scan a frame and still watch the field around the hive.
Follow this guide to choose gear that supports your beekeeping skills. The right investment preserves queen health, boosts honey yields, and makes time spent at the apiary more productive and rewarding.
FAQ
What tools help me check eggs on a frame?
Use a clear lens with 10x–20x magnification, a headband visor with built-in LED light, or a pocket loupe. Combine that with a thin hive tool and a soft brush to steady the comb and move bees gently while you inspect the cells.
How do I position a lens to see tiny eggs clearly?
Hold the frame steady at chest level and angle the comb toward daylight or an LED. Keep the lens 1–3 inches from the comb, adjust focus slowly, and move the lens across cells until the tiny white oval becomes visible. A visor frees both hands and helps keep a consistent distance.
What magnification range is ideal for viewing brood and eggs?
Start with 10x for a broader field and switch to 15x–20x when you need detail. Higher power narrows the view, so balance magnification with comfort and lighting to avoid eye strain during longer inspections.
Are plastic lenses acceptable or should I choose glass?
Glass offers clearer optics and resists scratching over time. High-quality acrylic can be lighter and cheaper, but it may scratch and distort. For frequent inspections, invest in optical glass or a coated lens to maintain clarity.
Do built-in lights on visors make a real difference?
Yes. Adjustable LED lighting eliminates shadows and brings out the contrast between eggs, larva, and cell walls. Look for dimmable LEDs and multiple color temperatures to match different hive and daylight conditions.
Can I inspect frames without removing bees completely?
Yes. Use gentle smoke, a soft brush, and a steady hand. A head-mounted visor lets you work with both hands while keeping bees calm. Focus on one frame at a time and limit inspection time to reduce colony stress.
How do I tell a queen egg from a worker egg at a glance?
Eggs themselves look similar, but egg placement and cell type give clues. Queen eggs appear in larger, vertically oriented queen cups or on the center of cells prepared for queen rearing. Regular worker eggs sit at the bottom of worker-sized cells in consistent patterns laid by a productive queen.
What common mistakes reduce inspection accuracy?
Rushing, poor lighting, using low-quality lenses, and holding the lens at inconsistent distances are frequent errors. Also avoid excessive smoke and long inspection sessions that agitate the bees and make visual checks harder.
How often should I check eggs to assess queen health?
Inspect brood patterns every 2–4 weeks during the active season. Regular checks let you spot spotty laying, gaps, or drone-rich patches that can indicate queen decline or disease.
Are head-mounted visors better than handheld lenses?
Head-mounted visors free both hands, maintain a steady viewing distance, and are best for longer inspections. Handheld loupes offer higher magnification and portability for quick checks. Choose based on inspection style and comfort.
What accessories improve egg inspection success?
Carry a quality hive tool, soft bee brush, portable LED work light, replacement batteries, and lens cleaning cloths. A small notebook or app helps record queen performance and brood patterns over time.
How do spacing and frame type affect egg visibility?
Wider frame spacing and older comb can obscure cells. Fresh foundation and consistent frame spacing keep comb flat and cells uniform, making eggs easier to spot. Repair or replace warped frames and dark, overused comb that hides details.