Early detection is critical when pests invade bee colonies. The tiny invaders were first confirmed in the United States near Charleston, South Carolina, in 1996, and they can wreck comb and honey fast.
Adult beetles are compact and hide in dark corners of the hive. Females lay eggs in cracks near brood cells, and larvae feed on honey, pollen, and brood. Their activity can trigger fermentation and a foul, slimy mess that repels bees.
Look for greasy sheens on combs, honey that weeps from cells, and a rotten-orange odor. Check under covers, in frame corners, and on the bottom board. For detailed field clues and practical signs, see this guide on identifying damage: identifying SHB damage.
Key Takeaways
- Watch early: quick signs save colonies from collapse.
- Adults hide; inspect dark crevices and frame corners.
- Larvae ferment honey, producing a foul, slimy mess.
- Greasy comb sheen and weeping honey are key clues.
- Record sightings and act promptly to protect hives.
Understanding the Small Hive Beetle Threat
Aethina tumida is an invasive pest that threatens apiary productivity and hive stability in the United States.
Native to South Africa, this species coevolved with the Cape honey bee and rarely causes collapse there. In the U.S., the first confirmed report came in 1996 near Charleston, South Carolina. A later introduction in Florida in 1998 allowed populations to establish widely.
The impact is clear: these beetles feed on honey, pollen, and brood. Their activity can ruin comb and force bees from their colony.
“Beekeepers must adapt management practices when natural defenses are absent.”
- Rapid spread: documented movement across states since 1998.
- Resource loss: food stores and brood can be destroyed.
- Support: Florida Department of Agriculture provides guidance and resources for local apiaries.
How to Recognize Small Hive Beetle Slime Out
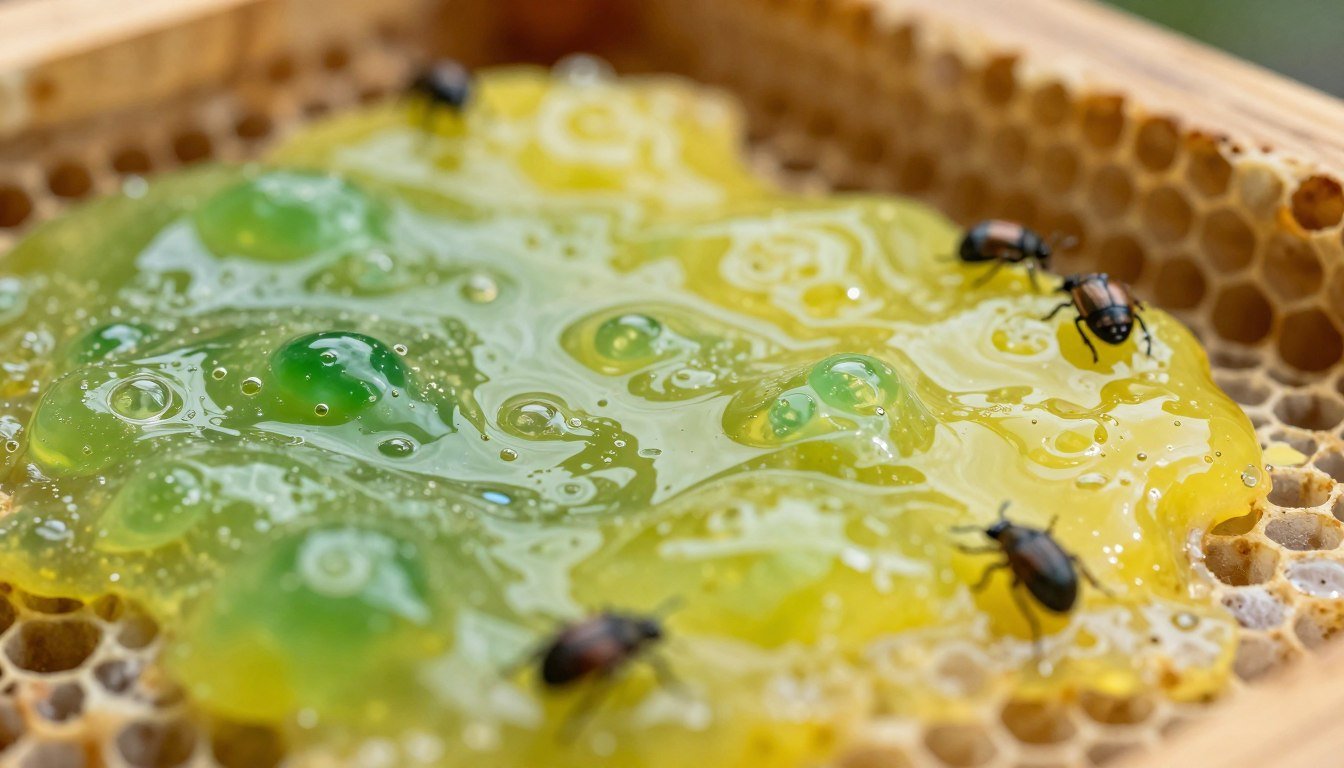
A telltale sign of an active infestation is comb saturated with frothy, fermented honey that beads and runs.

Visual Indicators of Slime
Look for a syrupy film on comb and wax. Honey may froth and weep from cells, and pollen piles can turn wet and collapsed.
Frothing honey and a greasy sheen on frames point to larval feeding and rapid fermentation.
The Odor of Fermentation
The scent is distinct: rotten oranges from fermenting stores. That smell comes from Kodamea ohmeri, a yeast housed in larval guts and passed in feces.
“Fermentation odor often draws adult beetles, worsening an infestation fast.”
- Eggs hatch in about 24–48 hours under warm conditions, speeding damage.
- Larvae feed on brood, honey, and pollen, turning comb into a sticky mass.
- Adults follow volatile odors and can migrate between hives, spreading the problem.
| Sign | What it means | Action |
|---|---|---|
| Frothing honey | Active fermentation | Inspect frames; remove affected combs |
| Greasy sheen | Larval feeding on wax | Treat colony; consider trapping |
| Rotten-orange odor | Yeast-driven spoilage | Check adjacent hives for spread |
Identifying Adult Beetles in the Apiary
Adult small hive beetle measure about 3–6 millimeters long. They are oval and vary from reddish-brown to nearly black.
When active their clubbed antennae are visible. At rest they tuck antennae, head, and legs into a turtle-like posture.
Open a hive and you will see adults darting for dark gaps. They often play dead or hide under frames and in crevices.
“Regular inspections catch adults before eggs are laid and infestations accelerate.”
- Size: ~3–6 mm, compact and oval.
- Behavior: fast runners that hide in supers and beneath frames.
- Distribution: males appear more in supers; females favor brood chambers.
- Identification tip: look for clubbed antennae when beetles move and the tucked, turtle posture when they rest.
Keep frequent checks of colonies and hives. Early spotting of adults limits egg laying and reduces damage. For detailed regional guidance see small hive beetle guidance.
The Life Cycle of Aethina Tumida
Understanding timing gives beekeepers a clear advantage when monitoring hives. The life of Aethina tumida moves fast, linking egg laying in comb with soil pupation close by.
, and pupae with a soft, pale hue. The background should depict a beehive environment with wooden frames and honeycomb, emphasizing a natural habitat. Utilize soft, natural lighting to enhance the organic feel, capturing the intricate details of each life stage. The atmosphere should evoke a sense of careful observation and study, making the viewer feel intrigued and informed about this pest's life cycle. No text or annotations in the image.")
Egg Deposition Patterns
Females lay clusters of eggs in tiny cracks and near brood cells. These eggs hatch within 24 to 48 hours, and tiny larvae begin feeding on brood, wax, and stored honey.
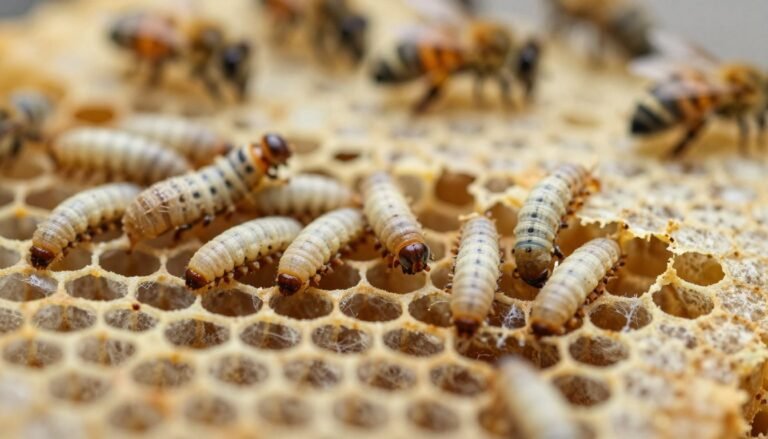
Larval Growth Stages
Larvae pass through four growth stages over about a week. Each stage grows the larva rapidly until it reaches the size needed to leave the comb.
Pupation in Soil
Mature larvae exit the hive and burrow into soil, usually within 900mm of the hive. They pupate at depths of about 100–200mm.
Pupation takes roughly 21 days, after which adults emerge and re-infest nearby hives.
| Stage | Location | Typical duration |
|---|---|---|
| Egg | Cracks near brood | 24–48 hours |
| Larva | Comb (feeds on honey, wax, brood) | ~7 days (4 stages) |
| Pupa | Soil, 100–200mm depth | ~21 days |
| Adult | Hive and nearby areas | Begins new cycle |
“Fast development and nearby pupation explain why infestations can spread quickly between hives.”
Why Larvae Cause Hive Collapse
Larvae can strip a colony of stores and brood faster than most beekeepers expect.
The larval stage of the small hive beetle is the most destructive in the life cycle. Larvae feed voraciously on honey, wax, brood, and bee bread.
The gut yeast Kodamea ohmeri carried by larvae ferments stored honey. This fermentation froths and ruins comb, making the hive environment repulsive to honey bee workers.
Heavy larval infestations often force bees to abandon frames or the entire hive. Even a few larvae found in the brood nest or honey supers signals a weak colony or an expanding problem.
“Rapid larval feeding can turn sound comb into sticky, unusable stores in just a few days.”
- Damage pace: a large outbreak can consume an entire colony’s stores within days.
- Target items: honey, brood, pollen, and wax suffer most.
- Warning sign: larvae in the brood nest usually indicate high infestation or a failing colony.
| Impact | Visible sign | Quick action |
|---|---|---|
| Fermented honey | Frothy, weeping comb | Remove affected frames; check adjacent hives |
| Brood loss | Collapsed or missing brood cells | Assess colony strength; consider requeening |
| Colony abandonment | Empty hive with ruined stores | Sanitize equipment; relocate or replace frames |
| Rapid spread | Larvae in supers and brood | Implement traps and targeted treatments |
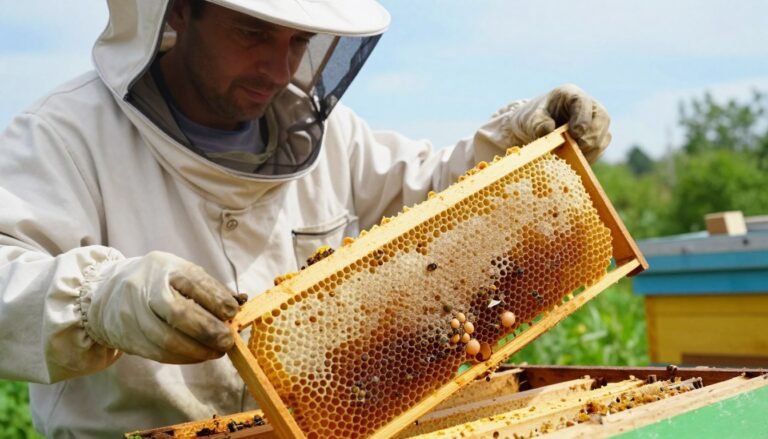
Inspecting Your Hives for Infestation
A quick, careful inspection reveals hiding spots where pests gather and damage begins. Start each visit with a calm plan and a checklist. This saves time and reduces stress for the bees.

Where to Look During Inspections
Underside of the lid: remove the lid and scan the underside. Many adults hide there to escape light.
Lift the hive mat: if a mat is present, lift it and watch for beetles running down comb faces. They often bolt into cells.
Remove supers carefully: place a super on an upturned lid and wait a few minutes. Adults and larvae may move from combs to the lid, making them easier to spot.
- Inspect the bottom board, focusing on back corners where debris and darkness offer refuge.
- Check pollen cakes and open sugar syrup feeders; larvae may hide in sticky stores.
- Examine honey and brood combs for eggs and larvae beneath cell caps before replacing frames.
| Location | What to look for | Immediate action |
|---|---|---|
| Underside of lid | Adults hiding or clustering | Remove and record; treat if many adults found |
| Bottom board (back corners) | Debris, larvae, shed cuticle | Clean board; set traps or replace bottom if infested |
| Supers and combs | Wet or fermented honey, larvae under caps | Remove affected frames; isolate or extract clean honey |
| Pollen cakes & feeders | Larvae, wet mass | Replace feeders; discard contaminated pollen cakes |
Managing Infestations with Chemical Methods
Chemical options give beekeepers a fast, targeted way to curb heavy infestations when traps fall short.
Checkmite+ strips (coumaphos) are the only preformulated in-hive insecticide registered for larval control. Use them sparingly and follow label directions.
Cut the strip in half and staple each piece to a small sheet of corrugated plastic. Place the treated panel on the bottom board so the colony gets even exposure.
- Wear gloves when handling strips and staple them securely so bees cannot drag the material out.
- Replace old comb with new foundation every three years to reduce chemical buildup in wax.
- For wandering larvae and pupae in soil, a permethrin product such as GardStar 40 may be applied around hives, but never used preventively.
“Chemical treatments can break severe cycles, but good technique and rotation are vital for safe beekeeping.”
For practical tips and integrated approaches, see this short guide on effective treatment guidance for beekeepers managing infestations.
Nonchemical Strategies for Hive Protection
Nonchemical tactics give beekeepers reliable, low-risk ways to protect colonies during peak reproductive months. These methods focus on trapping adult pests and reducing suitable sites for eggs and larvae.
Mechanical Trapping Designs
Popular designs include modified screened bottom boards with a sliding tray that holds a killing agent. Entrance traps and reservoir traps placed between frames are common in active apiaries.
Top traps fit beneath the outer cover and catch beetles as they move upward. Reservoir traps sit in frame gaps and trap adults before they lay eggs.
Using Diatomaceous Earth and Other Agents
Food-grade diatomaceous earth is a widely used inert product for mechanical control, but it must be registered as an agricultural chemical where required.
Other killing agents include vegetable oil, mineral oil, soapy water, and propylene glycol. Always choose agents that do not contaminate honey or harm bees.

| Trap type | Killing agent | Placement |
|---|---|---|
| Sliding tray board | Vegetable oil | Under hive |
| Reservoir trap | Mineral oil | Between frames |
| Top trap | Diatomaceous earth (food‑grade) | Under cover |
“Preventing larval outbreaks requires good management plus trapping during April through September.”
Protecting Honey Supers and Extracted Combs
Cold treatment is the most reliable safeguard for supers that show signs of pest activity. Wrap each super in a heavy-duty trash bag and place it in a deep freeze for a minimum of 48 hours. This kills eggs and young larvae and reduces the chance of later infestation.
If a freezer is not available, extract frames the same day you remove supers. Fast extraction shortens the time adult beetles have for laying eggs in comb or cappings. Handle frames promptly and keep the honey house tidy.
Research by Levot et al. (2005) found all life stages are vulnerable to cold, supporting freezing as an effective treatment. After extraction, dispose of slumgum and wax cappings quickly. These residues attract larvae and can seed a problem in processing areas.

“Freezing supers in sealed bags offers a low‑cost, proven step in control for beekeepers.”
| Action | Why it matters | Recommended duration |
|---|---|---|
| Freeze sealed supers | Kills eggs and young larvae | At least 48 hours |
| Same‑day extraction | Prevents egg laying during storage | Within hours of removal |
| Dispose slumgum & cappings | Removes food sources that attract larvae | Immediate; do not store |
When adult beetles are present at harvest, err on the side of caution and freeze supers. For additional processing tips and live demonstrations, see this practical guide on protecting supers during extraction.
Maintaining Apiary Hygiene to Deter Pests
Clean yards and sunny stands make a notable difference. A neat apiary reduces shaded refuges where pests breed and hide. Sunlit hives warm faster and are less attractive to roaming adults and larvae.

Keep routine checks simple and regular. Remove discarded comb, burr comb, and beeswax scraps from around stands. Old wax and slumgum attract beetles and invite egg laying near brood and honey.
Practical steps for strong colonies
- Clean bottom boards: clear debris so dark corners do not offer shelter for adults.
- Place hives in sun: bright locations discourage pests that prefer shade.
- Unite weak colonies: stronger colonies defend stores and brood better than isolated hives.
- Inspect dead colonies: check for American foulbrood before disposal to avoid spreading disease with beetles or comb.
“The Department of Agriculture and Consumer Services recommends keeping colonies vigorous as a key part of pest control.”
For more regional guidance on managing hive pests, see this overview for beekeepers: hive pests guidance.
Conclusion
Effective apiary protection blends steady vigilance with practical routines that keep colonies strong.
Understand the pest life cycle and schedule inspections at key times. Strong bee colonies resist invasion better, and early detection of eggs and larvae limits spread within hives.
Prioritize hygiene, remove debris, and use cold treatment for stored comb and wax. Combine trapping, targeted product use, and good management for reliable control.
For guidance on surveillance, detection thresholds, and integrated measures, consult the EFSA summary on monitoring and eradication efforts: SHB surveillance and control.
With steady effort and the right strategies, beekeepers can limit damage from this pest and safeguard colony health for the long term.