Starting a new colony is a rewarding step for any beekeeper in the United States. A standard package holds about 12,000 live adult workers — roughly three pounds — and that living mass needs careful handling.
Proper installation matters. David R. Tarpy, an Extension Apiculturist at North Carolina State University, stresses correct techniques for early colony success. Gentle, steady work and ready equipment cut stress and losses.
In short, preparation is protection. Have frames, a full brood box, and syrup or candy starter ready. Handle the box calmly, check the queen cage, and follow each step with care to help the new colony settle in.
Key Takeaways
- Typical packages contain ~12,000 workers (about 3 pounds).
- Proper setup and calm handling reduce bee loss.
- Follow expert guidance for a strong start.
- Prepare hive equipment before the bees arrive.
- Small, careful steps make installation less stressful.
Understanding Package Bee Components
Before opening the shipment, know what you have and why each item matters. A standard bees package arrives in a wooden box that acts as a temporary home for the colony. Treat that box gently and keep it sheltered until installation.
What is in a Package
Typical contents include one newly mated queen in a small cage, roughly three pounds of workers, and an inverted can that holds sugar syrup for short-term feed.
Inspect the feeder can on arrival and confirm it is not empty. The workers rely on that syrup during transit and while waiting for transfer into the permanent hive.
Move the shipment indoors or under cover if weather is poor, and plan the next step so the colony spends minimal time in the temporary box.
Temperature Control
Climate management is critical. Overheating above 100°F will kill workers and the queen. Chilling below 55°F can damage the queen’s stored sperm and harm future brood.
Keep packages warm and install them only when ambient temperatures are consistently above 65°F.
Monitor the box and feeder every hour if temperatures are extreme. Proper temperature control at this stage is the most important step for long-term colony success.
- Check feeder syrup before installation.
- Keep the box secured and shaded during short waits.
- Schedule placement on a suitable day—temperature and calm conditions matter.
For practical installation guidance, see installing a new package and basics on beehive installation.
Essential Beekeeping Tools and Safety Gear
A calm start begins with having a veil, smoker, hive tool, and spray bottle within reach.
Protective clothing is the first priority. Wear a veil and closed pants to stop insects from crawling up legs. Gloves and a light jacket add confidence without losing dexterity.
Hand tools make the work efficient. A reliable hive tool removes the wooden panel and pries frames. A smoker keeps the colony settled during each critical step.
Keep a spray bottle filled with warm water mixed 1:1 with granulated sugar. Use this syrup sparingly to hydrate and calm the workers during transfer. Dissolve sugar fully to avoid clogging the nozzle or feeder.
“Have all gear ready before arrival,” recommends Jennifer J. Keller, Extension and Outreach Coordinator at North Carolina State University.
- Veil, gloves, and smoker for safety and calm handling.
- Hive tool for panel and frame work.
- Syrup spray and a feeder for immediate nutrition.
| Tool | Purpose | Tip |
|---|---|---|
| Veil | Protection | Secure under jacket or pants |
| Hive tool | Frame and panel manipulation | Keep one clean, spare nearby |
| Smoker | Calm colony | Use small, steady puffs |
| Syrup spray | Hydration and calm | Mix 1:1 warm water and sugar |

For further setup tips and a practical guide, see installing bee packages.
Preparing Your Hive for New Arrivals
Site selection and simple prep work make the first day calm for everyone. Choose a stable, well-drained place that gets morning sun and part shade. Elevate the box on a stand to prevent rising damp and deter predators.
Remove three or four frames from the center of the brood chamber before you collect the colony. That clear space gives the incoming group an immediate area to occupy and reduces handling time.
Ensure the stand is level and the hive box sits square so frames hang correctly. A tilted setup causes warped comb and stressed workers.
Selecting the Right Location
Position the hive facing east or north in the Northern Hemisphere when possible. This orientation provides gentle morning warmth without overheating the colony in midafternoon.
- Make sure the site is sheltered from high winds and away from heavy foot traffic.
- Finish every prep step before pickup so transfer is quick and smooth.
- A stable, level box helps frames sit flat and supports healthy comb building.
For guidance on moving colonies while limiting disease risk, read best practices for relocating apiaries.
How to Move Package Bees from Shipping Cage to Hive
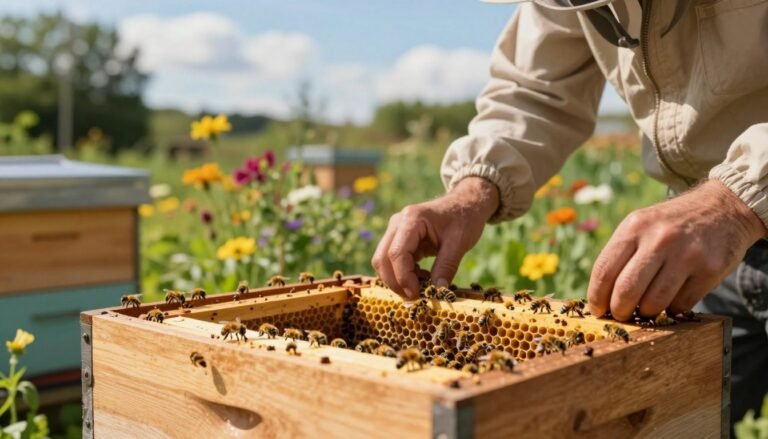
Begin by unfastening the top panel and keeping the queen cage accessible while you work.
Use your hive tool to lift the wooden panel carefully. Remove the tin feeder and set the queen cage where you can reach it quickly.
Give the box a firm knock once on the ground. This helps the bees drop to the bottom so they can be shaken safely into the open space in the hive.
Invert the package over the frames and shake the contents so most workers fall onto the bottom board between the frames. Keep the queen cage out and secure.
Place the remaining bees near the entrance so they can crawl in on their own. Then slide frames back slowly, avoiding crushed workers.
Replace the inner cover and lid, and add a light feeder of syrup if needed. Precise, calm work at each step reduces stress and improves installation success.

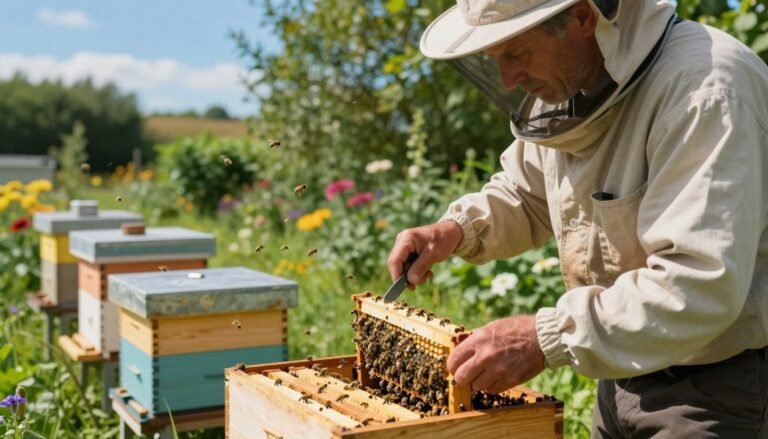
Inspecting the Queen and Colony Health
Before releasing the colony, a focused health check cuts risk and sets the stage for success.
Start your inspection by locating the queen cage and observing the queen through the mesh. Make sure she moves steadily and is not lethargic.
Checking for Queen Vitality
Gently lift the cage and watch the queen for several seconds. If she walks briskly and reacts, you may proceed with the next step.
If the queen is missing or appears dead, document the condition and contact your supplier for a replacement.
Identifying Dead Bees
Inspect the bottom of the box for mortality. About one inch of dead workers is normal in a standard package.
If you find an excessive number, this often signals overheating during transit. Photograph the evidence and notify your vendor promptly.
| Check | Normal | Action if abnormal |
|---|---|---|
| Queen activity | Active, moving | Contact supplier for replacement |
| Dead workers | ~1 inch | Document, report excess mortality |
| Cage integrity | Secure, undamaged | Replace or secure before release |
Every careful inspection helps protect colony health. For timelines on acceptance and detailed disease checks, read checking queen acceptance timeline and guidance on inspecting purchased nucs.
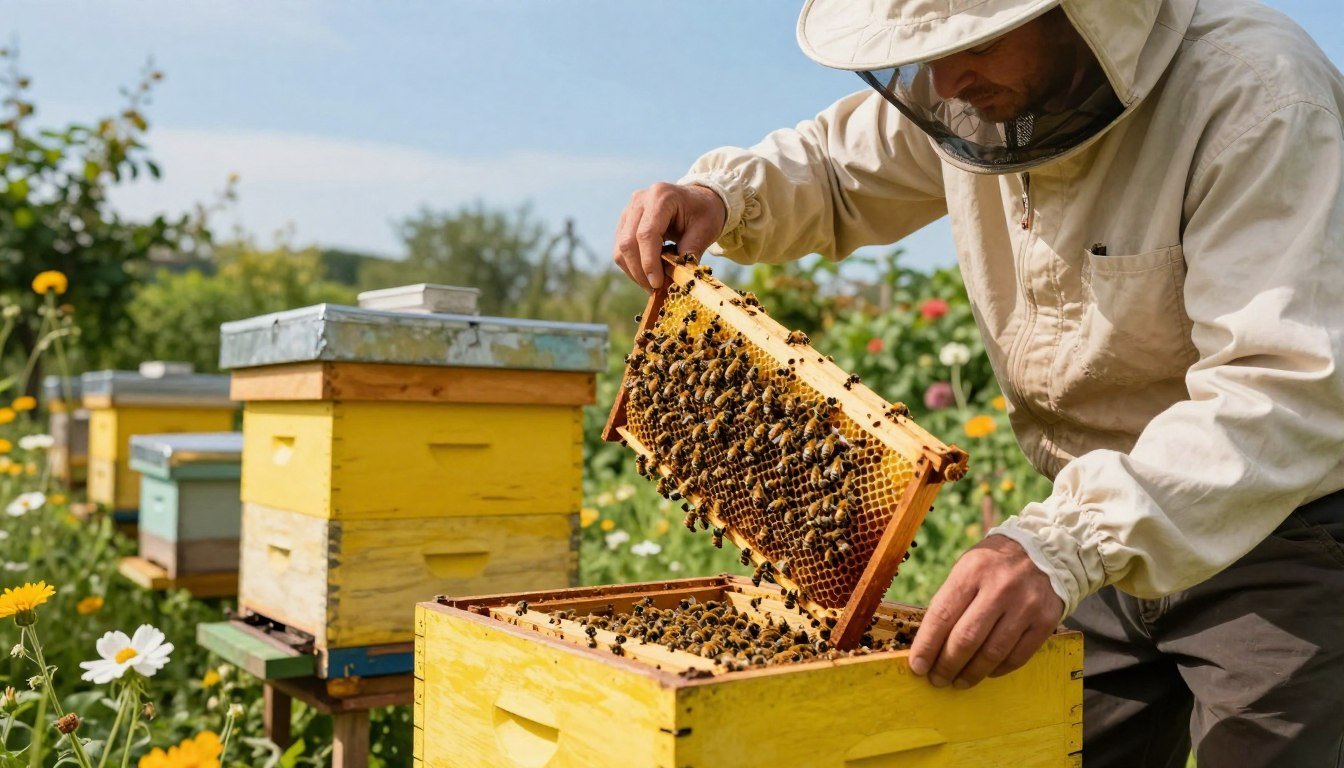
The Shake Method for Installation
Clear roles and quick action make the shake method a top choice for rapid installations. One person shakes while another readies the queen and frames. This teamwork reduces time the colony spends confined in the box.
Core steps include removing the center frames, inverting the package, and shaking workers into the open space between frames. Replace frames rapidly so the newly settled group finds comb and stays inside the hive.
Handle the queen with care. Keep her cage accessible and position her between frames where she is protected. Coordinate each step so she is not harmed during the shake.
- Work with a partner for speed and safety.
- Cover the hive with the empty box for a gentle confining period.
- Use an entrance reducer after installation to limit drifting and help orientation.

For a practical, step-by-step guide on installing package bees, see installing package bees.
The Crawl In Method for Gentle Installation
Place the open box inside the brood chamber and let the workers find frames at their own pace.
This method reduces stress. By letting the colony exit on its own, you lower crushing and shock risks that come with forced transfer. It is ideal for new keepers who prefer a patient, low-impact approach.
Set the container between central frames and position the queen cage where workers can smell her. That scent bond helps acceptance and encourages movement onto comb.
Leave the lid slightly open and fit an inner cover with a small hole at the top. Provide a light syrup feeder nearby if weather is warm and food is needed.
After 24–48 hours, remove the empty box and the queen cage once most workers have crawled out. Check the entrance and replace the cover for security.
- Gentle for the colony, minimal handling stress.
- Slower than a shake but safer for fragile queens.
- Preferred by those focused on long-term colony health.
| Step | Action | Why it matters |
|---|---|---|
| Placement | Set open package between frames | Makes frames accessible; encourages natural movement |
| Queen position | Place cage between frames | Allows scent acclimation; aids acceptance |
| Timing | Wait 24–48 hours before removal | Ensures most workers have entered the hive |
For additional gentle handling techniques and swarm advice, see catching a swarm safely.
Managing the Queen Cage and Candy Plug
Proper handling of the queen cage at installation sets the colony up for acceptance and stability.
Before you set the queen in place, confirm the candy end of her cage is exposed and ready for worker access. Remove the cork from the candy end only. Do not remove the cork at the opposite end; that would release the queen too quickly and risk harm.
Place the queen cage candy-side up between two center frames. Make sure the screen faces outward so workers can feed the queen and eat through the white sugar plug over one or two days.
Proper Placement Between Frames
Secure the queen cage between frames using a wire or string so it cannot slip down to the bottom board. This keeps the queen safe and steady during the critical acceptance period.
- You must remove the cork from the candy end of the queen cage to allow natural release.
- The time-release method helps workers accept the queen by sensing her pheromones.
- Ensure the cage screen is accessible so workers can feed the confined queen.
| Action | Why it matters | Tip |
|---|---|---|
| Remove cork (candy end) | Allows gradual release over 24–48 hours | Use a small tool; avoid touching the queen |
| Place candy-side up between frames | Gives workers easy access to the plug and screen | Center frames reduce drifting risks |
| Secure cage | Prevents falling and crushing | Wire or string across frame top works well |

Once most workers have eaten through the candy, carefully remove queen cage wrapping and then remove queen into the brood area if needed. Replace the inner cover and lid gently and add a light feeder of syrup if the colony shows hunger.
Post-Installation Feeding and Hive Management
Make food availability your first priority after the frames are set and the queen is resting.
Provide a continuous supply of sugar syrup in a top or frame feeder so workers can secrete wax and draw comb on the frames. Refill the feeder often; running out stresses the colony and slows comb building.
Inspect the box five days after installation. At that check, confirm the queen has been released from the cork end of her cage and shows activity.
Keep the inner cover and lid replaced securely. A steady internal temperature helps brood development and protects the bees from weather.
If the colony has not stored enough honey, continue feeding sugar syrup until comb is well drawn. Every step of refilling the feeder matters to prevent early starvation.
Perform a second inspection five days after the first. Look for eggs—tiny, white, rice-like shapes—that indicate the queen is laying and the colony is establishing itself.

For additional seasonal management, review this spring beekeeping checklist and best practices on relocating apiaries.
Troubleshooting Common Installation Issues
Early checks save colonies. Start with a calm, methodical inspection of frames, entrance, and queen cage. Small signs let you act before problems spread.
Queen Acceptance Problems
Check queen activity through the screen. If workers won’t feed her or aggressive behavior increases, consider introducing a replacement queen or uniting with an established colony using the newspaper method.
Comb Building Challenges
If comb is sparse, feed more sugar syrup in the feeder and keep the empty box or inner cover sealed properly. Use your hive tool to remove burr comb built at odd angles so workers focus building on frames.
Drone Brood Issues
Drone brood cells bulge and sit proud of the comb. That pattern often means a failing or poorly mated queen and requires fast action. Replace the queen or unite before the colony weakens.
- Observe frames daily for worker versus drone eggs.
- Ensure inner cover and lid fit tightly to reduce drifting.
- Remove queen cage wrapping only when plan dictates and after you check acceptance.

installing package bees gives detailed steps if you need a refresher during troubleshooting.
Conclusion
Conclude each install by confirming the colony has steady food and a secure shelter. Give the group time and a calm environment so workers and the queen can settle. Check that the bees show normal movement and that the feeder remains available.
Regular inspections matter. Maintain gentle checks on the queen and brood, top up feed when needed, and watch the entrance for orientation flights. Proper attention now reduces problems later and speeds comb building in the hive.
With patience, the right tools, and consistent care, this package will become a thriving hive. Good beekeeping is steady work and reward for any keeper who prioritizes queen health and colony needs.
FAQ
What should be inside a typical bee package?
A standard bee package contains several thousand worker bees and a caged queen, usually in a small wooden or plastic queen cage with a candy or syrup plug. It may include a bulging paper or mesh shipping container and instructions from the supplier. Inspect the package for live bees, an intact queen cage, and no obvious damage before opening.
How do I keep bees at a safe temperature during transit and before installation?
Keep the crate shaded and steady; avoid direct sun and extreme wind. If temperatures are high, place the package in a cool, shaded area or in a cool garage briefly. In cold weather, keep the bees in a warm spot just above freezing until installation. Fast installation reduces stress and improves survival.
What personal protective gear and tools are essential for installation?
Wear a well-fitting veil, gloves if desired, and a light-colored suit or jacket. Bring a hive tool, smoker, sugar syrup in a feeder, and a flat surface for opening the box. A spare frame and a cork or stopper for the queen cage slot can help during the transfer.
How should I position the hive before introducing the colony?
Place the hive on a level stand in a location with morning sun and afternoon shade if possible. Ensure a clear flight path and protection from strong winds. The entrance should face away from heavy foot traffic and toward forage if practical. Leave nearby water sources available.
What is the shake method for installing bees?
With the package over an empty hive box, remove the cork or plug and invert the can or mesh. Shake or tap the bees into the box so most workers fall onto the frames and bottom board. Place the queen cage between two frames or on top bars, secure the inner cover slightly open for ventilation, and add a feeder of sugar syrup.
What is the crawl-in (gentle) method and when should I use it?
The crawl-in method opens the package and places frames next to the cluster of bees so they crawl into the hive at their own pace. This is slower but reduces shock and is helpful in cooler conditions or with nervous bees. Leave the box near the hive entrance so escaping workers can find the new home.
How should the queen cage be placed in the hive?
Position the queen cage between two frames in the center of the brood chamber with the candy end toward the frames so worker bees can access it. Pin or wedge it securely so it won’t fall. Some beekeepers slot the cage into the top bars or use a notch in the frame to hold it steady.
When and how do I remove the candy plug or cork from the queen cage?
Leave the candy plug intact for three to seven days to allow workers to get accustomed and gradually release the queen. If the colony seems calm and attendants have chewed a tunnel through the candy, you can remove the cage after about a week. Use a hive tool and move slowly to avoid crushing bees.
How do I check whether the queen is alive and accepted?
After about seven to ten days, carefully open the hive and look for a laying pattern or the queen herself. Spotting the queen may be difficult; instead, look for eggs or young larvae in multiple cells, which indicates acceptance. If you find the queen dead in the cage or no brood after two weeks, take corrective steps.
What should I do if many bees are dead in the package or hive after installation?
Remove dead bees from the bottom board and assess for signs of disease or mite infestation. Check the queen cage and escorts for activity. Ensure adequate ventilation and proper syrup feeding. If mortality is high, contact your supplier and consider replacing the colony.
How long should I keep the inner cover adjusted and the entrance partially blocked?
Keep the inner cover slightly propped and the entrance reduced for the first few days to help the colony orient and prevent robbing. After three to seven days, when bees are flying and bringing in nectar or syrup, open the entrance fully. Watch for signs of congestion or heat stress and adjust as needed.
What feeding regime works best immediately after installation?
Provide a 1:1 sugar syrup in an in-hive feeder or entrance feeder to encourage comb building and brood rearing. Refill as needed for the first two to four weeks until natural forage is available. Avoid overfeeding with heavy syrup that can ferment or drown bees.
How do I encourage comb building and honey storage in a new colony?
Ensure the hive has drawn foundation or empty frames near the cluster and maintain steady syrup feeding. Position frames so bees can work the center of the brood box. Minimize inspections in the first few weeks to let bees focus on drawing comb and establishing the brood nest.
What steps help prevent queen rejection or supersedure after installation?
Use the candy-release method, place the cage among frames with attendants, and avoid rough handling. Reduce colony stress by providing syrup and shelter, and avoid introducing another queen. Monitor for laying patterns; if workers stop feeding the caged queen or show aggression, act promptly.
How should I handle stray or remaining bees in the empty package box?
Hold the empty box near the hive entrance for a short time so stragglers can find the colony. Brush a few remaining workers into the hive if needed. Clean the shipping crate for reuse or dispose of it; remove any dead bees and sanitize equipment between uses.
What are common signs of trouble during the first weeks and how can I troubleshoot them?
Signs include few flying bees, queenless behavior, excessive dead bees, or weak comb building. Check for queen presence, adequate syrup, and correct ventilation. Address pests, reduce entrance size, and contact the supplier if the queen arrived dead. Timely intervention prevents colony loss.
When is the best time of day to introduce a new colony?
Late afternoon or early evening works well because foragers return to the old hive, leaving the new residents calmer. Cooler temperatures reduce flight activity and increase the chance all workers stay in the colony overnight. Avoid very hot or stormy days.
How much space should I give the new bees in the brood box at installation?
Provide a full deep or two medium boxes with frames spaced normally. Place empty drawn frames or foundation near the cluster. Avoid crowding by giving them at least five to eight frames around the queen cage so workers can move and build comb comfortably.
What tools or materials are useful for securing the queen cage and preventing it from falling?
Use a staple, small nail, wire, or a notch cut in the top bars to secure the cage. A small cork or wood wedge can also hold it in place. Keep a hive tool and spare frames on hand to adjust positioning gently without disturbing the cluster.