Small hive beetles pose a serious risk to colony health, especially in humid regions. These pests can turn combs into messy, decaying zones that threaten honey production and the well‑being of bees.
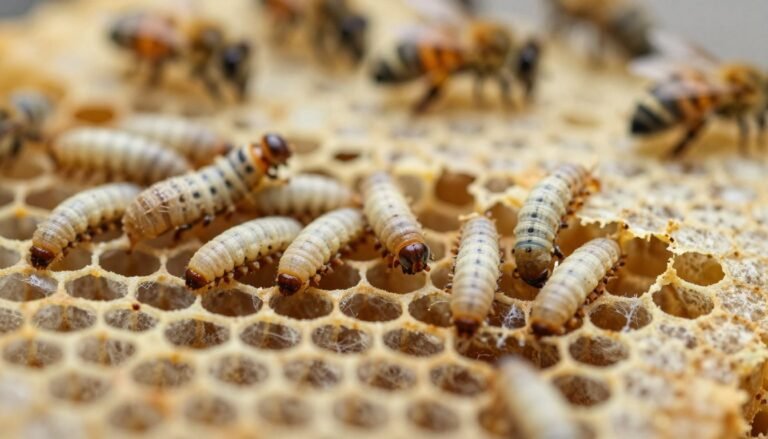
When beetle larvae invade frames, they produce slimy residues that spoil stores and harm larvae. This slime out process moves fast if the colony is weak and cannot cover all frames.
Active monitoring helps beekeepers spot early signs before damage spreads. Maintaining strong colonies through season care is the best defense against rapid infestations and loss of honey bee populations.
Key Takeaways
- Small hive beetles thrive in humid conditions and damage comb quickly.
- Larvae create slime that ruins honey and brood if left unchecked.
- Strong colonies that cover frames resist infestations better.
- Regular hive checks let beekeepers intervene early.
- Proactive management protects honey production and colony health.
Understanding the Phenomenon of Slimy Brood
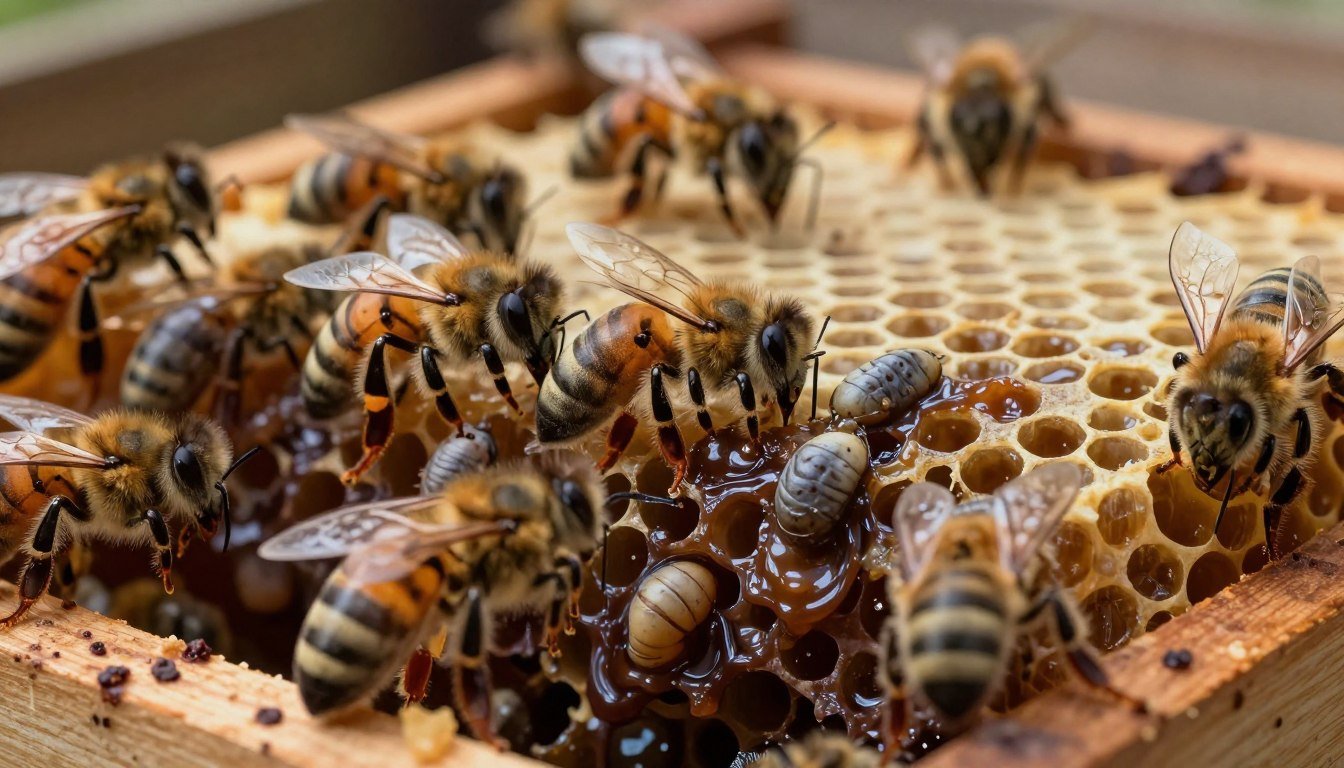
When the colony loses vigor, invading larvae quickly turn stored honey and brood into a sticky mess. This process escalates when bees cannot patrol frames or remove pests.
Experienced beekeepers know that a healthy population is the best barrier. Regular checks and prompt action keep the hive protected and productive.
Biological triggers such as warm, humid weather and gaps in worker numbers let larvae multiply. Monitoring brood pattern and food stores helps detect early warning signs.
- Keep colony strength high through seasonal care.
- Inspect frames often and remove infested combs quickly.
- Use proven beekeeping practices to maintain defense.
| Risk Factor | Sign | Quick Action |
|---|---|---|
| Low winter survival | Thinned bee population | Feed, combine colonies |
| High humidity | Rapid larval growth | Improve ventilation |
| Pest breach | Sticky, discolored comb | Isolate and treat frames |
For guidance on related brood issues, see identifying chilled brood. Close monitoring of bees and the colony is the most effective prevention.
What Causes Slimy Brood in a Hive
Short intro: Small hive beetles are now global pests after arriving in Australia about twenty years ago. Their spread has changed how beekeepers watch colonies and protect stores.

The Life Cycle of Hive Beetles
Adult beetles can fly up to 15 km to find a hive. Once inside, adults lay eggs in cells that hatch in three to six days.
Larvae tunnel through the brood comb and combs of honey. That activity destroys the brood nest and ruins honey stores quickly.
Environmental Factors
Warm, humid conditions let the pest multiply fast. In high heat and moisture, eggs hatch faster and larvae thrive.
A strong colony keeps the hive entrance clear and covers frames to eject invaders. Keep the bottom board clean and ensure frames are well occupied to reduce risk.
For practical steps to protect colonies, see how to save your hive from slime.
Identifying Small Hive Beetle Infestations
Early detection saves colonies. Watch for adult beetles running at the bottom board and take immediate action if you see them.
Check entrance activity. A struggling colony often shows reduced bee movement and fewer foragers returning each hour.
Inspect frames regularly. If larvae reach honey supers, the whole hive can face rapid collapse and lost stores.
“Routine inspections and quick responses are the difference between recovery and total loss.”
| Sign | What to do | Priority |
|---|---|---|
| Adults at bottom board | Trap or remove adults; tighten entrances | High |
| Reduced bee activity | Assess food, combine weak colonies, increase monitoring | Medium |
| Larvae in honey supers | Remove infested frames; treat and isolate affected hives | Critical |
Monitoring for this pest is standard practice for any serious beekeeper. For further small hive beetle guidance, see small hive beetle guidance.
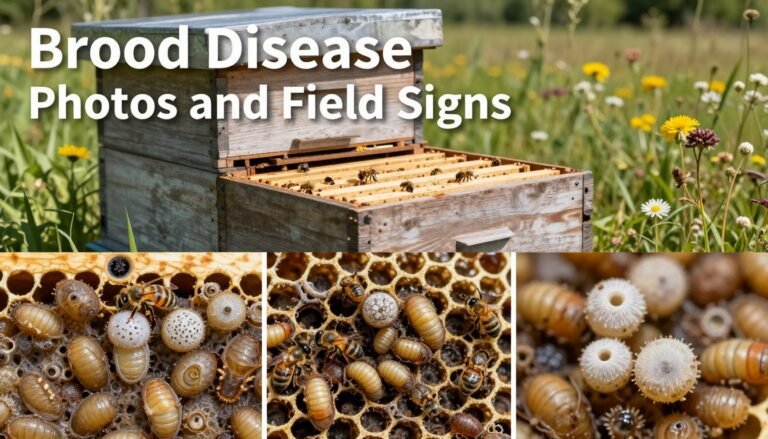
Distinguishing Between Brood Diseases
Noting whether sick brood sits capped or uncapped gives strong diagnostic clues. Early, targeted identification lets beekeepers act before disease spreads across frames or colonies.
American Foulbrood Characteristics
American foulbrood is bacterial, caused by Paenibacillus larvae. This disease is highly contagious and can kill bee larvae across the comb.
If you suspect this disease, report it to local agricultural authorities immediately to limit spread.
European Foulbrood Symptoms
European foulbrood (Melissococcus plutonius) often affects larvae before cells are capped. Signs include twisted, discolored larva and uneven brood patterns.
Quickly isolate affected frames and consider laboratory confirmation or a simple rope test for field checks.
Chalkbrood and Sacbrood
Chalkbrood shows white or gray mummies in brood cells; bees often remove those remains. Sacbrood makes larvae look sac-like, then dry into a gondola-shaped scale inside the cell.

- Use the rope test and lab tests when uncertain.
- Inspect brood comb and frames on each visit.
- Learn local reporting rules for American foulbrood; see foulbrood diseases for guidance.
- After colony loss, follow cleanup steps such as those at clean plastic foundation.
“Accurate ID is the way to effective control and the best chance to save nearby colonies.”
The Role of Colony Strength in Hive Health
A dense, active workforce of bees keeps frames covered and threats at bay.
Strong colonies patrol entrances, seal gaps, and maintain comb integrity. This steady defense prevents many pests from settling and reproducing.
When the population drops, workers cannot guard the entrance or cover all frames. That leaves brood and honey exposed to invaders and rapid spoilage.
Maintaining strength requires careful feeding, managing stores, and checking the queen’s laying pattern often. Timely combines or splits keep colonies near peak numbers.
| Factor | Action | Benefit |
|---|---|---|
| Worker numbers | Feed and combine weak units | Better frame coverage |
| Queen performance | Replace or requeen when low | Consistent brood pattern |
| Honey stores | Manage reserves and prevent robbing | Stable colony energy |
Keep colonies at full strength to resist stress and pests. For links to risks and management, see consequences of unchecked small hive beetles.
Performing the Rope Test for Diagnostic Accuracy
Perform the rope test on suspect cells to get a fast, field-level diagnostic for common brood disease.

Use a clean matchstick or probe during routine inspections. Insert it into the top of a suspect cell, then pull straight up. Watch the remains.
Interpreting Test Results
Positive result: If tissue pulls out in a sticky rope, this strongly indicates american foulbrood. Treating or removing the colony is often required.
Negative result: If remains do not rope, consider chalkbrood or general colony stress. Follow up with further checks of frames and eggs over several days.
- Vita Diagnostics Test Kit costs about $14 and gives clear guidance for field use.
- Always follow kit instructions to ensure accuracy and legal compliance.
- Perform the test during regular inspections to protect honey stores and nearby colonies.
| Action | Indicator | Recommended response |
|---|---|---|
| Matchstick ropes out | Sticky thread of tissue | Isolate colony; confirm diagnosis; treat or dispose per regs |
| No rope | Tissue breaks cleanly | Monitor frames; consider lab tests for other disease |
| Test uncertain | Inconclusive result | Repeat in 3–5 days; consult extension or vet |
“A quick test can save your apiary from a widespread outbreak.”
Emergency Procedures for a Slime Out
Act fast when slime-out starts: remove honey supers immediately to stop larvae from moving through comb and spoiling stores.
Next steps: take affected frames and freeze them for at least three days to kill eggs and larva. If no freezer is available, submerge frames in water for three to four days to drown pests.
Reduce the colony footprint by removing extra frames. Leave only the center brood nest so bees can regroup and rebuild population.
Clean the bottom board thoroughly. Remove debris and fallen larvae to cut reinfestation risk.
If the unit cannot recover, combine it with a healthy hive to save bees and remaining honey stores. Acting quickly gives the colony the best chance to survive disease and pest pressure.
| Problem | Immediate Action | Follow-up |
|---|---|---|
| Larvae in supers | Remove supers; freeze or submerge frames | Replace with clean frames; monitor for adults |
| Weak colony | Shrink to central brood nest | Feed, check queen, consider combine |
| Debris on bottom | Clean bottom board and entrance | Maintain hygiene each inspection |
Managing Hive Moisture and Ventilation
Good airflow stops excess moisture before fungi and pests take hold.

Proper ventilation keeps the brood nest dry and lowers risk of chalkbrood or mold. Use the bottom tray and add small vents at the entrance to boost airflow.
Place the hive so rain and standing water do not pool near the stand. During wet weather, tilt the box slightly forward so water runs away from frames and the entrance stays clear.
Check the entrance each visit. Blocked entrances trap humid air and make the colony work harder to regulate temperature and moisture.
If you see condensation or damp comb, open vents or increase screened area. A well-ventilated hive is less attractive to pest activity and helps bees protect eggs and honey.
For tips on managing humidity in humid regions, see humid climates tips.
Utilizing Pest Management Trays
A simple tray beneath the colony gives real-time feedback on pest pressure and activity. It is a low-cost tool that helps protect frames, eggs, and stored honey while you monitor beetle trends.

Oil Trapping Techniques
Oil or grease in an ant guard or tray stops crawling pests from escaping. The Flow Hive 2+ ant guards can be filled with oil or grease to form a barrier at the entrance.
For the screened bottom, fill a shallow tray with cooking oil to trap beetles that fall through. This prevents adult beetles from reaching cells and laying eggs.
Alternate: dilute detergent with water in the tray. The mix clogs insect spiracles and kills beetles effectively.
Maintaining Tray Hygiene
Check trays often, especially during peak season. A clean tray works better and gives accurate counts of pest presence.
If you find larvae or many bodies in the tray, treat the colony immediately and inspect frames for infestation.
- Empty and refill oil trays weekly in warm months.
- Clean grease from the rim and replace so oil remains sticky.
- Record counts to track pest trends across colonies.
| Tray Type | Action | Benefit |
|---|---|---|
| Oil-filled shallow tray | Refill weekly; remove trapped beetles | High capture rate; prevents eggs in cells |
| Detergent + water | Replace frequently; avoid overflow | Cost-effective kill method; easy to maintain |
| Flow Hive 2+ ant guard (greased) | Top up grease seasonally | Blocks crawlers at entrance; reduces colony stress |
| Monitored clean tray | Log counts; inspect frames if larvae appear | Early warning system; protects honey and brood |
“A well-kept tray is a simple but powerful way to monitor pest levels and keep colonies healthy.”
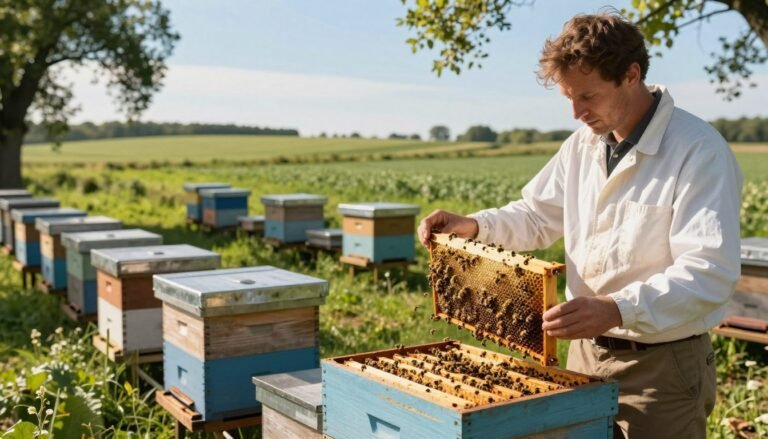
Best Practices for Regular Hive Inspections
Short, regular visits keep frames covered and cut pest opportunity. Check activity at the hive entrance first to judge forager flow and general vigor.
Open the top and work quickly. Look at brood comb and frames for even cells, healthy larvae, and consistent egg patterns. Note any odd signs that suggest disease.
Inspect the bottom board each time to spot fallen adults, debris, or early pest tracks. Early signs let you act before problems spread to nearby colonies.
Record every visit. A simple log of dates, queen status, honey stores, and tests helps track trends over months and years. Good records make 문제 solving faster and clearer.
Always use a smoker and protective gear to keep the inspection safe for you and the bees. If you suspect american foulbrood or european foulbrood, isolate the unit and follow local guidance immediately.

| Focus | What to check | Action |
|---|---|---|
| Entrance & activity | Forager numbers, traffic flow | Note changes; inspect frames if low |
| Frames & brood comb | Eggs, larvae, capped cells | Remove or isolate affected frames |
| Bottom board | Debris, pests, dead adults | Clean, treat trays, increase monitoring |
Further reading: Follow detailed inspection logs at inspection and recordkeeping, and scale your routine as you grow using tips from expansion planning.
Conclusion
Prompt removal of affected cells and frames preserves healthy bees and limits spread across colonies. Keep regular inspections and act fast when you spot adults, larvae, or odd residues. This approach protects honey stores and supports strong colony recovery.
Maintain good ventilation, clean trays, and shrink the nest when needed. These steps reduce moisture and lower pest pressure that leads to slime or disease such as chalkbrood. Treat or isolate suspect frames and eggs immediately to stop spread.
With steady care, accurate inspections, and proper tools, you can keep hives productive and honey bee numbers healthy for years to come. Prioritize prevention — it is the best way to protect your frames, cells, and harvest.
FAQ
What should I look for when slimy brood appears in combs?
Check for wet, shiny larvae that string out when pulled, discolored cells, and a fermented odor near the brood nest. Inspect frames at the top and bottom board and note whether adult bees avoid affected areas. Compare with nearby healthy brood combs to spot unusual moisture or bee behavior.
How do small hive beetles lead to slimy combs?
Beetles and their larvae feed on stored pollen and honey, then excrete waste and introduce yeasts and bacteria. Those microbes ferment the contents, turning honey and brood into a slimy, foul-smelling mass that repels nurse bees and ruins combs over days to weeks.
Which environmental factors make this problem worse?
High humidity, poor ventilation, prolonged wet weather, and standing water near the apiary create conditions that favor fermentation and beetle reproduction. Warm temperatures speed microbial growth, while crowded hives and weak colonies struggle to keep beetle populations in check.
How can I tell the difference between slugged comb and foulbrood diseases?
Slugged or slimed combs have a sticky, fermented feel and often visible beetles or larvae. American foulbrood produces a ropy, brown larval residue that dries into hard scale; European foulbrood yields twisted, yellow-brown larvae without the fermented smell. Chalkbrood results in dry, chalky mummies. Use visual cues and smell to guide diagnosis.
What are the signs of American foulbrood versus European foulbrood?
American foulbrood shows sunken cappings, brown ropy larval remains that form hard scales, and a distinct, sour odor. European foulbrood causes twisted larvae with uneven capping and variable color, often in early-stage colonies or during stress, and lacks the persistent hard scale left by AFB.
Could chalkbrood or sacbrood be mistaken for slimed comb?
Chalkbrood creates white, chalky mummies that do not feel slimy. Sacbrood forms sac-like dead larvae filled with fluid but does not typically ferment stored honey. Both differ from fermentation by texture and the absence of beetle activity and a sour, fermented odor.
How does colony strength affect susceptibility to slime issues?
Strong colonies maintain brood temperature, remove dead brood, and fend off beetles. Weak or stressed colonies cannot perform hygienic behaviors efficiently, allowing pests and microbes to proliferate. Boosting population, ensuring ample nurse bees, and maintaining queen vigor reduce risk.
What is the rope test and how do I perform it?
The rope test checks for American foulbrood by probing a dead larva with a sterile tool; healthy AFB-infected material forms a sticky, rope-like strand. Always follow state regulations for testing and sample submission to a certified lab for confirmation before taking action.
How should I interpret rope test outcomes?
A long, sticky rope suggests AFB and requires immediate reporting in many states. If the sample breaks short or feels crumbly, suspect other issues like European foulbrood or microbial spoilage. When in doubt, send samples to your apiary inspection service for accurate diagnosis.
What emergency steps limit damage during a slime out?
Isolate the hive by moving frames away from healthy colonies, remove and freeze or burn heavily contaminated combs if local rules allow, and treat the colony for small hive beetles using approved traps or registered miticides where appropriate. Increase ventilation and reduce moisture quickly.
How can I manage moisture and ventilation to prevent fermentation?
Improve airflow with screened bottom boards, add an upper entrance for cross-ventilation, and avoid overcrowding frames. Position hives on well-drained stands away from water sources and maintain proper roof and inner cover spacing to reduce condensation.
What role do pest management trays play in controlling beetles?
Trays catch emerging beetles, reducing reproduction and population pressure on the brood. Regular use under screened bottom boards helps monitor infestation levels and protects stored honey and pollen from contamination.
Which oil trapping techniques are effective for beetle control?
Use low-toxicity vegetable oil in corrugated or off-the-shelf traps placed under an entrance or under screened bottom boards. Oil prevents beetles from escaping and reduces numbers without harming bees. Empty and refill traps on a routine schedule during peak beetle season.
How often should I clean and maintain pest trays?
Inspect trays during each hive check and clean at least monthly during warm months. Replace soiled oil and remove trapped beetles and debris to keep traps effective and reduce disease vectors on the bottom board.
What are best practices for regular hive inspections to catch issues early?
Inspect every 7–14 days during buildup and more often in summer. Look under cappings, check brood pattern, note beetle presence on frames and trays, smell for fermentation, and assess colony strength. Keep clear records and act promptly on abnormalities.
When should I contact an apiary inspector or lab for testing?
Reach out if you detect ropy larvae, hard scales, widespread brood failure, or persistent fermentation despite management. Local extension services and state apiary inspectors can confirm diagnoses and advise on legal requirements and treatment options.