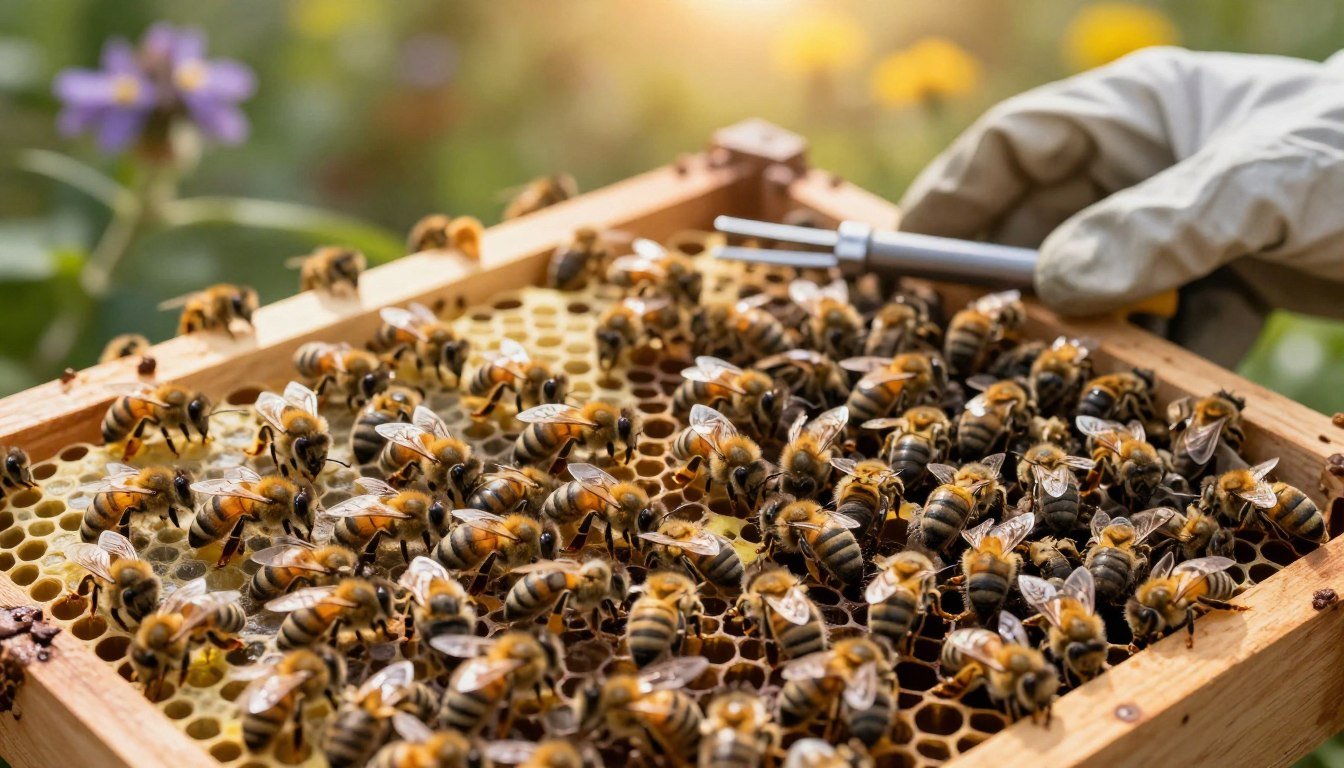
Good hive hygiene keeps an apiary productive and lowers the risk of disease transmission. Beekeepers must clean frames, combs, and any beekeeping equipment after inspections. Removing wax, pollen, and debris from a hive tool helps stop viruses moving between hives.
Simple routines protect your queen and young bees. Inspect frames and combs often to find hidden pathogens. Use gloves and firm cleaning methods to reduce contamination while handling honey or brood.
When a colony shows signs of illness, act quickly. Learn safe methods such as using a nuc to support weak groups by transferring brood or downsizing an infected hive. Read guidance on using a nuc and on how to repair damaged hive boxes to keep equipment reliable and extend the life of your hives: using a nuc, repair damaged hive boxes.
Key Takeaways
- Clean hive tools and frames after each inspection to limit transmission of viruses.
- Remove debris like wax and pollen to keep bee colonies productive.
- Inspect combs and frames regularly to catch disease early.
- Use a nuc or downsizing methods when a colony is weak to improve survival odds.
- Follow clear hygiene practices and wear gloves when handling brood or honey.
- Maintain beekeeping equipment and repair hives to reduce long‑term risk.
The Critical Importance of Apiary Hygiene
Good apiary hygiene stops tiny threats before they harm a hive. The National Bee Unit stresses that these practices should be routine, even when bees appear healthy. Regular cleaning of hive frames and boxes prevents bacteria and viruses from building up over time.
Beekeepers should keep a bucket of washing solution at the apiary. A simple mix of soda crystals and water works well to sanitize a hive tool and other equipment during inspections. This washing step reduces the chance of transmission between colonies.
Practical methods—wiping a hive tool, rinsing frames, and cleaning gloves—make a big difference. Consistent control of contamination protects brood, queen, and foragers. Long-term hive productivity depends on these small habits.
- Sanitize equipment at each inspection to limit virus spread.
- Use a washing solution on site to neutralize pathogens quickly.
- Adopt cleaning methods that make routine control simple and reliable.
Learn more about gentle colony management and practical beekeeping techniques in this guide: raising gentle bee colonies.
Understanding the Risks of Cross-Contamination
Organic buildup inside frames often masks the real threats to colony health. Wax, propolis, and trapped pollen form tight pockets in wood and comb where pathogens survive. These residues make it easy for mites, spores, and viruses to persist inside a hive.

Pathogens in Organic Debris
Propolis and wax can carry disease. Nosema and chalkbrood spread when spores cling to sticky substances on frames or hive surfaces. Moving a contaminated frame or hive tool without cleaning raises transmission risk.
The Role of Old Comb
Research shows old comb is about four times more likely to host varroa mites than new brood comb. That increases the risk of disease across hives and reduces honey production.
- Debris in nooks of frames shelters mites and spores.
- Old comb raises the chance of nosema and chalkbrood.
- Accurate information on comb age helps protect the queen and bees.
| Item | Risk | Recommended Action |
|---|---|---|
| Old comb | High — varroa, spores | Replace or quarantine; inspect age before reuse |
| Propolis buildup | Medium — spores, hidden debris | Scrape and wash frames; sanitize hive tool |
| Sticky pollen pockets | Medium — pathogen shelter | Remove debris during inspections; clean equipment |
| Wood surfaces | Low–Medium — longshelf pathogen harbor | Repair or replace damaged wood; sterilize when possible |
For more detailed guidance on diagnosing and treating hive disease, consult our guide to bee diseases.
Why You Should Use Separate Tools for Sick and Healthy Colonies
One contaminated hive tool can undo months of careful apiary work in a single visit. A single transfer of material can carry viruses or spores from an infected hive to nearby bee colonies.
American foulbrood (AFB) cannot be cured. The Department of Energy, Environment and Climate Action advises euthanizing an infected colony and destroying anything it touched.
Using a dedicated hive tool at an infected site prevents accidental transmission. A second, reserved hive tool set for healthy hives adds a layer of protection during inspections.
“Maintain strict protocols for your equipment to keep bees safe and reduce the risk of cross-contamination.”
- Assign a single hive tool to any confirmed infected hive.
- Keep a washing soda solution on site to sanitize implements between healthy-hive checks.
- Label and store gear separately to save time and reduce accidental reuse.
| Action | Benefit | Quick Tip |
|---|---|---|
| Use dedicated hive tool at infected hive | Limits spread of pathogens and AFB | Mark tool with paint or tape |
| Reserve clean equipment for healthy hives | Protects honey and brood | Store in sealed box at apiary |
| Sanitize with washing soda | Fast, effective cleaning | Rinse well and dry before reuse |
Essential Cleaning Before Sterilization
Start cleaning by scraping off built-up wax and propolis from frames and hive boxes. This initial step clears visible debris so sanitizing agents can work where pathogens hide.

Removing Propolis and Wax
Before sterilization, remove all organic matter from each frame, comb edge, and metal tool. Wax and pollen trap spores and viruses beneath sticky layers.
A practical washing solution is 1 kg of soda crystals dissolved in 4.5 liters of hot water. That mix loosens propolis and melts wax residues on beekeeping equipment.
- Scrape frames and hive tool surfaces to remove bulk debris before soaking.
- Soak metal equipment in the washing soda solution to dissolve propolis.
- Wear protective gloves while handling the hot solution to avoid skin irritation.
“Remove visible wax and propolis first — sterilization only works well on clean surfaces.”
| Step | Purpose | Quick Tip |
|---|---|---|
| Scrape and brush frames | Eliminates bulk wax, pollen, and propolis | Use a stiff brush outdoors to limit mess |
| Soak in washing soda solution | Dissolves sticky deposits for cleaner surfaces | Mix 1 kg soda crystals in 4.5 L hot water |
| Rinse and dry | Prepares equipment for heat or chemical sterilization | Air-dry in sun when possible to aid sterilization |
Clean surfaces first so heat or disinfectants reach microbes rather than being blocked by wax. For formal guidance on disinfecting equipment, see healthcare equipment disinfection guidance.
Effective Heat Sterilization Methods
Flame and boiling remain the most accessible sterilization methods for backyard beekeepers. These methods kill pathogens quickly and require little extra equipment.
Torching Metal Hive Tools
Use a propane torch to heat metal until it glows red. Flame sterilization destroys bacteria and viruses on the surface of a hive tool within seconds.
The University of Pennsylvania notes that flame sterilization is effective at eliminating surface pathogens. When you torch metal, move the flame steadily to reach all faces and edges.
Boiling Equipment
Boil smaller equipment in a washing soda solution for 5–10 minutes to loosen wax and remove debris. This process is ideal for comb scrapers, small metal parts, and frames that can be safely submerged.
- Boiling in a soda solution breaks down propolis and pollen residue.
- When torching wood, char gently to sterilize nooks without starting a fire.
- Always allow tools to cool completely before reuse in a hive or colony.
“Heat methods offer fast, chemical-free sanitation for hive equipment and reduce transmission risk.”
Chemical Disinfection Techniques for Beekeeping Equipment
Chemical disinfection gives beekeepers a reliable option to stop outbreaks before they spread through an apiary.
A 10% bleach solution (about 0.5% sodium hypochlorite) works well on plastic hive parts and many metal items. The National Bee Unit recommends soaking beekeeping equipment for 20 minutes to kill common pathogens.
Acetic acid fumigation uses an 80% solution in a sealed space for at least one week. This method requires protective gloves and goggles and careful handling to avoid skin or respiratory contact.

Always rinse thoroughly after chemical cleaning to remove residues that might taint honey or harm bees. Rinse twice and air-dry frames and boxes before reuse.
“Chemical methods help break chains of transmission when large batches of frames or boxes need treatment.”
- Use bleach soaks for plastic parts and non-wood items.
- Reserve acetic acid fumigation for heavily contaminated equipment in sealed areas.
- Wear gloves, goggles, and follow label instructions to protect yourself and your apiary.
For step-by-step protocols and official advice, consult hive cleaning and sterilisation guidance.
Managing Hive Components and Comb Replacement
Managing frames and comb helps reduce pests and keeps honey clean. Replace old brood comb on a scheduled basis to cut disease risk. New foundation reduces buildup that shelters mites and spores.
Quarantine Procedures for New Swarms
Quarantine new swarms away from your main apiary for two brood cycles—about six weeks. This wait time lets you observe brood patterns, spot pathogens, and act before mixing equipment.
Freeze unused frames or wooden parts at 20°F (−7°C) for 24 hours to kill wax moth larvae and other pests before storing. Store honey supers in airtight containers; this preserves flavor and prevents infestation.
- Mark supers and frames with a colony number to track use and control transmission.
- Replace old comb annually or when brood quality drops to limit disease buildup.
- Keep a clear storage routine to avoid cross‑use of contaminated pieces.
| Component | Risk | Recommended Action |
|---|---|---|
| Old brood comb | High — mites, spores | Replace with new foundation; label age |
| Stored frames | Medium — wax moths | Freeze 24 hrs at 20°F before storage |
| Honey supers | Low–Medium — contamination | Clean, dry, airtight storage |
“Careful component management cuts transmission risk and preserves hive productivity.”
For compact apiary layouts and gear selection that limit cross contamination, see minimalist beekeeping setups.
Best Practices for Preventing Disease Spread
Small changes in apiary layout and routine can lower disease transmission dramatically.
Arrange hives in a semi-circular pattern so each bee learns its own entrance. This simple step reduces drifting and the movement of mites and viruses between hives.
Avoid spilling syrup or feed. Spills attract robbing bees and raise the risk of transmission. When feeding, reduce hive entrances to limit robbing and contact.

Record every inspection. Note when you cleaned hive equipment, which sterilization method you used, and any signs of disease. Clear logs help you track patterns and act fast.
- Never place honey supers directly on the ground; soil can carry pathogens.
- Double gloving with nitrile gloves protects you and stops transfer between bee groups.
- Keep gear labeled and stored apart to prevent accidental reuse.
“Consistent, simple practices are the best defense against spread in an apiary.”
| Practice | Benefit | Quick Action |
|---|---|---|
| Semi‑circular hive layout | Reduces drifting and cross‑contact | Reposition hives with distinct entrances |
| Controlled feeding | Limits robbing and contamination | Close entrances; avoid spills |
| Detailed inspection records | Tracks cleaning and risk trends | Log date, cleaning method, and observations |
For guidance on why it matters to clean hive tools between uses, follow our linked advice to protect your hive and queen.
Conclusion
, Consistent handling of gear stops viruses moving between hives.
Keep a clear routine. Clean and sterilize each hive tool after use. Use heat or approved chemical methods to ready equipment before reuse.
Inspect your bees and honey often. Early signs save time and loss. A written log helps you spot trends and act fast.
Assign dedicated implements when an infection appears. Store used items apart and mark them. Learn more about proper beekeeping tools maintenance to protect your apiary.
Your care matters. Small, steady steps keep bee populations productive and resilient. Thank you for following this guide and supporting better beekeeping.
FAQ
Why use separate tools for healthy and sick bee colonies?
Using dedicated equipment for infected hives lowers the risk of spreading pathogens like American foulbrood, viruses, and fungal spores. Assign a set of hive tools, gloves, and protective gear to diseased apiaries and keep another clean set for healthy colonies to protect brood, comb, and queens.
How does good apiary hygiene protect my colonies?
Regular cleaning and organized workflows reduce disease reservoirs in debris, wax, and propolis. Clean frames, sanitize tools, and remove dead bees and old comb to limit transmission routes and keep bee populations robust.
What pathogens hide in organic debris?
Pollen, old wax, and propolis can carry bacterial spores, fungal elements, and viral particles. These agents persist in hive material and on equipment, so removing organic buildup before sterilization is essential.
How does old comb contribute to disease spread?
Old comb accumulates chemical residues, pathogens, and parasites over time. Reusing contaminated comb can reintroduce infections into healthy colonies and undermine hive strength and honey quality.
What are the main reasons to separate equipment between hive types?
Separation prevents cross-contamination during inspections, feeding, and harvesting. It simplifies quarantine procedures, reduces the need for harsh chemicals on all equipment, and helps trace outbreaks to specific apiaries.
What cleaning steps should I perform before sterilizing beekeeping gear?
Remove wax, propolis, and brood debris first. Scrape frames and boxes, wash with warm water or a mild detergent, then rinse. Dry thoroughly before applying heat or chemical disinfection to ensure effectiveness.
What’s the best way to remove stubborn propolis and wax?
Use a hive tool or metal scraper to lift deposit, then soak equipment in hot, soapy water. For heavy buildup on metal parts, gentle boiling or a wash with washing soda solutions helps dissolve residues without damaging wood frames.
Can torching metal tools sterilize them effectively?
Yes. Briefly heating metal hive tools with a propane torch kills many pathogens. Work outdoors, avoid overheating temper-sensitive parts, and let tools cool on a clean surface to prevent recontamination.
Is boiling equipment a reliable sterilization method?
Boiling frames, smokers, and small metal items for at least 10–15 minutes reduces live pathogens. Boiling won’t penetrate deep comb, so combine this with removing organic matter and consider replacement of heavily contaminated wax.
What chemical disinfectants are safe for beekeeping equipment?
Food-safe disinfectants like diluted bleach solutions (properly rinsed) and specialized apicultural products can be effective. Follow label directions, rinse thoroughly, and avoid residues that harm bees or affect honey flavor.
How should I manage hive components when disease appears?
Isolate infected boxes and frames immediately. Remove suspect comb, place affected material in sealed containers, and choose heat or chemical methods for decontamination. Replace brood comb if contamination is severe to protect larvae and the queen.
What quarantine steps work for new swarms or nucs?
Hold new colonies separate from the main apiary for several brood cycles. Inspect regularly for mites, brood diseases, and dysentery. Use new or sterilized foundation and tools during installation to minimize introduction of pathogens.
Which daily practices help prevent disease spread in an apiary?
Maintain strict hygiene: clean hive tools after inspections, limit traffic between apiaries, use gloves, and label equipment by status. Rotate and replace old comb, monitor varroa and Nosema, and keep records of treatments and movements.
How often should beekeeping gear be inspected and serviced?
Inspect equipment each season and after any disease detection. Clean after each inspection when possible, deep-clean annually, and replace damaged or heavily contaminated frames and woodenware to reduce long-term risks.


