Protecting your hive wood extends service life and keeps colonies healthy. Choosing the right finish is mostly about shielding the boxes from rain, sun, and temperature swings.
Water-based latex options dry quickly, smell less, and resist decay. Many beekeepers prefer these products because they balance durability with low fumes that can stress bees.
Prep is simple: sand, prime bare patches, and leave interiors uncoated to protect colony health. Allow adequate cure time—typically 48–72 hours—before placing beehives outdoors.
For eco-friendly guidance and product ideas, see a short guide on eco-friendly hive finishes. For expert advice, contact Dadant & Sons at 888.922.1293.
Key Takeaways
- Prioritize low-VOC, water-based finishes to reduce fumes.
- Paint is mainly wood protection, not decoration.
- Keep interiors unpainted to protect colony health.
- Allow 48–72 hours to cure before outdoor placement.
- Choose colors to suit local climate and reduce drifting.
Why Painting Your Beehives Matters
A protective finish helps keep hive wood strong through sun, rain, and cold snaps. This simple step limits warping and rot and makes boxes last longer.
Protection against the elements matters because untreated wood breaks down fast under sun and moisture. A shielded beehive holds stable internal temperatures, which helps bees maintain brood and honey production.
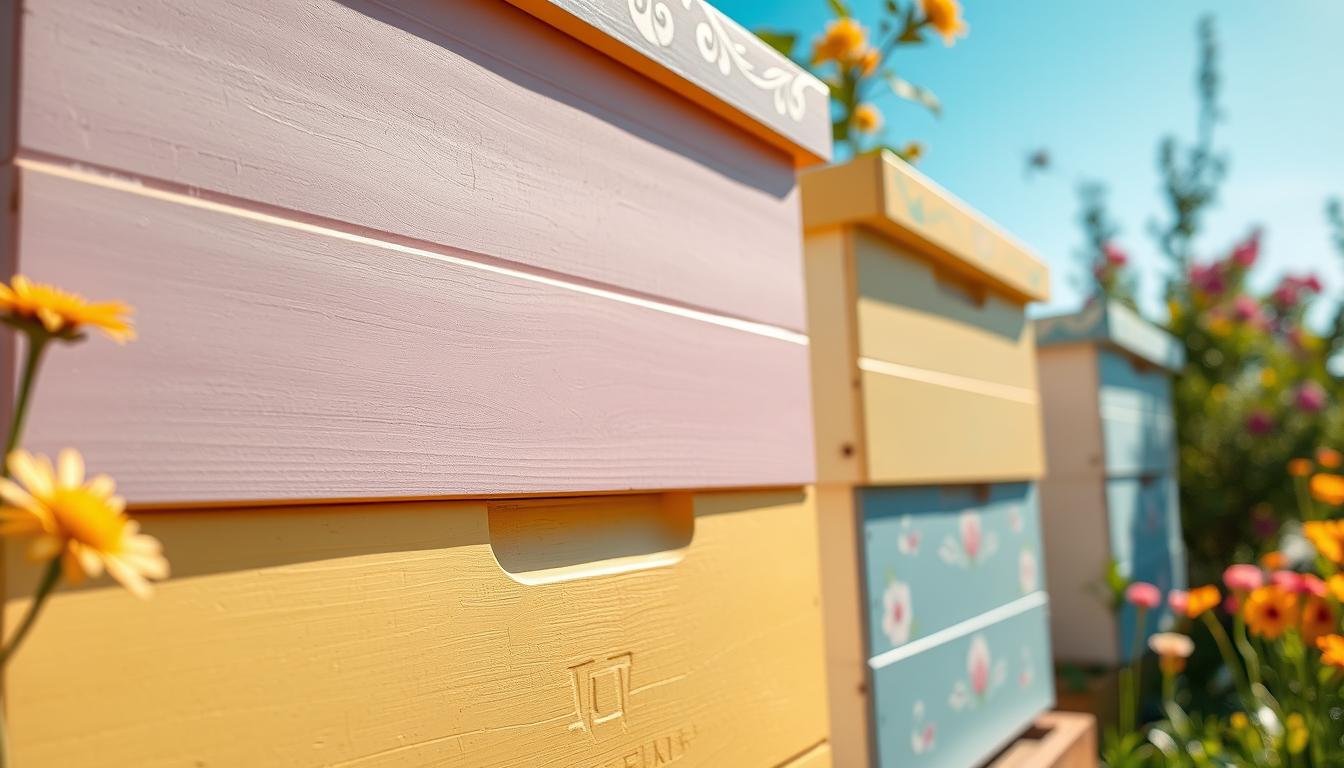
Color choices do more than look good. Light tones reflect heat in summer and help regulate hive temperature. Different colors also let beekeepers organize colonies and spot specific box sizes at a glance.
- Extend service life and reduce repairs by protecting surfaces from weather.
- Regulate internal hive temperatures in hot months with reflective colors.
- Use distinct colors to simplify apiary management and reduce drifting.
For guidance on selecting shades that work in your area, see a quick primer on hive color choices. For insulation tips and technique, visit hive painting and insulation advice.
Selecting the Best Exterior Paint for Bee Hives
Start by checking VOC levels—this step keeps bees healthy and boxes durable.
Prioritizing Low VOC Formulas
Low-VOC coatings reduce fumes that can stress a colony. Look for products labeled under 100 grams per liter (50 or lower is even safer).
Water-based options are the safer route. They dry faster, clean up with soap and water, and emit fewer harmful vapors than oil-based choices.
Understanding Latex Benefits
Latex paint offers reliable protection for wood and saves time during upkeep. A quality latex coat helps shields boxes from moisture and sun while remaining easy to recoat over the years.
- Make sure VOC content is below 100 g/L; lower is better.
- Apply a high-quality primer before your top coat to extend service life.
- Many beekeepers invest in mid-grade latex to protect supers and boxes longer.

| Feature | Water-based Latex | Oil-based |
|---|---|---|
| VOC Level | Low (often | Higher (can exceed 100 g/L) |
| Cleanup | Soap and water | Solvents required |
| Bee Safety | Better—lower fumes | Worse—stronger odors |
| Longevity on Wood | Good with primer and quality coat | Durable but harsher |
When you choose coatings, make sure to balance protection and safety. For product suggestions and comparative reviews, see a dedicated guide on hive paint options.
Essential Preparation Before You Start
A few thoughtful steps before you start will protect hive wood through seasons. Proper prep saves time and keeps colonies healthy.
Focusing on exterior surfaces only
Only treat the exterior surfaces exposed to weather. Make sure the interior stays bare so bees can coat their home with propolis.
Stack boxes or thread them on a 2×4 to reach every edge and joint. Pay special attention to joints, which rot first when hit by rain.
Use a high-quality primer on all exterior surfaces before the final coat. Avoid painting top and bottom edges; painted edges can stick and slow hive work.
“Protect the wood, respect the interior—your colony will thrive when you balance shelter and natural behavior.”
- Leave interiors uncoated for bee health.
- Prime exteriors for better adhesion and weather protection.
- Prepare joints and edges to prevent water damage.
Professional Techniques for Applying Paint
Professional results come from small habits: the right roller, order of strokes, and patience between coats. These steps help protect wood, keep hive boxes weatherproof, and reduce future maintenance.
Using Quality Rollers and Brushes
Use a 1/2-inch or 3/4-inch nap roller to push material into joints and around handholds. Start by coating the handholds, then roll the flat surfaces for even coverage.

Managing Multiple Coats
Two coats are the most practical approach. The first coat seals the wood and the primer; the second builds protection and improves color uniformity.
Apply thin, even coats. Thick layers trap solvents and extend drying time. Use a quality primer before the first top coat to boost adhesion and extend years of protection.
Allowing Proper Curing Time
Let each coat cure fully before adding the next. Off-gassing time matters—introducing bees too soon risks stress from fumes.
“Allow adequate cure time to ensure a safe, durable home for your colony.”
- Use the recommended nap roller for joints and corners.
- Apply two top coats after primer for reliable weather protection.
- Wait the full cure time before placing boxes outside or adding bees.
For a step-by-step pro workflow, see this guide on beehive painting like a pro.
Choosing Colors for Temperature Regulation
A hive’s surface color plays a practical role in how it handles sunlight and heat.
Light shades reflect the sun and help keep internal temperatures lower in hot months. This supports brood development during summer and reduces the need for bees to overwork to cool the box.
Darker tones absorb warmth and can be useful in colder climates to give colonies a small heat advantage during chillier seasons.
Remember that bees see ultraviolet light. Your color choice mainly helps you organize the yard and manage colonies, not the insects’ aesthetic preferences.
“Use color as a tool: regulate temperature, reduce drifting, and simplify apiary work.”
| Shade | Effect on Heat | Best Use |
|---|---|---|
| Light (white, pale) | Reflects sunlight; cooler interior | Hot summer climates, crowded yards |
| Medium (pastels) | Balanced; moderate absorption | Temperate regions, visual variety |
| Dark (deep tones) | Absorbs heat; warmer interior | Cold climates, winter prep |
For more on color choices see a practical painting a beehive guide. Pair color selection with placement tips from this climate-based hive placement resource to optimize temperature control.
Alternative Methods for Protecting Hive Wood
Many beekeepers turn to hot wax or traditional oils when they want long‑lasting protection and a natural look.
Wax dipping is a proven option that displaces water and seals fibers. Equipment is submerged in a 220°F vat for about 10–15 minutes so wax soaks deep into the wood. The result is durable, rot‑resistant boxes that can last many years.

The Benefits of Wax Dipping
Wax gives breathable protection without hiding grain or changing color dramatically. It also reduces the need for frequent maintenance on exposed surfaces.
- Wax dipping protects wood very well and can extend service life by years.
- The 220°F soak for 10–15 minutes ensures deep penetration into edges and joints.
- Boxes and supers treated this way resist moisture and rot better than untreated wood.
For a natural finish, boiled linseed oil or tung oil is another option. Apply a first coat mixed with mineral spirits to improve penetration, then follow with multiple coats until satisfied. These oil finishes dry to a warm, honeyed look and offer solid protection without heavy coatings.
“Choose the method that balances durability and natural behavior—your colony will thank you.”
Whether you use wax, oil, or a thin layer of paint, the goal remains the same: protect wood and provide lasting shelter. For additional guidance on techniques and safety, see a practical painting and protecting guide.
Conclusion
A careful finish bridges durable wood protection with gentle conditions for bees.
Use a quality primer and follow with two thin coats to seal joints and shield boxes from moisture. Many beekeepers favor water‑based latex because it balances low fumes and reliable coverage. Choose a color that helps you manage hives and temperature while adding personality to your yard.
Painting your beehive is rewarding work that keeps wood longer and gives your colony a comfortable home. With these simple tips, you can protect equipment, express creativity, and support healthy bees. Thank you for your commitment to beekeeping and for caring for your buzzing neighbors.
FAQ
Can I use standard acrylic house paint on hive boxes?
Yes. Use a high-quality 100% acrylic latex exterior formula with low VOCs and good UV resistance. Apply paint only to outside surfaces and avoid sealing any interior parts where bees contact comb or honey.
Should I prime hive wood before coating?
Primer helps adhesion and extends protection. Use an exterior wood primer compatible with acrylic latex. Prime raw pine or cedar, paying attention to end grain and joints to prevent moisture entry.
How many coats are recommended to protect hive surfaces?
Two thin coats usually work best: one sealing coat and one finish coat. Thin layers dry faster and resist cracking. Allow proper drying time between coats per manufacturer instructions.
Are oil-based paints better than latex for beehives?
Oil-based products are durable, but they emit stronger fumes and take longer to cure. Modern acrylic latex with low VOC is preferred because it balances protection, quick curing, and lower odor that can disturb colonies.
Which colors help with hive temperature regulation?
Lighter tones reflect sunlight and help keep colonies cooler in summer. Earth tones and pastels work well. Dark colors absorb heat and can raise internal temps, which may stress bees in hot climates.
Can I paint hive components that will touch honey or brood frames?
No. Leave all interior frames, deep boxes, and surfaces that contact comb unpainted. Paint only the external faces, lids, and bottom board exteriors to avoid contamination of honey and brood areas.
What surface prep steps should I follow for long-lasting protection?
Clean off dirt and old flaky paint, sand rough spots, and repair splits. Wipe dust away and let wood fully dry. Treat exposed end grain and fastener holes with primer or additional sealant.
How soon can I place painted hives in the yard after painting?
Wait until paint is fully cured and free of strong odor—typically 24–72 hours for acrylics in warm, dry conditions. Longer cure times reduce the chance of deterring swarms with lingering solvents.
Is waxing or wax dipping a good alternative to coating with paint?
Wax dipping gives a natural barrier and can extend wood life while avoiding strong odors. It requires equipment and maintenance but preserves ventilation and is acceptable when finished only on external surfaces.
Do painted edges and top bars need extra attention?
Yes. End grain and edges absorb moisture faster, so apply extra primer and a topcoat there. Avoid painting the top bars themselves; instead, paint the box edges and the underside of lids if needed.
Can painting affect swarming or colony behavior?
Bees can react to strong scents. Using low-VOC, quick-curing acrylics and allowing full cure time minimizes behavioral impacts. Also stick to light, neutral colors familiar in your apiary to avoid visual disruption.
How should I maintain painted hive boxes over the years?
Inspect annually for peeling, weathering, or cracks. Spot-sand and touch up coatings before significant wood exposure occurs. Repaint every few years depending on climate and sun exposure to protect the wood and extend service life.