Well-chosen finishes protect wooden beehives from rain, humidity, UV, and wide temperature swings. A good exterior coat improves weatherproofing and extends service life. That saves time and replacement costs for beekeeping operations.
Low-VOC, water-based latex or acrylic paint reduces fumes that can stress bees. Avoid oil-based products; they trap moisture and emit stronger odors. Natural sealants, like linseed oil or beeswax blends, can add moisture resistance without synthetic additives.
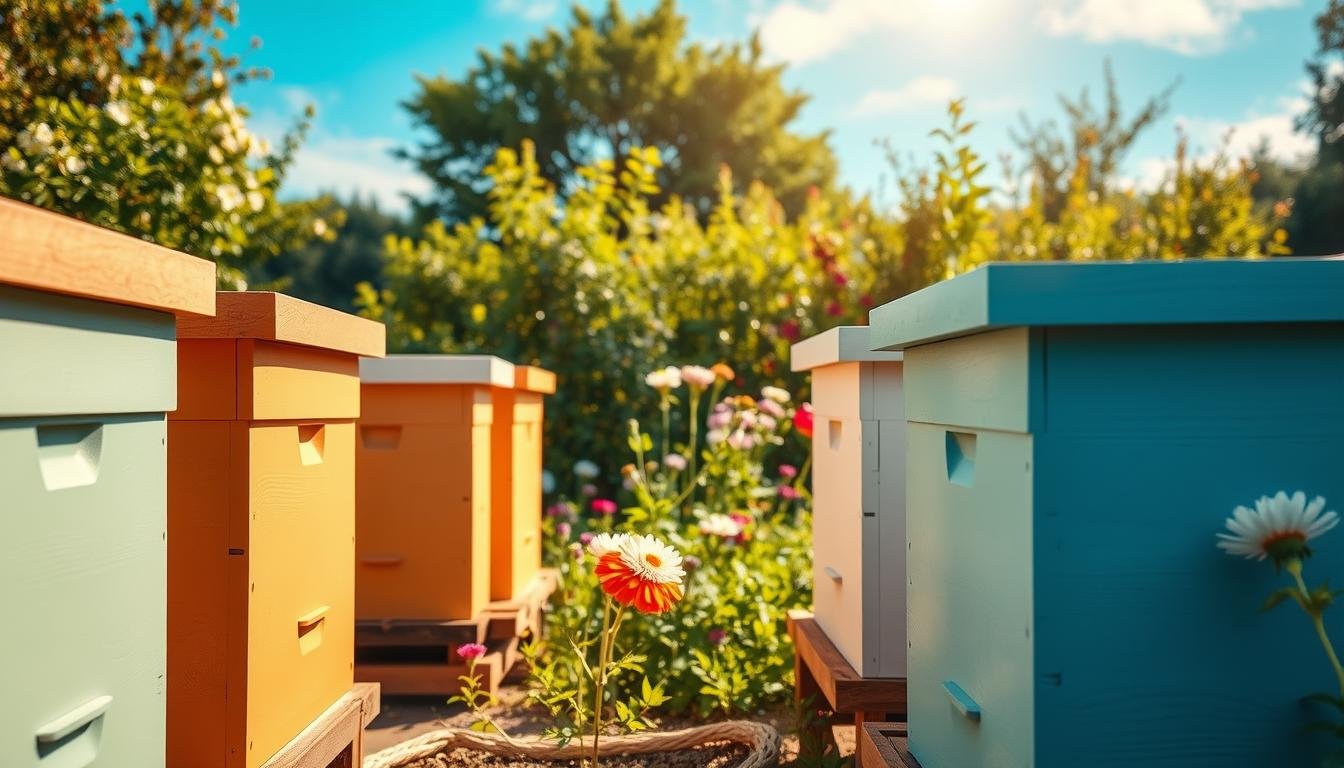
Color matters. Distinct shades make apiary organization easier and can cut drifting between colonies. Let finishes cure 48–72 hours before placing beehives outdoors. Also, keep interior surfaces unpainted to protect colony health.
Key Takeaways
- Choose low-VOC, water-based options for bee-safe exterior protection.
- Natural finishes offer moisture resistance without harsh chemicals.
- Proper curing (48–72 hours) and unpainted interiors protect colonies.
- Color strategy reduces drifting and improves apiary management.
- Regular maintenance extends wood life and reduces replacement costs.
Why finishing beehives matters for bee health and longevity
Well-applied finishes stop moisture from ruining common pine used in apiaries. A good exterior finish limits rot, warping, and mold that attack raw wood. That simple step saves time and money for U.S. beekeepers.
Weatherproofing and wood protection
Exterior finishes form a barrier against rain, UV, and other elements. Untreated pine soaks up moisture and can decay quickly. A stable surface helps keep joints tight and prevents water entry at edges.
Safer colonies with low-odor surfaces
Bees detect strong fumes. Using low-VOC products reduces off-gassing that can disturb colony behavior. Leave interior surfaces bare so bees can apply wax and propolis for their own microenvironment.
Operational benefits of color-coding
Distinct colors reduce drifting and speed inspections. Light shades reflect heat in hot climates; darker tones help retain warmth where nights are cold. Simple color strategies improve record-keeping and hive management.
| Issue | Cause | Finish Benefit |
|---|---|---|
| Rot and mold | Moisture in untreated pine | Barrier against water and fungi |
| Warping | Sun and temperature swings | UV protection and stabilized grain |
| Colony stress | Strong odors and off-gassing | Low-odor finishes that reduce disturbance |
Eco-friendly hive paints and coatings
Selecting the right finish affects how long wooden boxes last and how comfortable colonies remain. Pick products that limit fumes and let wood breathe.
What “eco-friendly” means: low-VOC, non-toxic, and water-based formulations
Low-VOC water-based latex or acrylic dries fast, cleans up with water, and reduces strong odors that disturb bee activity. Check labels for VOC ratings and exterior suitability.
Natural alternatives: linseed oil, beeswax-based sealants, and wax dipping
Natural oils and beeswax blends add moisture resistance without many synthetic chemicals. They keep a natural look but need more frequent reapplication than high-build films.
- Wax dipping gives exceptional durability, especially on cypress, but may be harder to access for small beekeepers.
- Balance breathability with protection to avoid trapped moisture in wood.
- When choosing right paint, review ingredient disclosures and mildew/UV claims.
| Finish Type | Advantages | Practical Notes |
|---|---|---|
| Water-based latex/acrylic | Fast dry, low odor, strong weather resistance | Good for most climates; minimal off-gassing |
| Linseed oil / beeswax | Non-toxic, natural finish, preserves wood grain | Requires regular upkeep; gentle on colonies |
| Wax dipping | Superior moisture protection and longevity | Best for high-end treatments; limited local access |
| High-build synthetic film | Long-lasting barrier, UV stable | Check VOCs and ingredient list for bee safety |
Selecting safe paints and finishes for beehives
A careful finish choice can cut maintenance while keeping colonies calm.
Prioritize water-based exterior latex or acrylic for a strong balance of durability, quick drying, and low odor. These products bond well to bare wood, resist sun and rain, and clean up with water. For pine boxes, a resilient exterior film reduces water absorption and limits repainting.
Water-based vs. oil-based
Oil-based systems can last longer, yet they emit stronger fumes and need mineral spirits for cleanup. That makes them a less suitable option near sensitive colonies. If you consider heavier products, weigh long-term toughness against colony disturbance and cleanup effort.
Deck stains with UV inhibitors
Deck stains preserve wood grain while adding UV resistance. They are a top choice when the best paint for appearance matters. Use mid-grade stains or discounted “oops” exterior options when labels confirm exterior use and acceptable VOCs.
| Finish | Strengths | Considerations |
|---|---|---|
| Water-based latex | Low odor, quick dry, good weather resistance | Easy cleanup; repeat topcoat as needed |
| Oil-based | Durable film, deep coverage | Higher fumes; mineral spirits required |
| Deck stain (UV) | Shows wood grain, UV and mildew resistance | Best for sun-exposed sites; choose exterior label |
For detailed methods on painting beehives, check a step-by-step guide. Good product choice saves time for beekeepers and extends box life.
Matching colors to climate and sunlight in the United States
Choosing the right color scheme helps hives handle local sun and temperature swings. Match tones to your regional needs to reduce heat stress and support brood development.
Hot climates: white and light colors for heat reflection
White and pale tones reflect strong sunlight. In southern and desert areas, light finishes cut thermal load and help colonies stay active. Use light shades on full-sun faces to lower interior temperature quickly.
Cooler regions: darker shades for passive warmth
Darker color choices absorb heat for passive warming. In northern states or high elevations, deeper tones give a small, free boost to brood temperature. Position darker boxes where they get morning sun to extend warm hours.
Blending with local flora and minimizing predator visibility
Earthy greens, blues, and browns help hives blend into woodlands and fields. That reduces visual cues for predators and keeps site aesthetics tidy.
- Avoid metallic or high-gloss finishes that reflect too much light and disturb bees.
- Vary colors across nearby hives to cut drifting while keeping climate needs in mind.
- Reassess colors after a season to refine choices for your specific areas.
Bee-safe product criteria and label checks
Start selection by verifying drying times, VOC levels, and exterior suitability.
Read labels first. Prioritize clear low-VOC ratings and explicit exterior-use claims. These tell you the product resists UV and wet weather and reduces fumes near colonies.
Scan ingredients for unwanted chemicals. Avoid additives that increase odor, shine, or reflectivity. High-gloss or metallic finishes can confuse or agitate bees and should be skipped.
Key label items for beekeepers
- Low-VOC or “low odor” metrics and curing guidance for safe deployment.
- Manufacturer statements on non-toxicity or wildlife-safe use.
- Claims for mildew resistance and UV inhibitors to extend service life.
- Recommended application temperatures and humidity ranges for proper cure.
| Label Item | Why it matters | What to look for |
|---|---|---|
| VOC rating | Lower fumes reduce colony disturbance | “Low-VOC” or numeric ppm values |
| Exterior claim | Signals weather and UV resilience | “Exterior”, “UV-resistant”, “mildew-resistant” |
| Finish type | Affects reflectivity and odor | Matte or satin; avoid metallic high-gloss |
| Drying / curing times | Shorter off-gassing windows allow safer placement | Clear hours to touch and full cure guidance |
Record keeping matters. Track part numbers, batch data, and technical data sheets. This helps repeat successful choices across multiple hives and seasons.
Preparing wooden hive components the right way
Begin prep by dry-fitting every wooden component to catch misalignments before any finish is applied. A trial assembly shows gaps, warped boards, or loose joints while parts are still easy to adjust.

Sanding, dust control, and dry-fit inspection
Sand faces and edges to remove splinters and mill glaze so primer and paint bond evenly. Focus on end grain and finger joints; they soak up water faster and need careful attention.
Work in a ventilated, dust-controlled area. Wipe surfaces with a clean cloth before priming to remove residual dust that weakens adhesion.
Where not to paint: keeping hive interiors untreated
Never paint interior surfaces. Bees coat inner walls with wax and propolis to create their microclimate. Bare wood helps colonies manage humidity and temperature.
Assemble with exterior wood glue (Titebond 3) and quality fasteners so joints resist seasonal movement. Establish a staging plan to handle boxes without smudging fresh finishes.
Good preparation reduces repeat work for beekeepers and sets primer and topcoats up for long service life. For tools and upkeep advice, see a practical guide on beekeeping tools and maintenance.
Primers and undercoats that improve adhesion and lifespan
A good primer makes every topcoat work harder and last longer on softwood boxes.
Start with a dedicated undercoat before applying your chosen finish. A water-based primer evens absorption on pine and cuts tannin bleed. This saves time by reducing the number of top coats needed.
Why choose water-based primers? They bond well to bare wood and pair cleanly with a latex topcoat for consistent color under light shades. Pick an exterior-grade product with mold resistance for damp sites.
| Primer Type | Key Benefit | When to use |
|---|---|---|
| Water-based blocking primer | Stops tannin bleed; evens softwood | Under whites and pastels |
| Exterior acrylic primer | Weather and mildew resistance | Frequent wet-splash exposure |
| Spot-priming formulation | Repairs bare patches; restores adhesion | Repainting aged hive bodies |
Apply a thin, even coat and allow full dry time before finishing. When prepping repairs, spot-primer bare areas to keep the final paint uniform.
For product recommendations and practical steps, see a detailed review of top-tier systems at Demidekk review.
Step-by-step: painting and coating beehives for lasting protection
Set up a tidy, shaded workspace before you open any cans; good staging saves time and protects finishes.
Gather tools and prepare the area. Assemble rollers, brushes, a quality primer, protective gear, and the selected exterior paint. Work in a ventilated, dust-free spot and stage boxes on blocks so air circulates under each piece.
First coat technique
Apply thin, even passes. Start with primer where wood looks dry or blotchy. Then use smooth, overlapping strokes for the first coat to avoid runs. Keep interiors unpainted so bees can manage the inner environment.
Edge and joint care
Spend extra time on end grain, finger joints, and handles. Use a detail brush to seal seams and edges. These areas are the main entry points for moisture, so a neat bead of finish here helps longevity.
Second coat and touch-ups
Wait full dry time before recoating. Apply a measured second coat to reinforce corners and high-touch areas. Stack boxes carefully while curing to avoid sticking or marring fresh film.
- Inspect under good light and touch up thin spots immediately.
- Record product names and dates so future maintenance matches the same system.
| Step | Action | Goal |
|---|---|---|
| Prep | Stage tools, ventilate | Clean, dust-free surface |
| First coat | Thin, even passes | Uniform base layer |
| Second coat | Detail corners and handles | Continuous moisture barrier |
Cure times, temperatures, and when to place hives outdoors
A proper cure window prevents lingering smells and helps finishes reach full toughness. Follow clear schedules so woodwork reaches full service life before colonies move in.
Drying windows for reliable results
Work when conditions suit the product. Target a temperature range of 60–85°F with low humidity and steady airflow for best drying time.
Respect the manufacturer’s dry and recoat times so the final film performs on exterior equipment.
When to return or introduce bees
Allow 48–72 hours after the last coat for off-gassing to subside before introducing bees or returning hives to the yard.
“Give finishes time to cure; a short delay protects colony acceptance and long-term durability.”
- Keep air moving across surfaces; avoid dusty sites.
- Do not stack freshly finished hives tightly; allow airflow between pieces.
- If painting with bees present, choose cool, low-flight periods and follow minimum temperature guidance.
- Log dates, time, and temperature for each job to refine future scheduling.
Moisture management and weather defenses beyond paint
Beyond a good finish, protect boxes with smart site work and physical barriers. Moisture often enters at the base, so a layered approach prevents water damage before it reaches the wood.

Sealants for damp areas and elevating stands
Use breathable, waterproof finishes where humidity is persistent. Apply a targeted beehive sealant on end grain and lower joints in coastal or fog-prone areas to slow ingress without trapping moisture.
Elevate hives on stands to stop splashback and wicking into lower boards. Stands also improve airflow under the box and reduce rot risk in wet seasons.
- Grade the site or add pavers so water flows away from bases during heavy rain.
- Install rain shields or sloped covers to shed water and shorten wet periods on vertical faces.
- Store painted components in dry, ventilated spaces and use breathable covers to keep dust off while letting wood breathe.
| Measure | Purpose | Benefit |
|---|---|---|
| Elevation on stand | Limit splashback | Extends life of lower wood |
| Targeted sealant | Protect damp areas | Controls water entry without trapping moisture |
| Site grading | Improve drainage | Reduces puddling near hives |
Routine checks after storms are essential. Inspect seals, lower seams, and stands to catch early finish fatigue or water ingress. A simple moisture plan that combines elevation, drainage, and selective sealants will keep hive interiors stable and support colony health through changing weather.
Maintenance, inspections, and refreshing finishes over time
A simple inspection routine catches small finish failures before they worsen. Inspect active hives every 7–14 days during busy seasons. This rhythm helps you spot fading, chipping, or pest stains early so repairs stay small.
Look closely at joints, handles, and end grain. These areas show wear first. If you see cracking or dull color, plan a quick service stop.
Seasonal checks for fading, chipping, and water ingress
Increase frequency during high UV months and after heavy rains. Note any blistering or flaking that could let water reach the wood.
Cleaning, priming, and repainting workflow for quick touch-ups
Clean surfaces with mild soap and water, then scrape away loose film. Prime exposed bare wood before you apply new paint so the surface is even.
- Work in a 60–85°F window with low humidity for best adhesion and cure time.
- Apply thin, even coats; let each coat dry per label guidance before adding another.
- Use small detail brushes on corners and handles to rebuild the protective layer quickly.
- Rotate boxes to a bench for service so active colonies remain undisturbed in the yard.
- Log product names, batch numbers, and service dates to repeat successful systems.
“Small, timely touch-ups extend finish life and reduce the need for full repaints.”
When discoloration stems from pests or mildew, clean thoroughly before recoating so the new film bonds properly. Proactive upkeep saves time and materials while keeping hives healthy for beekeepers and effective for beekeeping routines.
For a case study on practical protection, see protecting your beehive.
Common mistakes to avoid with hive painting
Small mistakes during finishing often lead to large problems later for active colonies.
Never paint interior surfaces. Bees need bare wood to build wax and propolis layers. Interior finishes can disrupt colony behavior and trap unwanted chemicals.
Don’t skip prep. Failing to sand and prime causes poor adhesion, early peeling, and water entry at joints. Seal end grain and finger joints carefully to reduce absorption.
- Match color to local climates; dark tones can overheat in hot zones, light tones may be too cool in northern sites.
- Avoid high-odor, solvent-rich products; lingering smell deters colony acceptance.
- Allow 48–72 hours after the final coat before placing a beehive outdoors to let solvents dissipate.
- Keep records of product names, batch numbers, and dates when you paint beehives to repeat successful results.
| Mistake | Impact | Fix |
|---|---|---|
| Painting interior | Colony rejection, contamination | Leave internal surfaces bare |
| Skipping prep | Peeling, moisture ingress | Sand, primer, seal end grain |
| Wrong color for climate | Overheating or heat loss | Choose tones suited to local climates |
| Using solvent-rich products | Off-gassing that affects bees | Pick low-odor formulations; read labels |
“A careful prep and the right timing protect wood, colonies, and your time in the apiary.”
Smart purchasing tips for U.S. beekeepers
A practical purchasing plan helps beekeepers balance upfront cost with durability.
Favor mid-grade exterior products paired with a compatible primer. Mid-grade options usually outlast the cheapest cans while keeping costs reasonable. Using a good primer reduces the number of top coats needed and improves long-term performance.
Shop discounted “oops” colors to stretch your budget, but verify the label for exterior use and low-VOC ratings. Testing a quart on one box first reveals real-world wear before you buy gallons.
- Compare data sheets for UV and mildew resistance plus recommended film thickness.
- Stock detail brushes, rollers, and sandpaper so touch-ups are quick and neat.
- Consider deck stains with UV inhibitors when you want visible wood grain and sun protection.
| Purchase Tip | Why it helps | Action |
|---|---|---|
| Mid-grade + primer | Better coverage, fewer repaints | Choose matched systems |
| “Oops” exterior colors | Cost savings | Confirm low-VOC label |
| Track products | Repeatable results | Log brand, color codes |
Evaluate total cost of ownership. Durable choices and consistent systems save time for beekeepers and reduce repaint cycles as the apiary grows.
Conclusion
Small prep steps yield big gains in longevity and fewer repairs down the line. A clear routine—proper sanding, a compatible primer, two measured topcoats, and a 48–72 hour cure—keeps wood serviceable and colonies calm. Choose low-odor, eco-friendly options when possible and match color to your climate to limit thermal stress.
Combine finishes with good site work: raised stands, drainage, and targeted sealant at end grain. Regular inspections and timely touch-ups save time and money. The result is straightforward: better protection, less rework, and a healthier home for bees that lasts season after season.
FAQ
Why finish wooden beehives before placing bees inside?
Finishing exterior surfaces protects wood from rain, UV, and temperature swings, slowing rot and splitting. A proper finish extends service life, reduces maintenance, and helps keep colonies healthier by limiting moisture intrusion and insulation loss.
What makes a paint or finish safe for bees?
Look for low-VOC, water-based formulations with minimal odor and no harmful biocides. Non-toxic sealants such as linseed oil or beeswax-based products provide protective films without harsh solvents. Always avoid strong smells and known pesticide additives.
Should I paint the inside of hive boxes?
No. Do not paint interiors or areas where bees contact comb and frames. Leave brood chambers and inner surfaces untreated to prevent chemical exposure and preserve natural hive microclimate and pheromone signals.
Which exterior paint types work best for U.S. climates?
Water-based exterior latex or acrylic paints perform well across most climates because they resist flaking, have lower odor, and offer good UV protection. In hot regions choose lighter tones; in cool regions, darker shades help retain warmth.
How many coats are needed and how should I apply them?
Apply a water-based primer if using a light topcoat, then two thin, even topcoats on exposed surfaces. Thin passes reduce drips and improve drying. Pay special attention to edges and joints to seal end grain and prevent moisture entry.
How long should painted hives cure before introducing bees?
Cure in 60–85°F conditions with low humidity. Allow at least 48–72 hours for off-gassing of water-based products; longer if temperatures are cool or humidity is high. Ensure the scent has dissipated before putting colonies inside.
Can natural finishes like linseed oil or wax protect hives effectively?
Yes. Boiled linseed oil, beeswax blends, or wax dipping preserve wood and maintain a low-odor surface. They require more frequent reapplication than modern exterior paints but offer a chemical-light option favored by many beekeepers.
How do I choose hive colors to reduce drifting and suit my locale?
Use distinct but not highly reflective colors to help bees orient and reduce drifting. Match tones to climate: white or pale creams reflect heat in hot zones; muted darker shades absorb some warmth in cool regions. Avoid metallic or high-gloss finishes.
What prep steps prevent paint failure on wooden boxes?
Sand rough surfaces, remove dust, and dry-fit components before finishing. Seal end grain and exposed joins. Use a quality exterior primer on bare wood and ensure surfaces are clean and fully dry before topcoating to improve adhesion.
Are primers necessary, and which type is best?
A water-based exterior primer improves topcoat adhesion and longevity, especially with light colors. It seals wood and reduces the number of finish coats needed. Select primers labeled for exterior wood and low VOCs.
How do I protect hives in persistently damp sites?
Elevate boxes on stands to improve airflow and drainage. Add simple overhangs or screened bottom boards to shed water. Use sealants on exposed joints and ensure good ventilation to reduce condensation inside the colony.
When should I repaint or touch up existing hives?
Inspect seasonally for fading, chipping, or water ingress. Touch up exposed edges and corners as soon as you see wear. Repaint whole boxes when multiple areas show failure or every few years, depending on finish type and climate stress.
What common mistakes should be avoided when finishing beekeeping equipment?
Avoid painting interiors, skip proper prep, or using high-odor solvent-based coatings. Do not deploy boxes before full cure. Also avoid shiny metallic or reflective finishes that can distress colonies or attract predators.
Any purchasing tips for U.S. beekeepers shopping for safe coatings?
Choose mid-grade exterior water-based paints and compatible primers labeled for outdoor wood and low VOC. Consider “oops” or discounted buckets for color experiments, and buy small quantities for testing scent and cure time before treating large numbers of boxes.