Queen management offers beekeepers a proven way to lower mite pressure without heavy chemicals. Updated guidance from the National Bee Unit (October 2024) highlights queen trapping as a targeted technique to induce a controlled brood pause and improve varroa control.
By restricting the queen inside the hive, caretakers time the colony growth so capped cells disappear. This forces mites onto adult bees and opens a window for effective soft treatment, such as oxalic acid, while protecting honey stores.
Successful use depends on precise timing, sufficient space in the brood box, and careful monitoring of frames and eggs. This article outlines essential equipment, step-by-step methods, and seasonal management tips to help colonies endure through winter and beyond.
Key Takeaways
- Confining the queen creates a broodless period that exposes varroa mites.
- Timing and space in the brood box determine treatment efficacy.
- Soft treatments like oxalic acid work best during the exposure window.
- Proper methods reduce reliance on harsh chemicals and protect honey.
- Refer to detailed trapping guidance for practical steps: queen trapping guidelines.
What is a brood break queen cage and how does it work?
A concise definition helps. A short enclosed holder keeps the reproductive female from reaching combs, creating a controlled pause in brood production. This method, often called brood break trapping, gives beekeepers a predictable window to act.
The mechanics of brood restriction
The tool functions by spatial restriction. Mesh walls let workers feed the restricted individual while stopping movement to laying sites. Without access to empty cells, eggs cease to appear and sealed cells mature out.
Stopping the reproductive cycle
When the colony becomes brood-free, varroa mites leave sealed cells and ride adult bees. This shift makes treatments like oxalic acid far more effective. The process also standardizes the hive so beekeepers can assess hygiene and mite levels.
- Safety: the mesh must permit feeding.
- Timing: align confinement with frame checks.
- Outcome: reduced mite pressure and protected honey stores.
For practical setups and frame ideas, see this guide on cage frames. For treatment comparisons during the exposure window, review treatment options.
Determining the optimal timing for your apiary
Timing for trapping depends on local forage patterns and seasonal shifts. Local climate and year-to-year variation mean the best moment varies by region. Plan around your main honey flow so the colony finishes foraging before confinement.
Follow guidance that suggests trapping after the main crop has been laid but before winter sets in. In cooler climates natural pauses can occur mid-November to mid-January and last 5–10 days.
Many beekeepers target the June gap, a short forage dearth, to create a controlled pause. This syncs the colony cycle with oxalic acid treatment, which works best when mites are on adult bees.

Use older drawn comb frames inside the restricted area to encourage continued laying in the confined space. Monitor the hive closely to avoid stress to the reproductive female and maintain colony strength for the summer honey flow.
- Assess local nectar calendar and weather forecasts.
- Plan trapping after peak foraging but with enough time to treat before winter.
- Use drawn-out comb and regular checks to ensure welfare and effectiveness.
| Region / Window | Recommended Timing | Key Benefit |
|---|---|---|
| Temperate (UK/NE US) | Post-main flow; Nov–Jan natural pause | Aligns with natural broodless period for effective acid treatment |
| Warm temperate | After main nectar flow; avoid cold snaps | Prevents colony stress and preserves honey stores |
| Regions with June gap | Implement during forage dearth in June | Creates predictable window for varroa control |
| Variable climates | Tailor timing yearly; monitor frames and eggs | Synchronizes treatment with mite life cycle for long-term control |
For practical guidance on timing and summer deployment, read this note on timing of small cage deployment. For monthly varroa thresholds to help plan treatment, see varroa mite seasonal thresholds.
Essential equipment and preparation steps
Prepare equipment carefully before you enter the hive to ensure smooth manipulation and minimal stress. Proper prep saves time and keeps the colony healthy during the temporary restriction period.
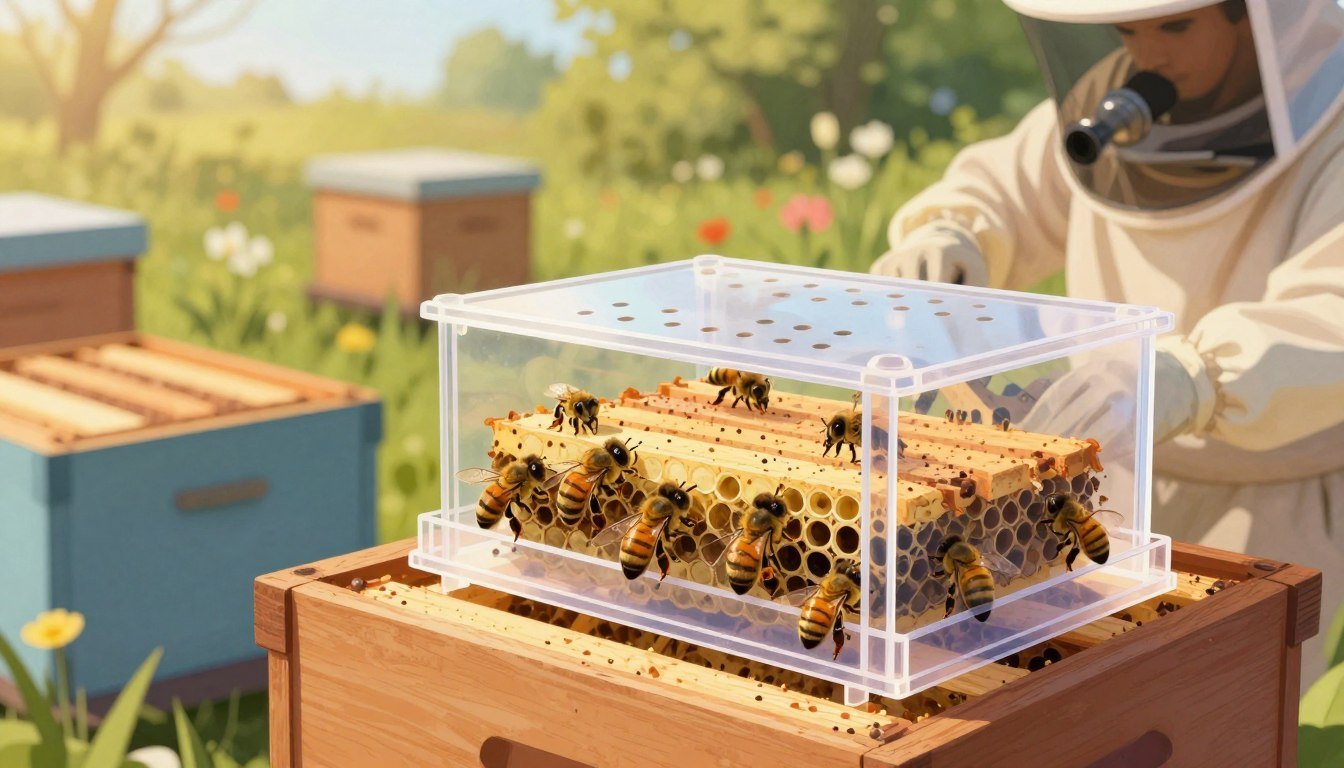
Select durable gear that suits commercial or hobby setups. Use a frame-style holder with a mesh around 4.3 mm to let workers feed while keeping the reproductive female contained.
Selecting the right confinement tool
Key items:
- Three frames of older, drawn comb to give enough space for laying and to keep bees calm.
- Rubber bands to fasten the holder and stop escape during frame manipulation.
- Small, portable live-holding cage for safe handling while rearranging frames.
- Consider the Scalvini system for shallow, injection-moulded convenience that mounts to a frame.
Before starting, remove two frames or insert a dummy board to create center space in the brood box. Label frames with a marker or drawing pins to track movement and brood pattern.
Scent the holder by leaving it in the hive briefly; that helps acceptance. Finally, prepare the hive for oxalic acid treatment after the exposure window to maximize efficacy and safety.
| Item | Purpose | Notes |
|---|---|---|
| 4.3 mm mesh frame holder | Restricts movement while allowing feeding | Standard mesh for worker passage and containment |
| Three drawn comb frames | Provide laying space and stability | Prefer older comb for reliable acceptance |
| Rubber bands & small live-holding unit | Secure the setup during manipulation | Use strong bands; have extra on hand |
| Scalvini-style frame cage | Quick mount for controlled isolation | Good for commercial operations and repeatability |
For design comparisons and product picks, review this short guide on best introduction holders and consult specific confinement guidance at confinement cage guidelines.
Executing the queen trapping procedure
Begin the trapping routine by placing the reproductive female on a drawn frame at the center of the nest. Set the framed holder so she sits among worker clusters and maintains feeding through mesh. Label that frame and note the start date for the cycle.

Initial setup
On day one, position the frame with drawn comb centrally in the brood nest. Close the holder carefully to avoid harm and leave adequate space around the frame for workers to move and feed.
Managing the nine day cycle
The nine-day interval between visits is critical. Check only at planned times; extend to ten days only when necessary for practical reasons.
- Day 9 — transfer the reproductive female onto a fresh frame and label the old frame.
- Day 18 — remove the first capped frame and destroy it after gently shaking bees off the comb.
- Continue removals until day 36 to crash mite populations.
Final frame removal
By day 27 you may release the reproductive female back to the colony and remove the frame holder for cleaning. Follow with oxalic acid treatment during the exposure window if needed for extra varroa control.
Safety notes: handle transfers slowly to avoid injury and always shake bees off frames before disposal to protect workers. This systematic method keeps the colony productive while drastically reducing mite numbers.
- Tip: For a chemical-free perspective on trapping and drone strategies, see the management note on chemical-free management of varroa.
- Tip: If swarming risk concerns you during confinement, read practical indicators on hive swarm preparation.
Balancing colony health and mite control
A deliberate program that pairs temporary confinement with targeted treatment gives strong, lasting results.
Large research across ten European countries found that caging the reproductive female significantly lowers varroa mites in colonies. When combined with an oxalic acid treatment the effect multiplies: oxalic acid exceeds 90% efficacy against mites on adult bees during a broodless period.
Nurse bees enter a light rest phase while the queen remains confined, slowing aging and preserving workforce quality. After release, the swollen worker number raises new eggs rapidly and helps the colony recover within about two months.
Practical points for beekeepers:
- Combine methods: pair the short confinement with an authorized oxalic acid comparison to maximize mite control.
- Legal safety: always use oxalic acid that is an authorized bee medicine for your region.
- Monitor frames: track frame changes and worker numbers during the days of treatment to avoid stress.
When managed correctly, this combination lowers mite population, protects honey stores, and supports strong overwintering without relying on harsh chemicals. For practical trapping steps and guidance see the detailed confinement guidance.
Conclusion
To sum up, combining controlled isolation with an oxalic acid program offers reliable mite control.
This article outlined clear steps for using a small confinement holder to induce a short brood pause and lower varroa loads. By pairing timed isolation with authorised oxalic acid treatment, beekeepers can cut mites while protecting honey and worker health.
Well-managed transfers and careful tracking of frames keep colonies strong for the summer flow and ready for winter. Mastering these methods helps colonies recover quickly and improves honey yield over time.
For further technical guidance on enforcing a brood break with oxalic acid, see this practical note: enforcing a brood break with oxalic.
Consistent management, good equipment choices, and timely treatment give beekeepers the best chance to protect bees, reduce mites, and keep colonies productive.