Returning colonies need calm, clear checks. Start with a quick look at the hive entrance and flight activity between 11:00 and 2:00, when worker bees forage most. Keep surface checks brief so you do not stress the colony.
Plan full inspections every 10–14 days. Wear minimal disturbance gear and use a reliable hive tool to open the top and bottom boxes. Check frames for brood pattern, honey stores, and any signs of disease or varroa mites.
Record simple notes on brood, queen laying, and stores. A clear log helps spot declines that national surveys like the Apiary Inspectors of America track. Use aids such as the Queen Rite Dial by Brian Koper and Jason Crook for efficient queen checks.
Key Takeaways
- Do brief entrance checks during peak foraging hours: 11:00–2:00.
- Perform full inspections every 10–14 days to protect brood and stores.
- Use a hive tool and log notes on frames, queen, and varroa mites.
- Focus on the bottom box and top cover with careful handling.
- Track losses and trends; national data guides long-term beekeeping plans.
Understanding the Importance of Post-Pollination Inspections
Routine checks after heavy foraging seasons protect colony strength and long-term productivity. Regular hive inspections give the beekeeper a simple, reliable way to track recovery and spot trouble early.
These inspections focus on the queen, brood pattern, and food stores. A clear view of these elements shows whether the bees have rebounded from intensive work.
Schedule inspections every 10–14 days so small issues do not escalate. This rhythm keeps colonies productive and helps beekeepers prioritize treatments or feedings.
“Short, consistent inspections are more effective than rare, long examinations.”
- Confirm queen presence and laying pattern.
- Check honey and pollen reserves.
- Watch for early disease or stress signs.
| Check | Why it matters | Action |
|---|---|---|
| Queen status | Drives colony growth | Verify brood and replace if failing |
| Stores | Fuel for recovery | Supplement feed if low |
| Signs of disease | Prevents spread | Isolate and treat promptly |
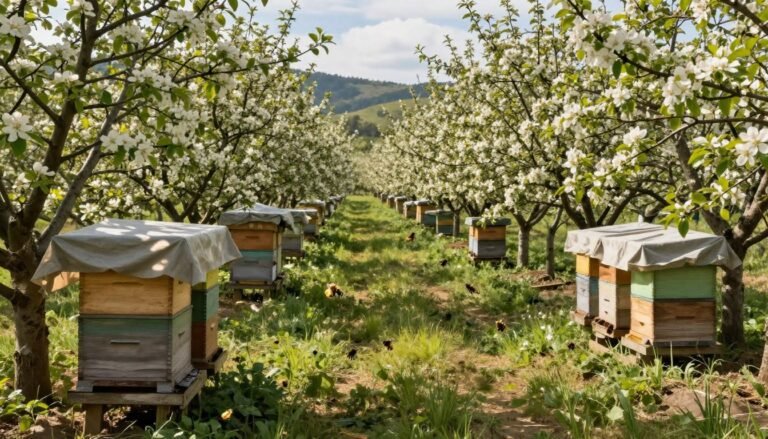
How to Inspect Rented Hives After Pollination
Begin visits by confirming supplies and a step-by-step plan to limit hive stress. Gather a smoker, a reliable hive tool, and a waterproof notebook such as Rite In The Rain. A clear plan helps you work quickly and gently.
Preparation Steps
New beekeepers should aim for checks during spring and summer, roughly every 10–14 days. Keep the list short: smoker, tool, protective gear, and a notebook for notes on brood, honey, and frames.

Safety Protocols
Always wear protective clothing because colonies can be defensive after a long trip. Open the box slowly and handle each frame with care to avoid crushing bees.
- Work in pairs when possible and have a quick plan for queen checks.
- Watch for queen cells and varroa mites — these signal urgent attention.
- Use short, frequent inspections rather than long exams; this reduces stress.
| Task | Why it matters | Fast action |
|---|---|---|
| Assemble gear | Speeds work and limits hive open time | Gather smoker, hive tool, notebook |
| Frame handling | Protects bees and brood | Lift gently, avoid crushing |
| Record notes | Tracks trends and issues | Use a waterproof notebook like Rite In The Rain |
Further reading: See an overview on why thorough hive inspections matter and guidance about the best time for checks.
Essential Gear for a Successful Inspection
A compact gear list cuts open time and keeps the colony calm during checks.
Every beekeeper needs a sturdy hive tool. It pries apart boxes and frames sealed with propolis. Use a tool that fits your grip and lifts frames without twisting.
Smoker readiness is critical. Light it before you open the hive and aim for cool, white smoke that soothes the bee cluster without overheating them.
- Protective clothing: veil and gloves reduce sting risk and let you work confidently.
- Notebook: keep concise notes on brood, queen status, and honey stores for trend tracking.
- Kit organization: a tote or tray keeps the frame grip, brush, and spare tool within reach.
Durable gear saves time and prevents damage to frames and box corners. A frame grip and soft brush help manage bees gently during a hive inspection.
“Prepared gear shortens visits and lowers colony stress.”
For a practical checklist and a clear walkthrough, see this step-by-step hive inspection guide.
Determining the Optimal Time for Hive Checks
Choose midday windows on calm, sunny days for the safest and clearest observations.
Best hours: Aim for the 11:00 a.m.–2:00 p.m. window. Many forager bees are away then, so entrance activity is low and frame work goes faster.
Weather Considerations
Never open a hive when the temperature is below 57°F. Cold drafts can harm brood and stress the colony.
Avoid windy or rainy days. Wind drives defensive behavior and rain keeps bees clustered. Check the forecast and plan your time accordingly.
Limit checks during winter. Opening the boxes on cold days drops internal heat and risks stores and brood. In spring, short checks are critical for queen and honey level reviews as the colony expands.
“Pick calm, warm afternoons and watch bee behavior at the entrance before you begin.”
- Look for steady flight and calm guard activity as a signal that a check is safe.
- Work quickly and keep frames steady to protect brood and honey.
| Condition | Why it matters | Action |
|---|---|---|
| 11:00–2:00 | Foragers mostly away | Do frame checks and queen sighting |
| Temperature ≥57°F | Protects brood | Delay if cooler |
| Sunny, calm day | Less defensive bees | Schedule regular hive inspections |

For field rentals and timing guidance, see the beekeeper rental guide.
Approaching the Hive with Confidence
Approach each hive with steady steps and a clear plan. Your movement and tone shape the day’s inspection and the colony’s reaction.
Stand slightly off the flight path and avoid blocking the hive entrance. This keeps you out of bees’ normal traffic and lowers sting risk.
Pause and watch entrance activity for a minute. Note whether flight is steady or agitated; this brief check gives a quick read on mood and time for your work.
Give a gentle puff of smoke at the entrance. One soft breath of smoke helps mask alarm pheromones and calms guards without overusing smoke.
- Keep notes handy, but focus on smooth moves and steady hands.
- Move slowly when lifting frames; sudden shifts jar the brood and alarm bees.
- Work with confidence—beekeepers who rush often trigger defensive responses.
“A calm approach shortens checks and protects both keeper and bee.”
For practical guidance on setup and placement, consult this hive beekeeping guide and these beehive installation tips.
Opening and Disassembling Hive Components
Start by clearing a steady workspace and laying out your gear before lifting any boxes. Organize the smoker, hive tool, and notebook within arm’s reach. A set plan cuts open time and keeps the colony calm.
Removing Covers
Use the hive tool to gently pry the outer lids and then the inner cover. Lift slowly and set the covers upside down on the ground. That creates a flat, stable base for boxes you will remove.

Handling Boxes
Work from the bottom up when practical; many keepers find this reveals brood and the queen more clearly. Give a light puff of smoke before lifting each box so the bees are subdued.
Lift boxes straight with your legs, not your back, if they feel heavy. Keep frames in order and return them to the same spots. This preserves comb orientation and makes future inspections faster.
- Use the hive tool on tight seams and avoid prying frames sideways.
- Handle each frame gently; do not crush bees or smear honey.
- Keep concise notes on brood, queen, and stores as you work.
| Step | Why | Quick tip |
|---|---|---|
| Remove top cover | Access inner hive | Set covers upside down |
| Smoke each box | Calm bees | Light, cool smoke |
| Work bottom-up | See brood and queen | Keep frame order |
“A steady routine and careful handling speed the inspection and protect the hive.”
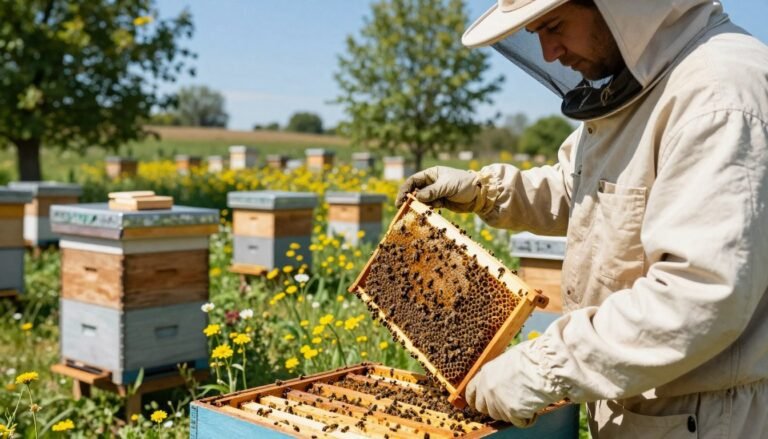
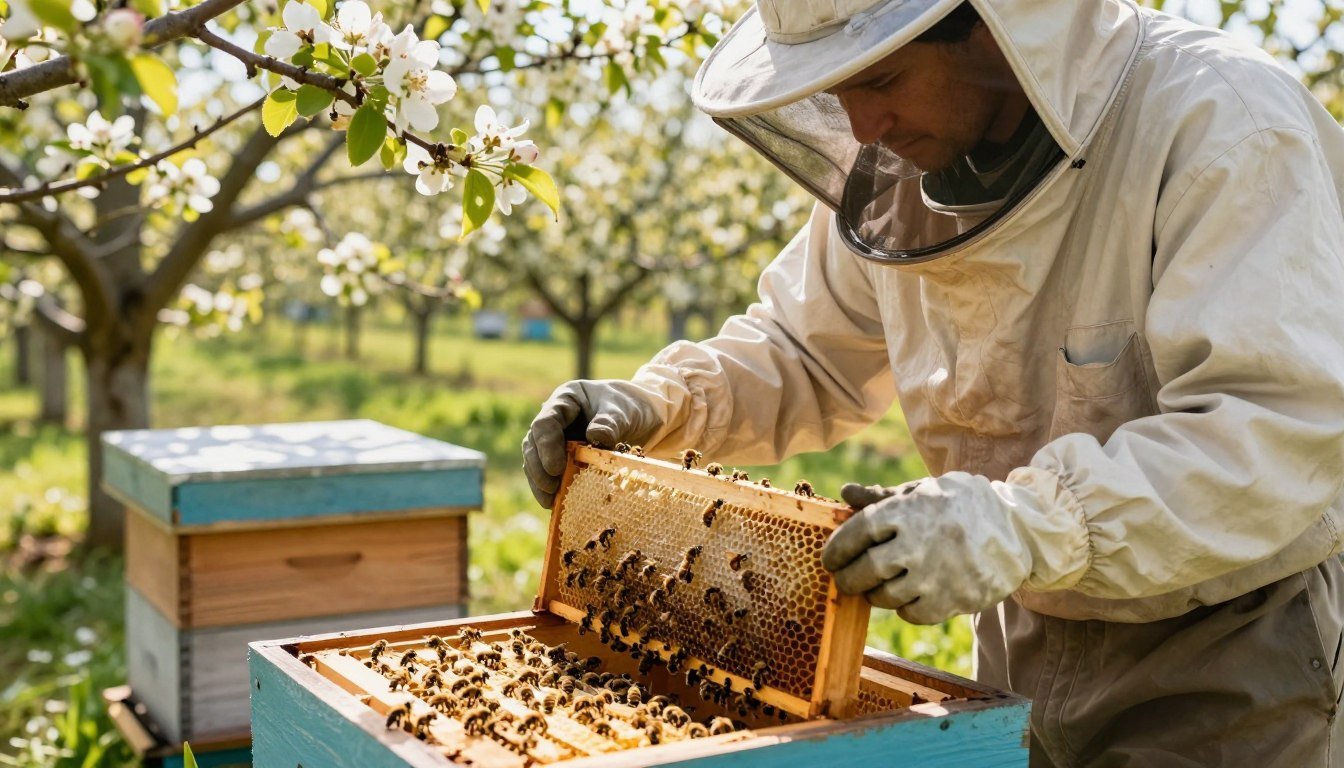
Evaluating Frame Health and Brood Patterns
Assess each frame one at a time, looking for continuous brood and fresh eggs in the cells.
Gently lift frames in order and keep them in the same sequence. A clear, solid brood patch across the center of a frame signals a healthy colony.
Look for tiny white eggs and open larvae as proof the queen is actively laying. If you have a marked queen, spotting her makes confirmation faster and less disruptive.
When you find queen cells, note their location and number. These cells can mean the colony is preparing to swarm or that the queen may be failing and needs replacement.
Pay special attention to the bottom box where brood often concentrates. Check stores and brood coverage, and make quick notes on each frame if any disease signs or low honey appear.
Work calmly, keep frame order, and limit open time. If you want a technology check, consider a link for thermal brood analysis for another layer of data: thermal brood analysis.
“A strong brood pattern is the best indicator of colony health; record findings promptly and act on clear deficits.”
Identifying Signs of Disease and Parasites
Early detection of pests and sickness keeps colonies productive and prevents costly losses. During a brief inspection, scan quickly but methodically so the hive has minimal open time.

Varroa Mite Detection
Varroa mites are a primary parasite to watch. Check every frame for visible mites and use a sugar roll or alcohol wash when you need counts.
Tip: A rising mite count calls for prompt treatment to protect brood and adult bees.
Queen Cell Identification
Look along the bottom of frames for queen cells. Multiple cells suggest the colony may be superseding or preparing to swarm.
If queen laying drops suddenly, note the change and mark the frames where queen cells appear.
Honey Store Assessment
Assess stores in the bottom and top box so the colony has enough honey for lean periods.
Low stores at inspection time mean feeding or combining colonies might be needed before winter.
“Document every finding; clear notes guide treatment decisions and track trends over weeks.”
| Sign | Why it matters | Action |
|---|---|---|
| Varroa on brood | Weakens brood and spreads viruses | Run mite count; treat if above threshold |
| Queen cells | Change in leadership or swarm prep | Locate queen, assess queen laying, decide on requeening |
| Low honey stores | Insufficient food for winter | Feed syrup or supplemental stores |
Managing Bee Behavior During Inspections
Watch guard activity at the entrance; it often signals how the colony will respond during checks.
If the bees grow agitated, it usually means you disturbed the hive too much or the weather is poor. Pause and step back for a minute. Let the colony settle before you continue.
Keep an eye on the hive entrance for increased guard numbers. A busy entrance can indicate the colony feels threatened and you should shorten the inspection time.
If you spot queen cells, expect higher defensiveness. Move with extra care, avoid loud noises, and minimize frame handling near those cells.
Use smoke sparingly. Small puffs can calm guards, but too much smoke stresses the colony and makes checks harder.
High varroa mite counts often correlate with agitated behavior. Note mite levels and plan treatment if counts are high.
- Stay calm and move slowly; steady hands reduce alarm cues.
- Work in short bursts and return frames in order.
- Learn each colony’s temperament—every bee group reacts differently.
“By staying calm and reading the hive’s signals, inspections become safer and more effective.”

| Sign | Why it matters | Action |
|---|---|---|
| Increased guard activity at entrance | Colony feels threatened | Step back, wait 5–10 minutes, reduce open time |
| Agitated bees on frames | Stress or poor weather | Close hive, revisit on a calm day |
| Visible queen cells | Possible swarming or supersedure | Handle frames near cells last; re-evaluate queen status |
| High varroa mites | Weakens colony and raises aggression | Record counts; plan treatment and shorten checks |
For practical hygiene steps that reduce stress and disease risk, review an apiary hygiene checklist. For a basic overview of bee care and colony health, see the University of Georgia’s honey bees and beekeeping guide.
Implementing Effective Record Keeping Methods
Start small: a page per hive will save time and prevent guesswork later.
Low-tech documentation keeps the focus on the colony without gadgets. A waterproof notebook such as Rite In The Rain is ideal for field notes during wet spring or cold winter checks.
Low-Tech Documentation
New beekeepers should write brief entries after every hive inspection. Note the queen status, brood pattern, and stores on a single line if you need a fast log.
Use the Queen Rite Dial on the box for quick visual marks of queen condition and needs. That saves time when doing multiple hive inspections in one day.
- Track frames inspected, dates, and any mites counts.
- Record feeding, added supers, and queen changes by month.
- Keep entries consistent; a short habit beats a perfect system.

| Record | Why it matters | Quick entry example |
|---|---|---|
| Queen status | Shows laying and leadership | Marked on Queen Rite Dial; note eggs seen |
| Brood & frames | Tracks growth and frame use | List frames with solid brood (e.g., 4 of 10) |
| Mites & treatment | Protects long-term health | Record count, treatment, and days since |
| Stores & season | Plans feeding by month | Note low honey; feed syrup if needed |
Share concise logs with other beekeepers when you can. Collective records help the wider beekeeping community spot regional issues and improve hive care over time.
Utilizing Modern Technology for Hive Monitoring
Remote sensors now give beekeepers a clear window into hive conditions without lifting a lid. Devices like BroodMinder track temperature, humidity, and weight from the top of the brood nest.

These units send real-time warnings when temperature or mass shifts. During winter, that data helps verify colony survival while limiting disturbance.
In spring, weight trends reveal nectar flows and signal when adding space will help the queen and growing brood. A lot of keepers use this information to plan feedings and supers.
Benefits:
- Reduce the number of full openings and stress on the colony.
- Detect problems early with continuous readings.
- Scale management across many sites with remote dashboards.
Technology complements hands-on checks, not replaces them. Integrate sensors into a management plan and you gain time, better data, and fewer emergency visits.
“Remote monitoring has become an essential tool for modern apiaries.”
For a deeper look at current research and sensor adoption, read about in-hive sensors.
Conclusion
Learning to read your colony takes patience, careful notes, and hands-on practice. Mastering hive inspections is a journey. Keep visits short and focused and record clear observations each time.
Good beekeeping habits protect the queen, support healthy bees, and save honey stores. A single clear note about brood or pests can steer your next decision.
New beekeepers and veteran beekeepers benefit from steady routines. Treat every inspection as an opportunity to learn, ask peers for help, and refine your craft.
Stay consistent, work calmly, and enjoy the rewards of a thriving hive. Confidence grows with practice, and your apiary will reflect that care.
FAQ
What is the main goal when checking rented apiary colonies after pollination?
The primary goal is to verify colony strength, confirm the queen is laying, assess brood patterns, check honey and pollen stores, and spot signs of disease or varroa mites. These checks protect pollination outcomes and help prepare colonies for transit or seasonal changes.
What preparation steps should a beekeeper complete before approaching a hive?
Wear appropriate protection, have a smoker, hive tool, spare frames, and a notebook or app for records. Review recent notes on the colony, secure an assistant if needed, and choose calm weather and midmorning when foraging is active.
Which safety protocols reduce stings and colony stress?
Move slowly, use a gentle smoker lit with natural fuel, avoid sudden noises, keep equipment tidy, and limit hive open time. Communicate with nearby workers, tie back loose clothing, and carry an epinephrine kit if allergic workers are nearby.
What essential equipment should be on-hand for an effective check?
Bring a hive tool, smoker, protective suit or veil, gloves, frame feeder or dummy boards, varroa test kit (sugar roll or alcohol wash), marking pen, and a camera or smartphone for photos and records.
When is the best time of day and season for hive checks?
Inspect midmorning to early afternoon on warm, calm days. Perform post-pollination checks within a few days after rental return and again weekly for several weeks to monitor queen laying, stores, and brood development.
How does weather influence the timing of a check?
Avoid inspections during rain, strong wind, or temperatures below 55°F. Bees are defensive in cold or wet conditions and less likely to forage, making inspections harder and more disruptive.
How should you approach the entrance and outer area of the hive?
Watch flight patterns and guard activity for a minute before handling equipment. Clear debris from the landing board, close any wide openings to reduce robbing risk, and position yourself slightly to the side of the entrance to avoid blocking traffic.
What is the right method for removing covers and outer components?
Light the smoker and apply a gentle puff at the entrance and top. Use the hive tool to pry the outer cover and inner cover on one side, lifting carefully to avoid crushing bees. Place covers downwind and maintain a calm pace.
How should boxes and supers be handled during disassembly?
Remove outer boxes one at a time, setting them on a dry, shaded surface. Inspect each box for bee density and stores before lifting. Use a foot brace or helper for heavy honey supers to reduce strain and prevent box drops.
What signs indicate healthy brood patterns and queen performance?
Healthy brood displays consistent, punctured brood caps with few empty cells in the central frames. A laying queen will produce mixed-age brood in neat bands. Spotting multiple patches of uncapped brood or irregular patterns can signal queen issues.
How can varroa mite presence be detected quickly?
Perform a sugar roll or alcohol wash on a sample of adult bees for a reliable varroa estimate. Look also for deformed wing virus symptoms on emerging bees and spot mites on brood cappings or adult bodies during close frame inspection.
What should a beekeeper look for when identifying queen cells?
Look along the lower edges and face of frames for large peanut-shaped or pointed cells. Queen-rearing cells that are vertical and larger than worker cells indicate potential supersedure or swarming. Determine if the colony has swarmed or is preparing to replace a queen.
How do you assess honey stores and overall nutrition?
Inspect frames for capped honey and pollen in brood-adjacent areas. Note the proportion of capped stores versus empty cells. If stores look low, consider feeding sugar syrup or pollen substitute, especially if brood is expanding or winter is approaching.
What tactics help manage bee behavior during inspections?
Use minimal smoke, maintain calm movements, avoid prolonged exposure of brood, and work methodically. If bees become defensive, close the hive and return later. Reducing inspection duration limits stress and lowers robbing risk.
Which low-tech record-keeping methods are effective in the field?
Use a waterproof notebook, pre-printed inspection sheets, colored frame tags, and a simple scoring system for queen, brood, stores, and pests. Mark frames with chalk or grease pencil to track progress between visits.
What modern monitoring tools make post-pollination checks easier?
Employ digital hive scales, temperature and humidity sensors, entrance monitors, and smartphone photo logs. Varroa test kits and handheld microscopes help with rapid diagnosis, while cloud apps centralize records for multiple rental colonies.