This article answers the practical question of how many colonies a single beekeeper should run. It frames a clear, pragmatic path: goals, time, skills, and local forage shape the right number, not a universal figure.
Beginners are often told to start with at least two hives. With two, a beekeeper can compare performance, move a frame of brood, and help a weak hive recover. Routine inspections take about 15 minutes per hive every two weeks, so time scales fast as you add colonies.
Bees forage 2–3 miles, so an apiary’s output depends on surrounding acres, bloom timing, and dearths. Density matters: too many beehives in one spot raises competition and robbing risk. This guide previews seasonal time math, layout tips, and scaling examples for hobby and small commercial setups.
Key Takeaways
- Start with two to compare and support weak colonies.
- Plan inspections: ~15 minutes per hive every two weeks.
- Assess forage: bees range 2–3 miles; area dictates production.
- Goals (honey, pollination, sales) set the right number and calendar.
- Density and layout reduce conflict and improve management.
- For seasonal tasks and benchmarks, see seasonal beekeeping tasks.
What this guide covers and who it’s for
A solid plan helps a new beekeeper match available hours to colony needs without stress.
This section is for people starting in beekeeping, growing hobbyists, side hustlers planning pollination or sales, and solo operators seeking a realistic cap per year. It frames the core question and gives an actionable answer so you can pick a safe, sustainable number of hives.
Use this guide to:
- Start with practical benchmarks and sanity-check your time math.
- Match density to local forage and neighborhood rules.
- Select a target number with room to scale later.
Search intent: finding a realistic number for one beekeeper
Readers want a clear result: a number that fits their goals and calendar. This guide turns that intent into outcomes. Expect simple formulas, examples, and quick decision points rather than vague rules.
“Measure your available time per two-week window, then plan around spring and summer peaks.”
How to use this guide to plan your apiary
Follow these steps in order:
- Set your goals (honey, pollination, bees for sale).
- Record available time and weekend commitments.
- Apply inspection and seasonal workload benchmarks.
- Check zoning and neighbor rules early.
| Topic | What you’ll learn | Action |
|---|---|---|
| Start smart | Why beginning with two helps queen issues and comparisons | Begin with at least two colonies or follow paired-check routines |
| Time math | Inspection rates and seasonal hours per hive | Track 15 minutes per hive every two weeks and seasonal spikes |
| Scaling | Match forage, space, and skills before adding boxes | Set a target number and reassess after the first year |
Quick glossary: start smart with two, layout and density, seasonal workload, cost and legal checks, and techniques to expand. Use the linked beginning beekeeper resource for basics and the expansion tips for growth scenarios: beginning beekeeper guide and expansion tips.
Note-taking tip: Track available time per two-week window, weekend counts in spring/summer, and income ways you prefer. Reassess after your first season and adjust the number for sustainable growth.
How many hives can one person manage
Practical benchmarks let a solo beekeeper size an apiary without burning out.
Quick benchmarks show typical capacity ranges based on time and goals.
- Backyard hobby: up to the mid-20s of hives with part-time attention.
- Focused bee sellers: roughly 100–150 colonies while holding another job.
- Full-time operations: 400–600 colonies with seasonal help and crews.
Yields affect returns: expect about 30–60 lb of honey per hive per year, with strong colonies reaching near 100 lb. At roughly $10 per pound, honey sales add steady money, while pollen, wax, and nucs diversify revenue.

The role of goals
Honey-focused work brings heavy handling in summer. Raising bees emphasizes splits, nucs, and queens. Pollination requires movement and logistics.
“Match inspection discipline and batch tasks to your seasonal peaks.”
| Operation | Typical range | Key tasks |
|---|---|---|
| Hobby | Up to mid-20s | Inspections, swarm control, honey extraction |
| Part-time seller | 100–150 colonies | Splits, queen rearing, nuc sales |
| Full-time | 400–600 colonies | Seasonal crews, commercial pollination, transport |
Start small, prove your per hive routine through a full spring and summer, then scale. For guidance on starting hive counts see starting hive counts.
Start smart: why new beekeepers should begin with two hives
A modest start speeds learning and cushions early mistakes. Beginning with a couple of colonies gives new beekeepers a clear comparison point. You’ll spot normal behavior quickly and notice abnormal brood patterns without guessing.
Practical rescue tactics matter. A frame with 1–3 day eggs moved into a queenless hive lets the bees raise a replacement queen. That option is impossible with one hive and is a vital tool in your first year.
Use frames and adult bees to equalize strength. Shift capped brood or workers from a strong hive to a weaker colony to balance growth and reduce swarm pressure.
- Learn faster with redundancy: different responses teach diagnosis.
- Keep gear efficient: two hives justify standard boxes and tools.
- Document queen status, brood pattern, and feed to guide expansion.
“If one hive falters, the other keeps your project moving.”
When you’re ready to read deeper on resources and management, consult this beginner resource for practical books and checklists.
Time first: build a per-hive calendar you can keep
Start by mapping a realistic calendar that links brief, regular checks to seasonal peaks and your available days. A clear schedule prevents reactive work and keeps colonies healthy.
Inspections and tasks by season:
- Spring: frequent brood checks, swarm control, and feed decisions.
- Summer: supering during nectar flow and quick follow-ups after heavy inspections.
- Fall: mite treatments and building winter stores.
- Winter: outer checks and minimal disturbance on mild days.
Realistic time math: use 15 minutes per hive every two weeks as a baseline. That covers inspections and light tasks. Broader estimates run about 20–40 hours per season per hive depending on goals and local conditions.
Batching work saves time: inspect multiple colonies for the same objectives in one visit. Check queen status, brood frames, and stores at each stop so you move efficiently through the yard.
Limit disruptions. Avoid opening boxes on windy or cool days and keep late-summer visits brief to reduce robbing risk.
“Set recurring days on your calendar and reserve buffer time during peak flow.”
Prepare checklists and supplies before arrival. Track minutes and issues per hive to refine your sustainable number next year. When your planned days fill or inspections overrun, that signal marks your practical capacity.
For a ready template and seasonal planner, see this beekeeping calendar.
Experience and management skills that expand your hive capacity
Experienced beekeepers widen their yards by mastering queen quality, seasonal mite work, and strategic transfers of frames and bees.

Three pillars of sound growth: queen selection, regular mite monitoring, and timely colony equalization. Build repeatable routines for these areas to avoid seasonal collapses.
Replace underperforming queens early. Poor laying patterns rarely self-correct and often cost a productive year.
Queen management, mite control, and equalizing colonies
- Monitor mites on schedule and treat when thresholds are met to prevent multi-hive failures.
- Equalize strength before a dearth by moving frames of brood and adult bees to balance stores.
- Standardize a response plan for queenless, laying-worker, or drone-laying scenarios.
Using splits, nucs, and frames of brood to solve problems
Master splits and nuc creation to relieve crowding and produce on-demand reserves. Keep one nucleus per apiary as a quick fix for queen loss or sudden colony decline.
“Track interventions and outcomes per colony; logs are the quickest path from luck to repeatable skill.”
| Skill | Action | Benefit |
|---|---|---|
| Queen work | Replace or requeen early | Preserves season productivity |
| Mite control | Monitor, treat on thresholds | Prevents collapse within a year |
| Equalizing | Move frames and bees | Reduces robbing and evens growth |
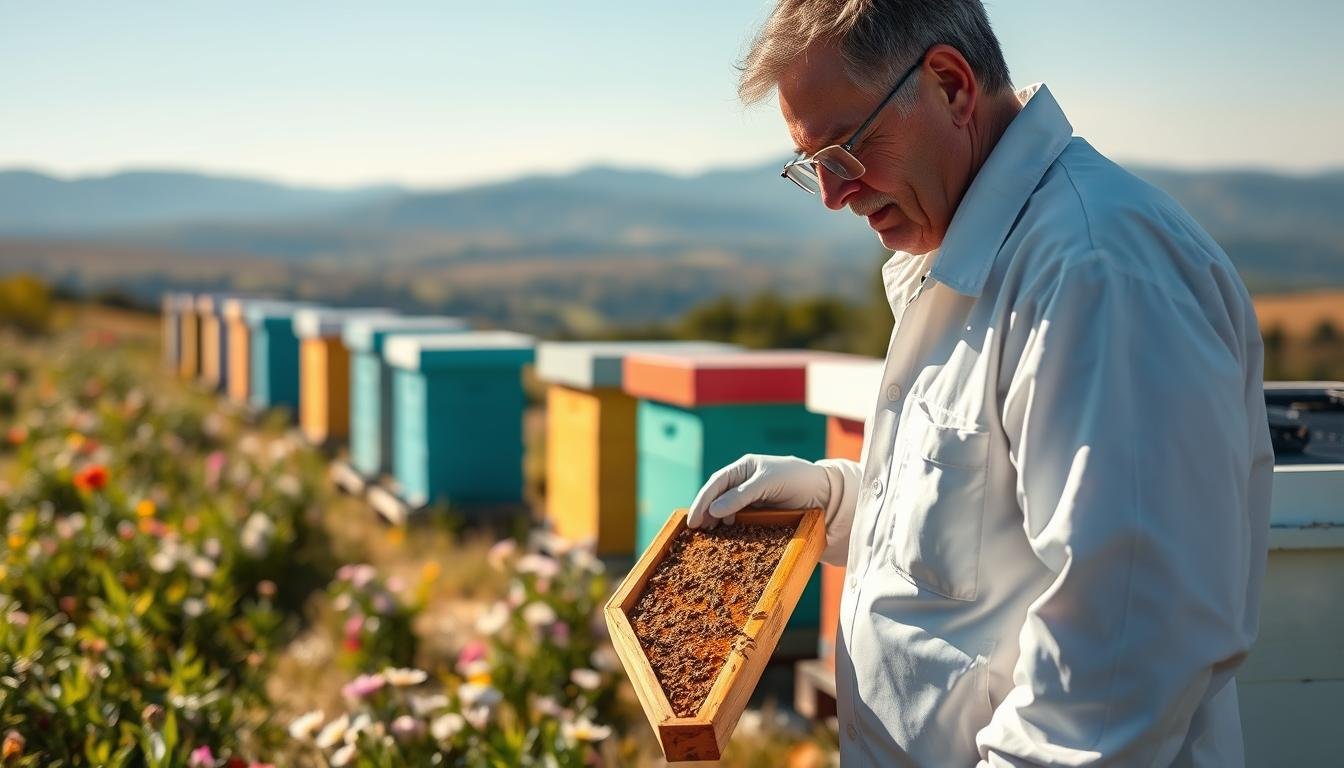
Space, forage, and density: matching hives to your area
Good apiary design begins with reading the land and planning for bee traffic. Start by measuring workable space and noting wind, shade, and access. A tidy layout saves time and reduces stress during peak inspections.
Apiary layout: spacing boxes, drift, and wind breaks
Keep entrances angled to limit drift and help bees find their own hive. Place boxes 6–8 inches apart in tight yards; use 1–2 feet where lifting and servicing is frequent.
Arrange rows or a U-shape to create a simple wind break and make hives easy to ID. Add a low fence, shrubs, or a pallet wall to smooth gusts and guide traffic.
Forage radius and nectar flow: why acres matter more than yard size
Bees range about 2–3 miles, so surrounding acres and bloom timing drive honey and pollen intake more than backyard fences. Track spring and summer blooms in your area to spot dearths before colonies suffer.
Rules of thumb: 2-3 per acre for pollination, adjusting for dearths
For pollination targets, aim for roughly 2–3 hive placement per acre but reduce density when summer nectar flows are short. Hobbyists often notice forage limits before reaching ten colonies in one spot.
| Focus | Practical tip | When to act |
|---|---|---|
| Space | 6–8 in tight; 1–2 ft ideal | If maneuvering is hard, increase spacing |
| Forage | Think acres, not fences | Slow buildup or lots of feeding = forage pressure |
| Density | 2–3 per acre for pollination | Cut back after a weak summer flow |
- Monitor signs: extra feeding, stalled growth, or robbing suggest moving some colonies or adding a second yard.
- Direct entrances away from neighbors and provide a nearby water source to limit stray traffic.
- Reassess after the first summer—spring abundance can mask later shortages.
“Design for bee traffic and forage first; layout for people second.”
Scaling scenarios by beekeeper type
Scaling an apiary depends on your goals, gear, and available weekends. Pick a path that matches your season rhythm and funds, then build systems that save minutes per box.
Backyard hobby: up to ~25 colonies with part-time attention
Plan for 5–25 colonies depending on weekend availability, extraction setup, and family commitments. Focus on healthy stock, simple records, and steady learning each year.
Raising bees to sell: 100–150 colonies while holding a full-time job
With repeatable splits, nuc production, and standard gear, experienced beekeepers reach ~100–150 colonies while working another job. This model trades some honey for predictable cash flow from sales and services.
Full-time honey and pollination: 400–600 colonies with seasonal help
Full-time operations need staging yards, crews, logistics, and migrations to nectar flows and pollination contracts. Expect to invest in transport, labor, and storage before scaling above this range.
- Match goals to workload: honey-heavy work increases lifting and extraction days; sales models emphasize timed splits.
- Build capacity gradually: add colonies only after your inspections, mite controls, and queen work scale without slipping.
- Stabilize income: pair honey with pollen, wax, and pollination fees to smooth cash flow; see cost and harvest planning for details at harvest & cost guide.
| Type | Typical range | Key needs |
|---|---|---|
| Backyard hobby | 5–25 colonies | Time, extraction kit, learning |
| Bee sales | 100–150 colonies | Splits, standardization, marketing |
| Full-time | 400–600 colonies | Labor, transport, contracts |
“Invest in repeatable systems and reserve nucs so setbacks don’t derail the yard.”
For broader benefits of diversified production and services, review this concise guide on beekeeping business models: beekeeping benefits.
Costs, gear, and cash flow per hive
A clear budget tells you when adding another colony makes financial sense.
Start-up and ongoing costs that grow with each box
Expect first-year start-up to run roughly $400–$650 for an initial beehive and about $300 for each added unit.
That includes protective gear, a basic extractor, frames, and bees. Ongoing line items add up: mite treatments, sugar during nectar gaps, paint, labels, and market fees.
When honey, pollen, wax, and propolis offset expenses
With 30–60 lb of honey per year at about $10 per lb, plan $300–$600 gross per hive before costs for packing and labor.
Higher-value items add margin: pollen and propolis sell per ounce, wax at roughly $10 per lb, and seasonal sales of packages, nucs, or established colonies often out-earn honey alone.
- Track per hive cash flow: include labor time as a cost and set breakeven targets.
- Standardize equipment: single-size boxes and frames save replacement and inspection time.
- Reinvest methodically: use honey and pollen revenue to fund growth and a repair reserve.
| Item | Typical cost | Benefit |
|---|---|---|
| First beehives (starter) | $400–$650 | Complete kit and initial stock |
| Additional hive/box | ~$300 | Lower marginal cost |
| Per year revenue (honey) | $300–$600 | Gross, depends on yield and price |
“Budget smart and let product sales cover expansion while keeping a reserve for low nectar years.”
Legal, neighbor, and safety limits in the United States
Legal rules and social expectations often set the practical limit for an apiary.
Start by checking local requirements. Many states require registering beehives and permits to move colonies. Honey labeling also follows food rules, so plan packaging and records before selling.
Local regulations: registration, caps, and labeling
Review municipal codes, county ag offices, and state apiary programs early. Zoning or HOA rules may cap the number of hives per lot or mandate setbacks and barriers.
- Keep registration and inspection records accessible.
- Label honey to meet food-safety rules and trace a source.
- Consider a business license and insurance if you sell product or offer pollination services for money.
Urban and suburban considerations: water, flight paths, and robbing
Provide a nearby water source so bees do not bother neighbors. Aim hive entrances away from sidewalks and play areas to reduce encounters with people and pets.
Avoid long, disruptive inspections during summer dearths. Short visits on weak colonies cut robbing risk and neighbor complaints.
“Communicate with neighbors and offer a jar of honey—goodwill prevents many conflicts.”
| Issue | Action | Benefit |
|---|---|---|
| Registration | File with state or county | Compliance and inspection records |
| Zoning/HOA | Confirm caps and setbacks | Avoid fines and forced removals |
| Neighbor relations | Share contact and schedules | Reduce complaints and safety issues |
Document everything: treatment dates, registration, and sales records. These show diligence if questions arise and protect your money and reputation.
Ways to manage more hives with less stress
Small, repeatable choices yield steady gains. Standardizing gear and routines is the simplest way to cut wasted minutes and reduce errors. Pick a single box size and frame style so parts fit without thinking.
Standardizing equipment and workflows
Choose standard gear. One box and frame type speeds inspections and simplifies stock. It lowers the chance of mismatched parts during splits or repairs.
Use checklists. Inspect, treat, and feed with the same sequence every visit. Checklists make training helpers faster and keep your time per hive steady.
Seasonal helpers and remote yards
Train seasonal staff on limited tasks so you focus on queen and health choices. Use clear instructions and a staging area for tools to save walking and load time.
Create remote yards only when forage and access justify them. Place yards with water nearby and secure access to reduce travel and disturbance.
“Stage gear, batch routes, and hold a spare nuc to solve emergencies fast.”
| Strategy | Benefit | When to use |
|---|---|---|
| Standard box & frame | Faster inspections, fewer mistakes | From first expansion onward |
| Staged gear | Less downtime, fewer trips | Extraction and peak flow |
| Seasonal helpers | Scale labor for peak tasks | During splits and moves |
| Remote yard | Relieves forage pressure | When local acreage is limited |
- Batch and route yards in a U-shape to cut walking and reduce drift.
- Use simple mechanical aids—dollies and hive lifters—to protect your back.
- Track KPIs: minutes per hive, honey per colony, and treatment adherence to guide growth.
Conclusion
, A clear end point ties your goals, hours, and landscape into a sustainable apiary plan.
Start small and prove your routine through a full spring and summer. Begin with a couple of hives, validate the inspection calendar, and confirm local forage before adding more colonies.
Focus on the basics: queen quality, routine mite checks, and timely equalizing protect each hive and save time later. Track minutes, yields of honey and pollen, and treatment dates so decisions are evidence-based.
Grow only when your workload stays calm and extraction days, sales, and repairs don’t overload you. Mind neighbors and space: move beehives or open a second yard if forage tightens or robbing rises.
Choose sustainability over scale. Healthy bees and steady results are the true measure of successful beekeeping and the best path to sensible growth next year.
FAQ
What is a realistic number of hives for a single beekeeper to manage?
A realistic range depends on goals and experience. A beginner should start small — two to five colonies — to learn inspections, queen checks, and mite control. A committed part-time backyard beekeeper can reasonably maintain up to about 25 colonies with careful scheduling. Those farming bees for sale or pollination may manage 100–150 colonies while keeping another job by using strong systems, regular splits, and seasonal help. Full-time commercial operations often run several hundred colonies with staff and mechanized workflows.
Why do new beekeepers often begin with two hives?
Two hives offer a safety net. If one colony fails to build up or loses its queen, you can use frames, a queen cell, or brood from the other hive to recover quickly. Managing two also teaches routine inspections, feeding, and disease recognition without overwhelming a novice. This approach improves survival rates and reduces costly mistakes.
How much time should I expect per hive each season?
Time varies by season and colony health. Plan on short routine checks—roughly 10–20 minutes per hive every one to two weeks during the active season. Over a full season, expect 20–40 hours per hive for inspections, honey harvest, treatments, and maintenance. Busy spring buildup and fall preparation require concentrated blocks of time, so batching tasks across multiple colonies saves labor.
What skills increase the number of colonies one person can handle?
Practical skills such as queen management, timely mite monitoring and treatment, effective splitting, and frame grafting let a beekeeper scale safely. Strong record-keeping, standardized equipment, and fast, focused inspections reduce per-hive time. Experience also helps you anticipate problems and prevent time-consuming emergencies.
How should I space and place hives on my property?
Layout affects drift, ventilation, and forage access. Space boxes so you can work comfortably, provide flight path buffers toward open areas, and use windbreaks where needed. Consider sun exposure—morning sun warms hives—and locate water near but not adjacent to the apiary. Density depends on forage: two to three hives per acre is a common pollination guideline, but adjust for local nectar flow and dearth periods.
What are the key seasonal tasks by spring, summer, fall, and winter?
Spring focuses on buildup: queen health, swarm prevention, and adding boxes. Summer emphasizes honey flow management, monitoring pests, and harvesting surplus. Fall requires consolidation, varroa treatments, and preparing winter stores. Winter tasks include checking food supply, ensuring ventilation, and minimizing disturbance. Each season has predictable checks that help you plan time across all colonies.
Can I manage more colonies by changing equipment or workflow?
Yes. Standardizing hive types, frames, and tools speeds handling. Use consistent checklists and batch inspections—work several colonies in one spot before moving hives. Invest in quality smokers, hive tools, and a lift or cart to reduce strain. Remote yards with satellite locations let you increase numbers without crowding a single site, but they require travel time and reliable helpers.
How do costs scale as I add boxes and colonies?
Start-up costs include hives, protective gear, tools, and bees. Ongoing expenses cover feed, treatments, replacement queens, and equipment repair. Per-hive costs fall with scale for some items, but labor and transport add up. Revenue from honey, nucs, queens, and pollination can offset expenses; track cash flow per colony to know when expansion is profitable.
What legal or neighbor issues should I consider before expanding?
Local laws often require hive registration, and some municipalities cap hive numbers or impose setbacks. Suburban and urban beekeepers must manage flight paths, provide water, and address nuisances to neighbors. Check state and county regulations, follow hive registration with the USDA Bee Informed Partnership resources when available, and maintain open communication with nearby residents.
How do beekeepers handle mites and disease when managing many colonies?
Consistent monitoring and an integrated pest management plan are essential. Use regular varroa sampling, rotate treatments, and combine cultural controls like drone brood removal and timed splits. Fast identification and isolation of sick colonies prevents spread. With scale, plan scheduled treatment windows and record results to measure effectiveness.
What scaling scenarios are realistic for different beekeeper types?
For hobbyists focused on backyard honey, managing up to roughly 25 colonies part-time is common. Those breeding or selling bees may operate 100–150 colonies alongside full-time work by outsourcing some tasks. Commercial honey and pollination enterprises that run hundreds of colonies typically employ seasonal workers and use organized, repetitive workflows to keep labor per colony low.
How does forage availability affect the number of colonies I should keep?
Forage is critical. A small yard with abundant nectar sources can support more colonies than a large property with limited blooms. Assess local nectar flows, bloom calendar, and dearth periods. Where forage is limited, supplement feeding or move yards to better sites. Overcrowding reduces honey yields and increases stress and disease risk.
Are there tips for managing remote or multiple yards?
Yes. Standardize equipment and labeling so you can work quickly. Batch similar tasks across yards—inspections, treatments, or feedings—rather than doing mixed work. Keep precise maps, maintain spare parts at each site, and schedule regular visits. Hiring seasonal help or trading labor with other beekeepers also expands capacity without burning out a single person.


