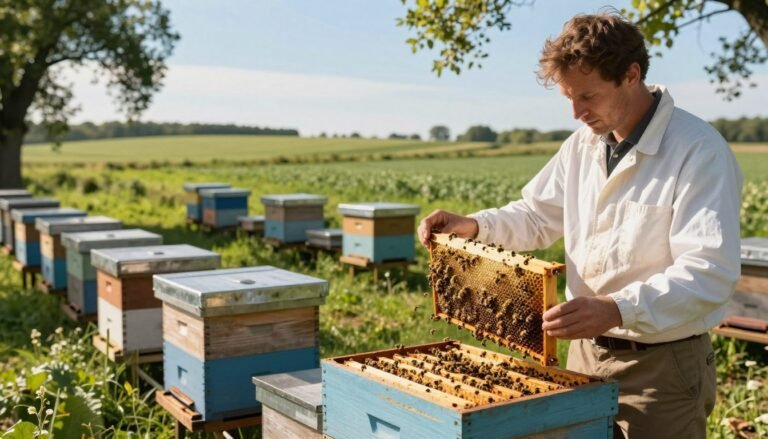
Regular inspection is the backbone of good beekeeping. Walk your apiary with purpose and check each frame during routine inspection. This helps you spot odd cappings, mites, or early virus signs before they spread.
A diligent beekeeper watches the brood pattern, queen activity, and the state of larvae and cells. Note eggs, capped cell texture, and comb appearance. Small changes in cappings or a spotty pattern can point to trouble such as sacbrood or mite pressure.
Every honey bee colony depends on adult bees to feed larvae and guard the hive. Take time to observe worker behavior and food stores. For deeper guidance on assessing the nest pattern, review visual tips at understanding the brood pattern, and compare chilled signs with the advice at identifying chilled brood.
Key Takeaways
- Inspect frames regularly to protect colony health.
- Watch for odd cappings, mites, or virus symptoms.
- Track queen, eggs, larvae, and comb appearance each visit.
- Adult bees and worker activity reveal hive status quickly.
- Document photos and time of inspection for follow-up.
Essential Preparation for Hive Inspections
Before lifting a lid, prepare with calm timing and the right kit to keep your hive visit smooth. Choose a warm, calm day when air temperatures are above 15°C (59°F). Working in these conditions reduces stress for bees and gives you clearer views during inspection.
Tools and Gear
Wear full protective clothing and make sure zippers and closures are sealed before using your j-hive tool at the hive entrance. A ready smoker, loaded with dried leaves or grass, helps mask alarm pheromones and calms adult bees.
Bring a notebook or smartphone to record observations. Use the FEDSS method—Food, Eggs, Disease, Space, Swarms—to keep checks systematic and consistent each visit.
Timing and Weather
Plan inspections for mid-morning to early afternoon when foraging bees are out. Avoid windy, wet, or cool mornings. For winter prep, confirm each colony has enough honey and pollen stores to make it through colder months.
For step-by-step guidance, review practical advice at how to conduct brood inspections.
Conducting Brood Disease Identification on Frames

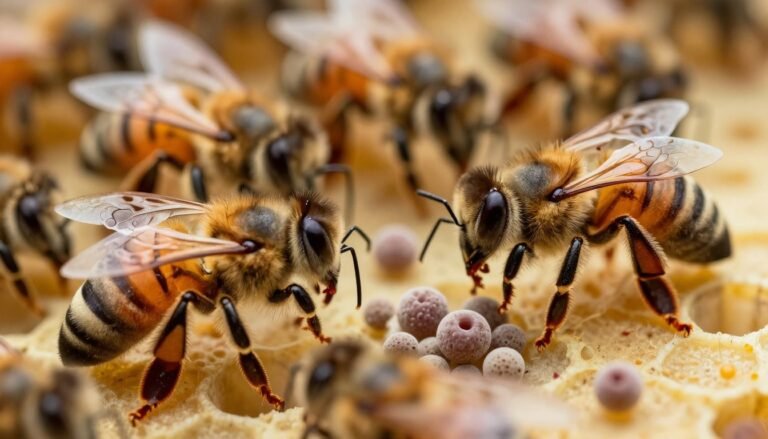
Hold each comb gently at eye level and use natural light to inspect eggs, larvae, and capped cells. A full, consistent pattern shows the queen is laying well and the colony is healthy.
Look for sunken cell caps or pin-pricks in cappings. These signs often point to serious problems and merit immediate attention.
“When in doubt, document a clear photo and consult local beekeepers or your apiary officer before moving frames.”
Replace every frame in the same order you removed it to protect comb structure and food stores. Check for pearly white larvae and signs of mite presence during each inspection.
| Action | What to check | Follow-up |
|---|---|---|
| Hold to light | Eggs, larvae visibility, capped cell clarity | Take photo if unsure |
| Scan pattern | Solid coverage indicates queen activity | Log notes in inspection book |
| Spot defects | Sunken caps, pin-pricks, mites | Contact local beekeepers or apiary officer |
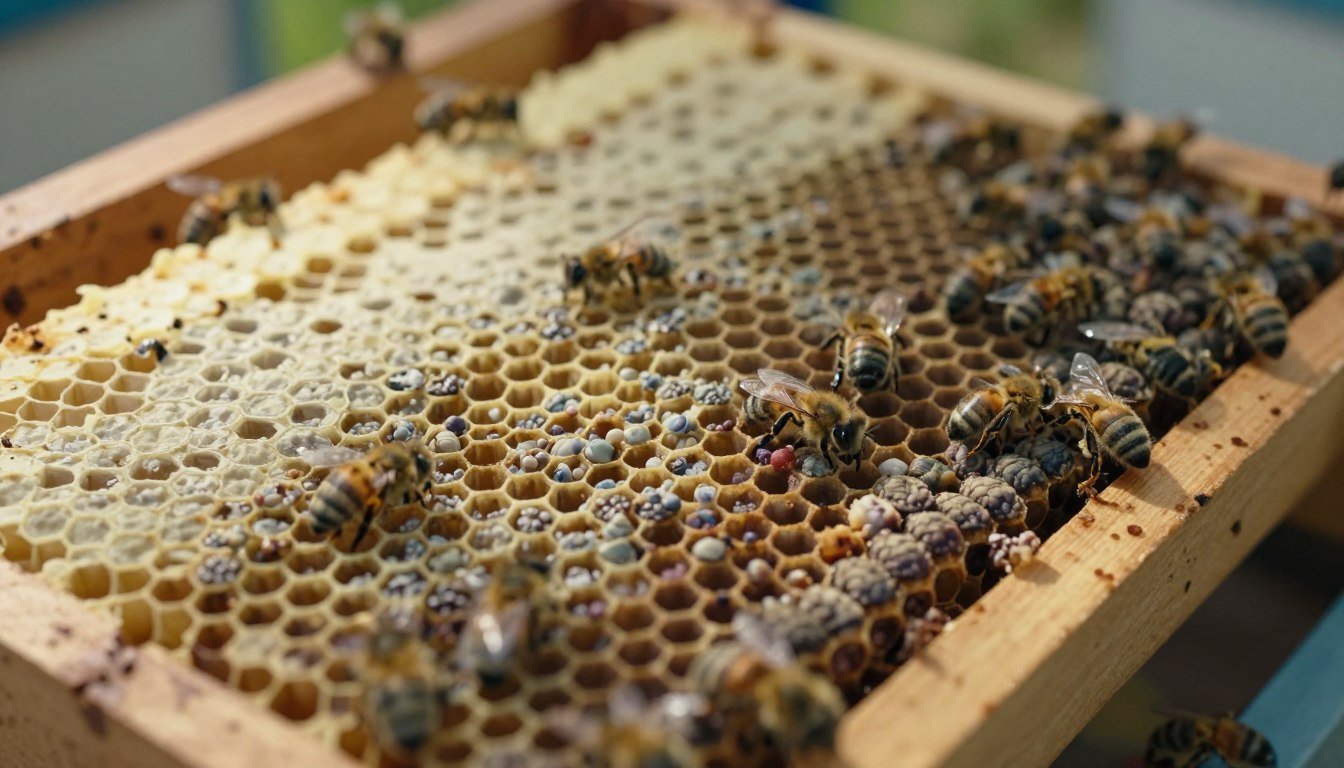
Recognizing Healthy Brood Patterns
A compact map of developing bees across a comb signals steady queen performance and a robust colony. Begin with a calm inspection and note how many neighboring cells contain developing young.
Visual Cues of Development
Healthy larvae are pearly white and glistening. You may see a faint orange gut line along their backs as they feed and grow.
Good patterning means nearly every cell in an area has a healthy occupant. That dense coverage shows consistent egg laying and strong nurse activity.
Worker cell clusters are smaller than drone patches. Watch for pupae whose eyes begin to color first — a clear sign the larva is entering the final developmental stage.
A frame of emerging young is especially valuable when introducing a new queen; young adult bees accept her more readily.
“Always check for a rim of pollen around the rearing area — it indicates available food for growing larvae and good colony nutrition.”
- Solid pattern = active queen and strong colony growth.
- Pearly larvae and shiny appearance suggest they are well fed.
- Smaller cells usually hold worker young; larger cells may indicate drone rearing.
- Emerging young on a frame shows recent, ongoing egg laying.
| Feature | What to see | Action |
|---|---|---|
| Larval color | Pearly white, slight orange gut line | Record photo if unsure; monitor next inspection |
| Pattern density | Nearly all adjacent cells filled | Mark as healthy; log queen activity |
| Cell size | Small = worker, large = drone | Note balance; check for queen laying behavior |
| Pollen rim | Ring of pollen near rearing area | Confirms food availability; maintain stores for winter |
For more visual guidance and heat-mapping tips that help assess pattern quality, see heat mapping for brood pattern assessment. For field-level diagnostic guidance, consult local resources such as field diagnosis and guidance.
Identifying Bacterial and Viral Brood Infections
Knowing how to tell bacterial from viral signs helps you protect bees and limit spread.

American foulbrood (AFB) is the most severe. Infected remains will “rope out” with a matchstick to about 25mm and eventually form a hard scale that sticks to the cell wall. Advanced AFB shows an irregular pattern and sunken, greasy cappings.
European foulbrood (EFB) differs. Remains are soft, watery, and twist in the cell, stretching roughly 18mm with the same matchstick test.
Recognizing the sacbrood virus
Sacbrood causes larvae to curl into a gondola shape, head raised toward the cell opening. These larvae darken and desiccate, leaving obvious bodies that you can photograph for records.
“If you suspect bacterial or viral infection, contact your local apiary officer for lab confirmation.”
- Check the hive entrance for dead larvae or mummies—this hints at advanced problems.
- Document with a clear photo and avoid moving suspect combs between colonies.
- Further guidance for AFB control is available at American foulbrood guidance.
- Use thermal tools for pattern checks: thermal analysis for pattern.
| Issue | Key sign | Field test |
|---|---|---|
| American foulbrood | Ropy remains; sticky scale; sunken cappings | Matchstick rope ≥25mm; lab confirmation |
| European foulbrood | Soft, watery remains; twisted in cell | Matchstick stretch ≈18mm; contact apiary officer |
| Sacbrood virus | Gondola-shaped larvae; darkened bodies | Photograph; isolate suspect comb; lab test |
Distinguishing Fungal and Developmental Issues
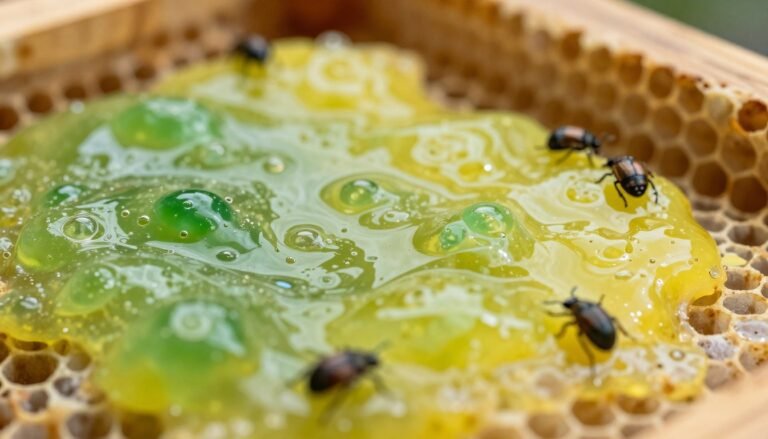
Fungal infections and developmental problems can mimic each other at a glance in the hive. Chalk-like mummies from chalkbrood are often loose in the comb and may rattle when the frame is shaken.
Fungal growth usually starts inside the larval gut and then covers the body with white, fluffy mycelia. These remains are often removed and dropped outside the hive by the bees.
Developmental issues differ. A queen low on sperm can produce a solid, uniform patch of drone brood in worker-sized cells. That pattern is regular, not patchy like many infections.
Unlike American foulbrood, scales from sacbrood and European foulbrood come away from the cell wall easily without scraping. Always compare suspect combs to healthy photos before acting.
“Observe the body of the larvae and consistency of remains to decide if the problem is fungal, viral, or developmental.”
- Key check: are the remains loose or stuck to the cell?
- Action: photograph suspect cells and consult local guidance such as foulbrood guidance.
Advanced Diagnostic Techniques for Beekeepers
A simple frame swap can reveal whether a colony lacks a laying queen or has laying workers.
The frame-introduction test is a reliable field method. Place a frame of eggs and young larvae from a healthy hive into the suspect hive. Mark that frame with a thumbtack or marker so you can find it again.

If the colony begins building queen cells on the introduced frame, the result confirms there was no laying queen. That reaction is fast and clear, often within a few days.
If a hive has been broodless for five weeks, laying workers are likely present. Look for scattered, irregular drone cells rather than a solid pattern. This helps differentiate worker layers from a true drone‑laying queen.
Practical follow-up and timing
Don’t assume the queen is dead if you find no eggs. Wait several days after inspection — a virgin queen may be present but not yet laying.
“The ‘queenless roar’ is a distinct sound made by bees that are truly queenless, signaling their distress.”
- Use the frame test to confirm queenlessness fast.
- Mark frames so your follow-up inspection is simple.
- Check patterns for scattered drone cells to spot laying workers.
- Record a photo and notes to track progress over time.
Mastering these diagnostics keeps colonies productive and helps you act early. For hygienic practices that support accurate inspections, consult the apiary hygiene checklist.
Conclusion
A short, methodical inspection routine prevents small issues from becoming large setbacks.
Regular checks are the most effective way to monitor hive health and spot a problem early. Use the FEDSS method each visit to cover food, eggs, space, and swarm signals.
If you suspect a serious problem, apply field tests such as the matchstick rope for AFB or the frame‑introduction test for queen problems. Keep clear notes and photos after each visit.
Consistent record-keeping and continued learning build confidence and protect your colonies. For tips about safely reusing equipment after a loss, see reusing frames after a loss.
FAQ
What should I look for when I first open a hive to detect problems in the brood area?
Start by scanning comb for uniform cell cappings and a consistent pattern of developing larvae. Look for sunken or perforated cappings, spotty patches of empty cells, or discolored larvae. Check adult bees for unusual behavior at the entrance and on frames. Use good lighting and a smoker to calm the colony during inspection.
Which tools and protective gear are essential for safe hive checks?
Carry a hive tool, smoker with fuel, bee brush, and a frame holder. Wear a well-fitting veil, gloves if you prefer, and light-colored clothing. A notebook or phone for photos helps record patterns and symptoms for later comparison or consultation.
When is the best time and weather to inspect a hive for early signs?
Inspect on warm, calm days when most workers are out foraging—late morning or early afternoon works well. Avoid inspections during cold, rainy, or windy weather. Frequent checks every 7–10 days in spring help catch issues early.
How does a healthy brood pattern look compared to a problematic one?
A healthy pattern is mostly sealed and filled with evenly spaced larvae at similar stages. Problematic patterns show scattered empty cells, many uncapped larvae, or areas with malformed or discolored brood. Consistency across frames suggests a strong, productive queen.
What visual signs point to American foulbrood (AFB)?
AFB often produces sunken, darkened cappings and a foul odor. Larvae may form a ropey, sticky mass when probed and eventually turn into hard, dark scales that cling to cell walls. Report suspected AFB to your state apiarist—treatment and disposal rules vary by location.
How can I tell European foulbrood (EFB) apart from other bacterial issues?
EFB typically affects younger larvae and causes twisted, yellowish or brown larvae that may shift in position within the cell. Cappings may be uneven or chewed. EFB often improves with better nutrition and reduced stress, but confirm with lab testing if unsure.
What does sacbrood virus look like in the comb?
Sacbrood causes larvae to die in the stretched “canoe” position and dry into a parchment-like sac. Affected cells often remain uncapped or have thin, brittle cappings. Workers may remove many dead larvae, leaving spotty areas in the brood nest.
How do fungal infections and developmental problems present differently from bacterial or viral issues?
Fungal or mold growth appears as fuzzy or discolored material in cells, often when frames are stored damp. Developmental problems from poor nutrition or queen issues produce irregular brood patterns without the distinctive odors or ropy consistency of bacterial infections.
What methods help diagnose queenlessness during an inspection?
Look for many drone cells, irregular brood patterns, patchy egg laying, and the presence of emergency queen cells. Absence of eggs and young larvae across several frames indicates queenlessness. Marking the queen when you install her makes future checks easier.
When should I collect samples or send material to a lab for confirmation?
Collect samples if you see strong signs of AFB, persistent unexplained brood mortality, or when treatments have failed. Many state apiarists or university labs offer testing. Take clear photos and small frame scrapings in sealed containers to support diagnosis.
Can management changes improve colony health without antibiotics or chemical treatments?
Yes. Improve forage by planting diverse nectar and pollen sources, reduce stress by avoiding over-harvesting, replace poor queens, and maintain strong hygiene during inspections. Good nutrition and strong worker populations help colonies resist infections and recover faster.
How often should I monitor hives for early warning signs throughout the year?
Inspect every 7–10 days during spring buildup and less frequently during stable summer and fall months. Before winter, perform a thorough check to ensure a healthy queen, adequate stores, and no lingering comb problems that could worsen over winter.