This section gives a clear, professional guide to making reliable wax sheets for U.S. beekeepers using a safe bain-marie setup and common tools.
Expect stepwise coverage of temperature control, sheet formation, embossing, trimming, and careful cooling. A thermostat-controlled bain-marie kept near 70–80°C limits direct heat and off-gassing in the air while melting beeswax safely.
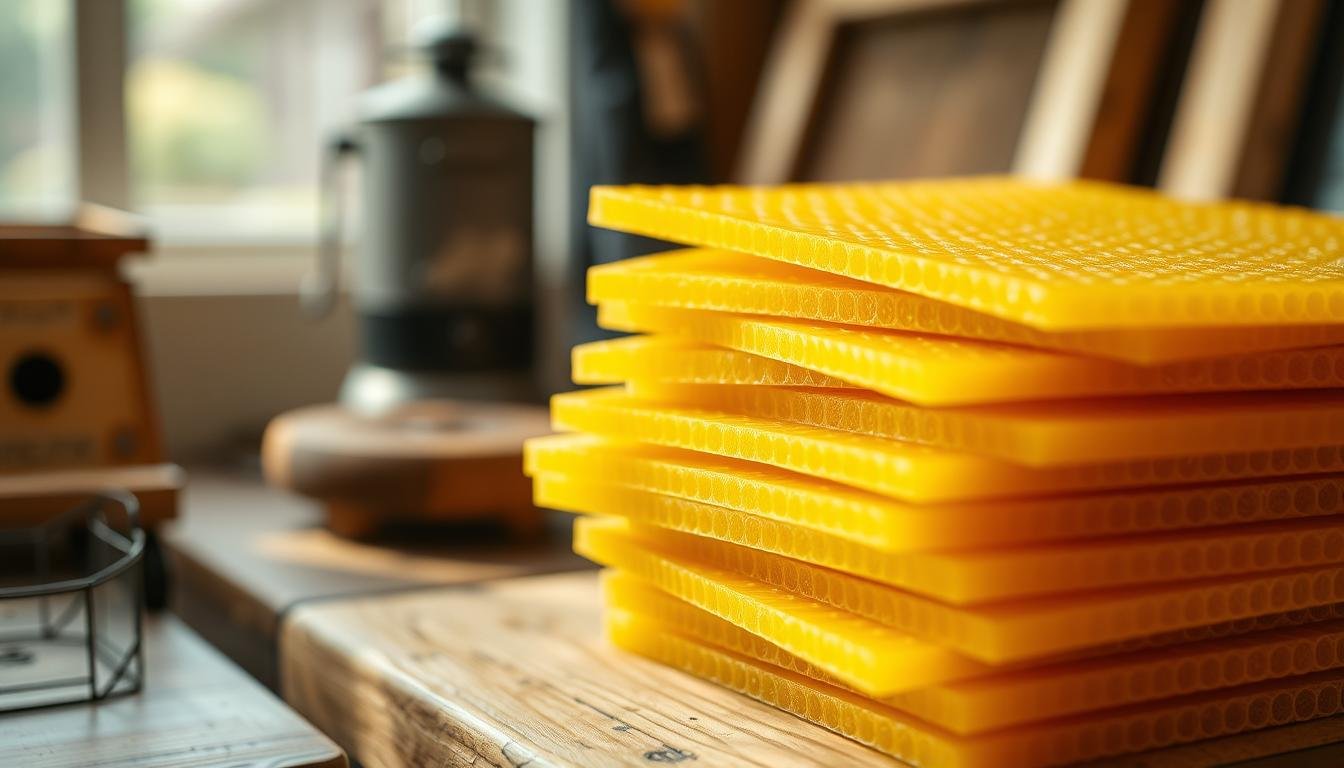
The workflow described can yield roughly 15 sheets per kilogram of beeswax when using an embossing roller and a soaked hardwood paddle. A hand-hot water bath with a dash of soap helps prevent sticking on rollers, and a cutting mat with templates gives repeatable trimming.
We compare a silicone press and a manual roller, note ergonomic tips for clamping a roller, and preview a troubleshooting section for sticking, thickness variation, and uneven embossing. For fuller, practical notes, see this practical guide on pressing and embossing.
Key Takeaways
- Safety first: use a thermostat bain-marie near 70–80°C.
- Expect about 15 sheets per kilogram with a refined roller method.
- Use a soaked hardwood paddle and a soapy hot-water bath to reduce sticking.
- Presses work but need careful temperature and charge control.
- Templates and a cutting mat ensure consistent sheet size and fit.
Why Make Your Own Beeswax Foundation Sheets at Home
Making sheets from your own beeswax cuts supply costs and gives you direct control over what your hive receives.
Cost advantage: Commercial wax foundation prices have climbed, especially for multi-hive operations. Producing sheets reduces per-frame spend and keeps your budget predictable.
https://www.youtube.com/watch?v=yZhoy1YxBKw
Cost savings and control over materials
Using your own wax lowers purchases and removes unknown additives found in some suppliers. You decide thickness, pattern, and the exact beeswax that goes in each frame.
Conserving bees’ energy and ensuring pure beeswax
Bees burn a lot of honey to make comb. Supplying ready-made foundation saves their calories for brood and nectar work.
- Purity and health: Home-processed material reduces exposure to residues and helps keep food stores cleaner.
- Practical output: With a dialed-in workflow, about 15 sheets per kilogram is realistic and offsets the time investment.
- Quality control: Managing melting degrees and water handling improves batch consistency across seasons.
For a practical demonstration and community tips, see this short guide on making your own wax foundation. Video demos give clear benchmarks for setup and time planning.
Safety and Temperature Essentials for Melting Beeswax
Start with a controlled bain-marie and small test pours; this protects color and helps dial in sheet thickness.
Use a double boiler so the molten material never touches direct flame. A thermostat-controlled bain-marie keeps degrees steady and sharply lowers ignition risk. Keep a reliable thermometer in the top vessel and stir gently to avoid hot spots.
Beeswax melts near 63.4°C. Most makers work around 70–80°C for best flow and embossing. Too hot yields overly thin sheets; too cool gives thick, uneven sheets that resist embossing.
Practical tips for a safer workspace
- Ventilate the area and keep sparks or open flames well away from heat sources.
- Use a hand-hot water bath nearby for rinsing paddles and rollers; cooler water can set wax on tools.
- Make gradual adjustments and run small test dips before long batches to confirm release and thickness.
| Setting | Degrees (°C) | Result for Sheets |
|---|---|---|
| Melting point baseline | 63.4°C | Wax becomes liquid; not ideal for embossing |
| Working range | 70–80°C | Good flow, consistent embossing, fewer cracks |
| Too hot | >80°C | Overly thin sheets, color change, possible degradation |
| Too cool | Thick, uneven sheets that tear or refuse emboss |
Final note: steady temperature, consistent stirring, and prepared wet tools produce safer runs and higher-quality sheets. For related gear and extraction tools, see bee wax extraction equipment.
Tools and Materials You’ll Need for Making Foundation
Good results come from pairing controlled heat with simple, durable forming tools.
Essentials: a thermostat-controlled bain-marie, an accurate thermometer, a matched pot pair, and enough water to hold steady degrees without boiling over. These keep melts consistent and safe.
Forming gear: use a hardwood paddle soaked for hours and a hand-hot water bath to re-wet between pours. Mild soap suds on rollers helps release patterned sheets and cuts down sticking.

Roller versus press
The embossing roller is heavy and works fast when clamped to a solid bench. Add a simple feed guide for straight entry. A silicone press can give uniform plates but needs careful pour volumes and trimming if set for Langstroth size.
Measurement and workspace
A cutting mat and rigid board template matched to your frame size speed trimming and keep sheet size consistent. Reserve bench space for cooling racks, a safe carry path for hot vessels, and a station for cutting and stacking.
| Item | Purpose | Notes |
|---|---|---|
| Thermostat bain-marie | Controlled melting | Work in 70–80°C range for best embossing |
| Hardwood paddle | Forming base sheets | Soak hours; keep hand-hot water nearby |
| Embossing roller or press | Pattern and thickness | Roller: speed and control. Press: single-charge, needs trimming |
| Templates & cutting mat | Consistent sheet size | Keep blades sharp and boards lint-free |
Consumables & safety: mild dish soap, clean water, lint-free towels, replacement blades, heat-resistant gloves, and eye protection. For community tips on frames and embedding, see this discussion: frames and embedding help. For extraction gear references, consult this bee-wax extraction guide.
How to Create Wax Foundation at Home: Step-by-Step Process
A clean, blocked batch of rendered beeswax gives the best start for even pours and consistent sheet quality.
Filter and cast: remove debris, then press wax into a solid block before melting. This prevents grit from marring patterns when you run sheets.
Forming base sheets
Soak a hardwood paddle for hours. Dip once forward and once back into a bain-marie held near mid-to-high 70s degrees Celsius. Transfer the fresh sheet to a cutting board or mat.
Prevent sticking and emboss
Keep a hand-hot water bath nearby and rinse the paddle between dips. Light soap suds on the roller help release the sheet. Clamp the roller and feed the sheet with a guide for straight embossing.
Rest, trim, and stack
Let embossed sheets cool on a flat board until firm enough to trim. Use a sharp cutter, save offcuts for re-melting, and stack between clean boards. With practice, yields approach about 15 sheets per kilogram by the end of a steady run.
| Step | Target | Tip |
|---|---|---|
| Filter | Clean block | Protect roller pattern |
| Melt | 70–80°C | Adjust in small increments |
| Form | Paddle dip | Use hand-water rinse |
| Emboss | Guided roll | Light soap on roller |
| Finish | Cool & trim | Stack between boards |
For additional reading and reference materials on making foundation, see this practical resource guide.
Sizing Foundation Sheets for Langstroth and Other Frames
Size and fit matter: a single miscut sheet can stall frame assembly and waste valuable beeswax. Measure and mark templates before trimming so each sheet seats properly in its frame.

Prepare templates for every frame standard you run. If your press is set to Langstroth, make separate templates for smaller or wider frames and keep them handy on the bench.
Trimming and cutting tips
Place each sheet on a cutting mat and lay a rigid board template over it. This keeps edges square while you trim along the guide.
Use a pizza cutter or a sharp utility knife for clean edges. Apply light hand pressure and repeat passes rather than forcing one deep cut.
- Adjust cuts for wire placement so the sheet seats without buckling.
- Group sheets by size after trimming for faster assembly.
- Save offcuts in a small bin and re-melt them into the pot.
| Action | Reason | Tip |
|---|---|---|
| Template use | Consistent size | Match board to frame standard |
| Multiple light passes | Cleaner edge | Less tearing, better fit |
| Group & label stacks | Efficient build | Label boards with frame size |
If sheets run slightly thick, take a marginal trim and run a light pass through the roller for uniform thickness. Keep degrees and water conditions steady across the batch; small changes will alter final size and thickness.
Troubleshooting Common Problems in the Process
Small changes in timing and temperature often cure repeat defects faster than swapping gear. Start by isolating the defect: sticking, cracking, or uneven embossing. Then apply the targeted fixes below.
Sticking to press or rollers: release agents and timing
Press timing matters. Try a quick close–open after about 10 seconds to break initial adhesion, then wait 2–3 minutes before opening fully. This reduces sheet pickup without extra agents.
Use release agents cautiously. A light food-grade oil-and-water spray gives marginal help. A detergent-in-water rinse helps more but may be undesirable for cut-comb production. For rollers, keep a steady film of soap suds on the pattern and refresh the bowl often.
Cracked or too-thick sheets: adjust temperature and wait times
If sheets crack, nudge the bain-marie toward the upper working range. Many makers report fewer cracks near ~80°C than at ~70°C. Too-cool runs give thick, poorly embossed sheets.
Correct thickness by changing dip cadence: longer, warmer contact thins a sheet; shorter or cooler dips thicken it. Let a fragile sheet set a bit longer on the board before handling.
Uneven embossing: feed angle, pressure, and roller setup
Check feed alignment and clamp stability first. Use a straight guide and steady pressure so the pattern meets the sheet squarely. Misalignment and loose bases cause tracking errors and uneven emboss.
If a sheet tears at the end, support it with both hands during transfer and allow a slightly longer set on the board. Keep tools wet but not dripping—excess water makes surface marks, while a dry paddle invites sticking.
| Problem | Likely cause | Quick fix |
|---|---|---|
| Sticking | Adhesion on mold or roller | Quick open/close; soap film; cautious release spray |
| Cracking | Too cool / fast handling | Raise degrees slightly; longer set |
| Uneven emboss | Feed angle or loose clamp | Align feed; secure base; use guide |
Time, Workflow, and Team Tips to Make Foundation Efficient
A staged bench layout cuts wasted motion and keeps runs moving at a steady clip.
Plan stations for melting, forming, embossing, trimming, and stacking. This layout reduces walking and keeps hot and cool zones separate.
Two people can often halve the work cycle. One handles dipping and stacking while the other rolls and trims. A solo operator will move more deliberately but can still hit steady output over long hours.
Practical tips for steady output
- Pre-soak the paddle and set soap suds in a bowl before starting.
- Batch work: form several base sheets, then run them through the roller in sequence.
- Keep spare towels, sharp blades, and labeled stacks within reach.
- Track yield: aim for about 15 sheets per kilogram and note sheets per hour.
- Communicate clearly as a couple or small team to avoid double-feeds and cooling delays.
| Role | Task | Typical output (per hour) |
|---|---|---|
| Solo operator | All steps, paced | Moderate, steady (varies with breaks) |
| Two people | Dipper + roller/trimmer | Higher, smoother flow; fewer re-melts |
| Three people | Melter, dipper, finisher | Best throughput; minimal idle time |
Work smart: take short breaks, clean as you go, and refresh water often. These small moves keep quality high and reduce wasted wax and hours lost to rework.
For tips on bench setup and safety, see a short guide on workspace preparation and a practical beekeeping training resource for seasonal planning.
Presses, Rollers, and Alternative Methods: What’s the Difference
The choice between roller and press shapes workflow, yield, and cleanup. A manual roller, once clamped and guided, delivers steady throughput and fine control over sheet thickness. It favors continuous runs and quick adjustments during a batch.
Manual roller method
Speed and control: A well-set roller feeds straight and embosses repeatably. Operators reported about 15 sheets per kilogram after practice. That number gives a reliable planning metric for materials and time.
Silicone press experience
Presses form one charge into a single sheet, which can yield precise patterning when fill volume and temperature are nailed. A silicone press made from liquid silicone works, but it is messier and very sensitive to temperature and pour amount.
Practical comparisons
- Size: Many presses are built for Langstroth sizes; trimming is common when you run other standards.
- Cleanup: Rollers with a soap-water film run cleaner; silicone molds need more frequent washing and may hold residue.
- Teamwork: Rollers suit hand-offs between a couple of people; presses set a cycle pace that a single operator can manage.
- Resource use: Rollers use continuous molten beeswax effectively; presses require precise dosing and can produce more re-melt from flash or overfilling.
| Method | Throughput | Control | Cleanup |
|---|---|---|---|
| Manual embossing roller | High — continuous runs (≈15 sheets/kg) | Good — adjustable thickness and feed guides | Easy — soap suds and quick rinses |
| Silicone press | Moderate — one sheet per cycle | Precise if temperature and pour are exact | Harder — residue and frequent cleaning |
| Rigid silicone mold (Langstroth) | Moderate — repeatable size | Limited — often needs trimming for other sizes | Moderate — careful demolding required |
Summary: Pick a roller for throughput and fine-tuning. Choose a press when you need molded shapes and accept the added cleanup and trimming. Match the tool to your workspace, team, and tolerance for mess.
Beekeeping Use Cases: From Cut Comb to Brood Comb
Select sheet thickness based on final use and colony behavior. Thin, well-embossed sheets speed drawing for section and cut comb honey. Thicker sheets give reliable support for brood frames and heavy handling during inspections.
Selecting thinner sheets for cut comb and sections
Reserve finer stock for presentation honey. Thin sheets let bees form delicate cells that look neat and sell well. These sheets also draw faster in early nectar flows.
Keep thin stacks labeled and nearby when you plan section runs. Place fresh sheets between drawn combs to encourage even building and reduce burr comb.
Matching foundation style to bee and hive needs
Use standard thickness for brood frames so comb spans wires and the top bar groove. This helps resist sagging in hot weather and during extraction.
Consider local nectar patterns and colony temperament when choosing pattern and size. Consistent embossing and handling produces repeatable batches that bees accept quickly.
| Use | Recommended sheet | Why |
|---|---|---|
| Cut comb / sections | Thin, finely embossed | Fast drawing; neat honey presentation |
| Brood frames | Standard, sturdy | Durable for inspections and re-use |
| General super | Medium thickness | Balanced draw speed and support |
Conclusion
Small tweaks in temperature and handling quickly add up to smoother sheets and fewer re-melts. Begin each run with a steady bain-marie set in the 70–80°C window and freshly prepared tools for best results.
Melt, dip, roll, trim is a compact workflow that delivers consistent results. Keeping paddle and roller water management steady prevents sticking and reduces defects. Use clean beeswax blocks and note any degree changes during the session.
With practice, making foundation reaches dependable yields — roughly 15 sheets per kilogram — when an embossing roller and a proper board template are used. Sharp cutters and organized stacks matter as much as the roller itself.
Balance tool choice: a clamped roller gives throughput and fine control; a press can work with careful timing but needs extra cleanup. Follow a set routine, record variables, and, when helpful, bring a couple of hands. The result is clean comb that bees draw quickly and that supports your beekeeping and honey goals.
FAQ
What materials are essential for making beeswax foundation sheets?
Essential materials include cleaned beeswax blocks, a thermostat-controlled bain-marie, a reliable thermometer, an embossing roller or press, wooden paddles, a cutting board, clamps and frame templates, hot water for a soap-suds release, and protective gloves and eyewear.
What temperature range should I maintain when melting beeswax?
Melt wax gently using a bain-marie. Beeswax softens near 63.4°C (146°F); aim for working temps around 70–80°C (158–176°F) to keep it fluid without overheating. Use a thermometer and avoid direct flame to prevent fire risk and discoloration.
How do temperature changes affect sheet thickness and quality?
Higher temperatures make wax thinner and easier to emboss, which can yield thinner sheets. Cooler wax thickens quickly and may crack during rolling. Consistent heat gives more uniform thickness and smoother embossing.
Can I use a manual embossing roller or is a press better?
Manual rollers offer fine control and cost advantages for smaller batches. Mechanical presses speed production and give uniform results but require more wax and careful temperature control. Choose based on budget, scale, and workspace.
What’s the recommended process for starting with raw beeswax?
Filter molten wax to remove impurities, pour into blocks, then reheat gently in the bain-marie when forming sheets. Clean wax gives stronger, cleaner sheets and reduces contamination in hives.
How do I prevent wax from sticking to the press or rollers?
Use warm soap-suds or a light release agent on wooden paddles and press surfaces. Maintain consistent hand-hot water for wiping and keep the roller surface slightly warm. Timing the feed so wax is tacky but not molten helps, too.
What are best practices for handling and cooling newly formed sheets?
Let sheets cool flat on a clean board or template with light clamps to prevent warping. Handle gently once set to avoid cracks. Store sheets in a dry, cool place away from direct sunlight and strong odors.
How do I size sheets for Langstroth frames and other types?
Use frame templates or measure the inner dimensions and cut sheets to match. Trim with a sharp knife, rotary cutter, or pizza cutter for straight edges. Consistent templates ensure repeatable results.
What causes uneven embossing and how can I fix it?
Uneven embossing often stems from incorrect feed angle, uneven pressure, or roller misalignment. Adjust roller spacing, steady the feed, and test with scrap wax until embossing becomes uniform.
Why do some sheets crack or become too thick, and what adjustments help?
Cracks occur when wax cools too quickly or is fed while too brittle. Too-thick sheets result from low heat or insufficient rolling passes. Raise working temperature slightly, allow proper resting between passes, and control feed speed.
How many people are ideal for an efficient workflow and what output is realistic?
Two people—one handling wax and feeding, the other operating the roller and trimming—speeds production and reduces errors. A small team can produce several dozen sheets per hour depending on equipment and experience.
Are silicone presses a viable alternative for small runs?
Silicone molds can produce detailed comb patterns but require more wax per pour and strict temperature control. They work for specialty items or limited batches but become messy and slower for larger volumes.
Which sheet thickness is best for cut comb versus brood comb?
Thinner sheets suit cut comb and sections where edible comb is desired. Brood comb benefits from slightly thicker sheets that provide stronger support and longer service life. Match thickness to hive use and bee behavior.
How should I store leftover beeswax and finished sheets?
Store beeswax blocks and sheets in airtight containers or wrapped in clean paper in a cool, dark place. Avoid strong-smelling environments; beeswax absorbs odors. Label containers with date and source for traceability.
Is it safe to remelt foundation scraps and reuse them?
Yes. Collect clean scraps and filter when remelting. Avoid mixing heavily contaminated wax that carried pesticides or propolis buildup. Proper filtering and controlled heating preserve quality for future sheets.


