Chilled brood occurs when developing larvae lose needed warmth and care. It often shows up after a warm spell followed by a cold snap, especially along frame edges and bottom bars of a hive. Quick, practical checks help keep a colony healthy and limit losses.
Dead brood shifts from pale yellow-gray to dark brown or black and then dries into brittle remains that can be removed. Nurse bees will often abandon outer frames to keep the nest center warm, so inspect cluster position and worker coverage before long manipulations.
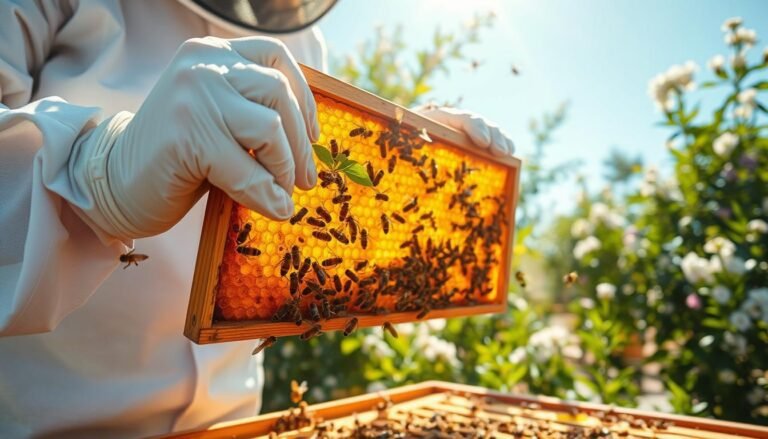
Look for a solid, oval “embedded football” pattern across central frames, with smooth, slightly convex cappings. Sunken or misshapen caps can point to disease rather than temperature loss. Note where pollen and honey sit above the brood as a visual baseline.
Key Takeaways
- Chilled brood is caused by insufficient warmth or coverage during cold snaps or long inspections.
- Check edges and bottom bars first; color change and dry black remains are classic signs.
- Healthy pattern is a central oval cluster with even cappings and a pollen “rainbow” above.
- Worker coverage and cluster position influence brood survival—support small colonies with dummy boards.
- Distinguish chilling from disease by cap shape, pattern consistency, and odor before treatment.
Why identifying chilled brood matters for a healthy hive
A quick, focused look at comb patterns and worker coverage saves time and protects future honey production.
Goal of a fast field diagnosis: in under a few minutes confirm whether patchy cells are a temperature problem or a sign of disease. That decision tells you if you should limit handling, add insulation or act against infection.
The goal of a quick field diagnosis during inspections
Protect colony momentum: early detection prevents large losses that slow population growth before winter and reduce honey yields later.
Act fast: note worker coverage, capping texture, and whether an oval brood nest appears across central frames. Drone cells with bullet-like caps often sit low at frame edges and can be normal.
At-a-glance checklist for beekeepers in the United States
- Confirm even worker coverage over the brood and the ratio of workers to brood.
- Check cappings: smooth, slightly convex versus sunken or puckered (sunken may signal disease).
- Look for the “embedded football” brood nest and the rainbow of pollen below lighter-capped honey.
- Verify nearby food stores and easy access to food within hive; avoid inserting empty foundation between brood frames.
- Record weather, time, and inspection handling so patterns across colonies become clear.
- Choose visible foundation (black or wax-coated) to make eggs easier to see during short checks.
Note: for seasonal planning and routine tasks, see recommended seasonal tasks to help schedule safe, efficient inspections.
Identifying chilled brood: clear signs, symptoms, and where to look
Look first at frame edges and bottom bars—temperature loss most often shows where worker coverage thins. Start with a quick visual sweep of the outer frames. Focus on the lower area of comb where larvae and cell changes become obvious after a cold snap.

Visual cues: cells with larvae darken from pale gray to dark brown and then become dry black remains you can remove. Smooth, slightly convex cappings point to healthy larva, while pinched or sunken caps suggest other problems.
Tactile and smell checks: chilled patches feel dry; healthy capped brood is slightly pliant. A neutral or faint odor fits temperature loss. Strong foul smells usually mean disease and need separate action.
“Scan edges and note whether the queen’s recent lay is central while outer cells show more dried remains.”
Record recent spring temperatures and egg distribution on each frame. That record helps confirm presence of temperature-related damage rather than infection in your colonies.
Brood pattern norms vs. problems: using the brood nest to confirm diagnosis
A strong, three-dimensional brood pattern across central frames signals a healthy queen and steady workers. Use that embedded football shape as your baseline when you inspect frames and comb.
What normal looks like
A robust colony shows concentric zones: eggs near the center, then larvae and capped brood. Pollen forms a band beside brood and lighter-capped honey sits above, creating a “rainbow” cue.
When patterns point to problems
Spotty coverage or sunken caps inside the central nest often means diseases rather than temperature loss. Drone cells with bullet-like caps are normal at lower edges.
“Use the embedded football as your baseline; scattered, pepperpot holes demand deeper disease checks.”
| Feature | Normal | Chill-like margin | Signs of disease |
|---|---|---|---|
| Shape | Embedded football across central frames | Gaps at outer edges | Random spotty patches |
| Cappings | Smooth, slightly convex | Dry, exposed cells at edges | Sunken, perforated, discolored caps |
| Food layout | Pollen band; lighter honey above | Pollen may shrink near margins | Disrupted rainbow; irregular stores |
Main causes of chilled brood within the hive
A sudden mismatch between brood volume and worker numbers is the most common root cause. Too many larvae and capped cells for the available adult workforce means outer cells lose vital heat. When coverage thins, peripheral cells cool first while the central nest stays warmer.
Seasonal triggers matter. In spring, a strong queen can boost laying after warm days. A cold snap after that surge leaves workers unable to cover all cells, producing dead larva at frame edges.

Beekeeper actions can create risk. Inserting empty frames, spreading brood too quickly, or long inspections on cool days dilutes cluster heat. Building nucleus colonies with more brood than workers also raises the chance of losses.
- Population coverage: too few workers per cell reduces nest heat and leads to edge mortality.
- Frames and spacing: excess empty space lowers cluster efficiency—use dummy boards to concentrate heat.
- Stores and honey: brood without nearby honey or pollen forces workers to travel, weakening cluster warmth.
“Match brood volume to workforce, especially in early spring, to minimize chilled patches.”
For practical regional advice on climate impacts and seasonal management, see this guide on beekeeping in different climates. For disease comparisons and recognition that help avoid misdiagnosis, consult the honeybee disease fact sheet.
Related brood issues often confused with chilling
Weak colonies invite a range of secondary pests and diseases that can be mistaken for thermal damage to developing larvae. Read frames carefully before choosing a response. Small clues on comb faces point to very different causes and fixes.
Wax moths as secondary scavengers
Greater wax moth larvae burrow through comb and spin silk-lined tunnels. Look for webbing across cells and shredded comb rather than simple darkened cells.
Galleriasis is clear when silk threads tether emerging adults. Protect stored frames with paradichlorobenzene, criss-cross stacking for light and airflow, or targeted traps in enclosed sheds.
Chalk-like fungal attack after short cold spells
Ascosphaera apis produces white to black mummies that workers often pull from cells. The rattle test helps: loose mummies will rattle in the comb, which differs from dry remains due to temperature loss.
Neglected drone sections under stress
Drone cells sit low on frames with bullet-like caps. When food and nurses are limited, these sections are the first to be left uncovered. Fixes focus on nutrition and rebuilding the worker population.
“Different causes need different responses: sanitation for pests, stress reduction for fungal issues, and feeding or requeening for drone neglect.”
| Issue | Key signs on comb | Immediate action |
|---|---|---|
| Wax moths | Silk tunnels, shredded comb, tethered adults | Sanitize equipment, store frames in lighted, ventilated stacks, fumigate if needed |
| Chalk-like fungus | White/gray/black mummies; comb rattles | Reduce stress, improve ventilation, remove mummies, monitor spores |
| Drone neglect | Bullet cappings low on frames, uneven coverage | Improve nutrition, increase nurse numbers, check queen status |
For practical references and books on managing hive pests and comb care, see this beekeeping resources guide.
How to prevent and correct chilled brood in real time
Use small, deliberate moves at inspection time to protect the central brood nest. Rapid fixes focus on handling, space, and simple equipment choices that keep the queen and workers warm.
Smart inspection handling
Plan inspections around weather: work quickly and close the hive if wind or cold picks up. Minimize open-box time to avoid loss of nest heat.
Avoid inserting empty foundation between active frames. Spreading frames forces bees to cover gaps and can cause edge losses. If you need more comb, add it at the brood area’s edge only when worker coverage is sufficient.
Right-sizing space and heat
Use dummy boards to shrink unused space in a partially occupied box. Remove them as the colony grows so workers can cover new frames in a few days.
Choose equipment that helps you see eggs—black, wax-coated plastic foundation speeds checks. Foundationless comb is fragile and needs gentle handling early on.
| Problem | Immediate action | Tools/equipment | When to recheck |
|---|---|---|---|
| Thin worker coverage | Close hive; delay expansion | Dummy board, extra frames | 3–5 days |
| Spreading brood by adding frames | Remove empty foundation; add at edge | Black foundation, solid frames | 2–4 days |
| Cold snap after warm spell | Limit inspections; keep stores near brood | Frames with honey, dummy boards | 3 days |
| Pest risk in stored equipment | Sanitize, criss-cross stack or treat | Paradichlorobenzene, ventilated storage | Before reassembly |
“Match colony space to worker numbers and keep inspections short—small changes prevent large losses.”
For detailed comparisons and treatment cues, see practical chilled brood guidance.
Conclusion
End each visit with a quick scan for a compact central pattern and thin, dark remains where worker coverage fell off.
Confirm the embedded oval on central frames, review capping texture, and check cells at edges and bottom bars to separate simple temperature loss from disease within hive.
Watch spring weather and worker numbers: rapid warm spells then cold days can leave larvae at margins. Use dummy boards, avoid spreading frames too soon, and match expansion to worker coverage.
Note lookalikes: wax moth silk tunnels and rattling chalkbrood mummies need different steps. For disease guidance see European foulbrood symptoms.
Act quickly: right-size space, protect pollen and honey stores, secure equipment in storage, and recheck frames in a few days. Use a seasonal beekeeping calendar to time inspections and prepare hives for winter.
Apply these checkpoints each visit to keep colonies resilient, limit losses, and support productive bees through changing seasons.
FAQ
What are the most reliable visual signs a beekeeper should check for when suspecting chilled brood?
Look for sunken or perforated cappings, discolored or darkened larvae remains, and spots where workers have removed dead young leaving dried “black remains.” Also check for uneven brood coverage at frame edges and patches of uncapped cells surrounded by healthy comb. These visual cues, combined with frame placement and the colony’s recent weather history, point to cold-related brood loss rather than disease.
How do tactile and smell cues help confirm chilled brood versus other problems?
Tactile checks reveal rough, brittle cappings over dead cells, unlike the smooth, elastic cappings of healthy brood. A musty or sour odor can indicate decay, but absence of a strong foul smell suggests chilling or early-stage problems rather than advanced infections. Dry, crumbly remains inside cells are typical after larvae die from exposure to low temperatures.
When and where in the hive does chilled brood most commonly appear?
Chilled brood often shows up along frame edges, bottom bars, or upper corners of the nest—places where worker clustering is thinner. Early spring cold snaps, sudden temperature drops during inspections, or moving hives in cool weather increase risk. Monitor frames nearest the hive entrance and periphery of the brood nest first during inspections.
How can I use brood pattern and nest structure to distinguish chilling from disease?
A solid, dense brood patch with consistent larval stages indicates a healthy queen and good brood rearing. Spotty, scattered cells or isolated dead larvae near edges more likely point to chilling or poor coverage by workers. Disease often produces specific patterns (e.g., sacbrood, foulbrood) and sticky or sunken caps; lab tests confirm bacterial and viral causes.
What main factors cause brood to chill inside the hive?
Common causes include insufficient worker coverage due to low adult populations, sudden cold weather, long inspections that break the winter cluster, and poor hive insulation or ventilation. Queen absence or poor lay distribution can leave brood exposed. Pests, poor nutrition, and equipment gaps that allow drafts also contribute.
Which other brood problems are commonly mistaken for chilling and how can I tell them apart?
Wax moth damage shows silken tunnels, frass, and eaten comb rather than just dead larvae. Chalkbrood (Ascosphaera apis) produces hard, chalky mummies that workers often remove, leaving white or gray remains. Neglected drone brood under stress has dark “bullet” cappings and often sits at frame edges where bees deprioritize drones. Examine cap texture, remains, and presence of pests to differentiate causes.
What on-the-spot steps can a beekeeper take immediately during an inspection to reduce chilled brood losses?
Work quickly and only on mild, calm days. Minimize the time frames are exposed, reassemble and close the hive promptly, and move cluster-supporting frames together if coverage is thin. Replace missing or damaged frames with drawn comb, add insulation or a quilt box in cold conditions, and limit manipulations that fragment the brood nest.
How does hive configuration and space management help prevent chilling?
Right-sizing the nest is critical. Use dummy boards or reduce super space so workers can keep brood clustered. Provide adequate but not excessive ventilation, maintain good comb distribution so brood sits centrally, and choose frame foundation that encourages dense brood patterns. Overcrowded or overly large empty spaces force workers to stretch, risking gaps and exposure.
Should I be concerned about pests or secondary scavengers after I find chilled larvae?
Yes. Wax moths and small hive beetles will exploit weakened comb, creating silk tunnels and infestation. Remove heavily damaged frames and clean equipment. Healthy colonies will remove many mummies, but follow up with regular inspections, good hygiene, and pest controls like screened bottom boards or traps if needed.
How can beekeepers monitor and record instances of chilled brood to improve future prevention?
Keep simple inspection logs noting date, weather, brood location on frames, queen presence, and adult population estimates. Photographs of affected frames help track patterns. Over time, these records reveal trends tied to weather, colony strength, or equipment, allowing targeted fixes like adding insulation, requeening, or altering hive setup.