Record keeping turns scattered notes into clear action. Start with simple metadata — date, apiary, hive number, weather — and add short inspection notes tied to goals.
Use a structured checklist to track brood frames, queen signs, honey stores, weight hints, and front‑porch activity. A quick back‑lift and frame count give immediate information. Over years, these entries reveal patterns in brood cycles and nectar flow.
This guide shows a step‑by‑step way to capture what matters for colony health and honey productivity. Each visit yields a repeatable page: hive condition, brood profile, queen performance. Consistent forms help spot deviations fast and scale as more colonies are added.
Key Takeaways
- Start simple: date, location, hive number, weather, short notes.
- Use checklists to record brood, queen cues, honey, and weight.
- Repeatable pages make comparisons across colonies easy.
- Consistent records reveal patterns over years for better timing.
- Small, regular entries save time and improve management decisions.
Why documentation matters for new beekeepers in the United States
Keeping simple records changes how a new beekeeper reads hive signals and learns from each visit.
Notes capture facts that memory often loses after a long day with the bees. Short inspection entries record eggs, brood pattern, and signs the queen is present. Over weeks, that information makes trends clear.
Well-kept notes support fast decisions about queenright status and let you compare one colony to another. A concise form speeds inspections and reduces stress on the bees while covering key line items.
Records also help meet local rules. In New York City, for example, registration or notification is required within 30 days of establishing hives. Treatment logs and location details can back up compliance and tracking.
- Plan work: anticipate adding space for honey, adjust feeding, and schedule winter prep.
- Share clear notes to keep partners aligned on what changed and what comes next.
- Start with a simple format and expand as the number of colonies grows.
For examples of practical logs and templates, see a guide to beekeeping journals and a records guide for detailed formats.
Set your goal and scope before your first notes
Set clear goals so every inspection yields actionable information. List legal needs, proof of queen status, expected honey during flow, and pest monitoring as top priorities.
Limit what you record at each visit to save time and reduce stress on the colony. Focus on metadata, visible signs, brood frames, and resource frames.
- Goals: legal proof, queenright checks, brood tracking, honey planning, pest alerts.
- Method: pick paper, audio, or an app before inspection to keep hands free.
- Follow-ups: set thresholds (recheck brood next week, confirm stores).
| Priority | What to record | Action |
|---|---|---|
| Queen status | Eggs, brood pattern, queen sighting | Reinspect or mark date |
| Brood strength | Frames with brood, capped ratio | Plan space or feed |
| Honey & stores | Capped honey frames, weight hints | Prepare supers or harvest |
| Pests | Varroa signs, odd behavior | Sample or treat |
Keep notes brief and consistent and run a short review after each visit to log to-dos and confirm completeness.
Build your beekeeping “metadata” habit
Begin inspections with a brief header: date, time, apiary location, and hive number. This small step makes later entries clear and comparable across hives and seasons.
Date, time, apiary location, hive number
Record date and time on every visit so you can match colony behavior to seasonal benchmarks. Note the apiary and hive number to link patterns to place when microclimates differ.
Weather and conditions: temperature, wind, nectar flow cues
Capture weather—temperature and wind—because entrance traffic and forager behavior change with conditions. A higher traffic volume on warm days and heavy pollen intake often signal active brood rearing.
“A quick back‑lift weight reading gives immediate hints about stores.”
What’s in bloom and available water sources
List nearby blooms to anticipate nectar availability and queen laying demand. Note water sources since access to water supports brood care and hive thermoregulation.
Quick checklist: date/time, location, weather, blooms, water, and a hanging-scale back‑lift for relative stores. Keep these lines short so later analysis can filter by conditions and time.
External inspection notes you can capture without opening the hive
A quick external check can give clear clues about hive health before you lift a frame. Start at the front and note activity at the entrance, matching traffic to the weather for the day.
Entrance traffic, orientation flights, and signs of robbing
Count arrivals and departures briefly. High activity on warm, calm days is normal; unusually low traffic may signal a stressed colony.
Watch orientation flights: bees bob and disperse near the front. Swarm preparation shows mass, tight flights and many exit runs.
Look for wax debris trails, fighting, or many bees carrying nectar away—these are clear signs of robbing and call for immediate action.
Weight lift checks and honey stores hints from the porch
A simple back-lift with a hanging scale gives relative information about stores. Track weight changes over weeks to spot nectar inflow or consumption.
Pollen being brought in suggests brood rearing; pair that note with weight trends to infer honey stores and feeding needs.
Dead bees on the front, dysentery streaks, and overall behavior
Log dead bees on the porch and any dysentery streaks on boxes. These signs can indicate disease or stress and should prompt a full inspection.
Note temperament across visits. Repeated aggression over several days often means checking brood, queen status, and possibly relocating the hive.
“Concise external notes often determine whether an internal inspection is needed that day.”
- Quick checklist: traffic vs weather, orientation vs swarm, robbing signs, pollen intake, dead bees, back-lift weight, temperament.
Internal inspection: a simple checklist for frames, brood, and stores
Open one hive at a time and note the frame-by-frame picture that shows how the colony divides work between brood, stores, and maintenance. Keep entries short and numeric so later comparisons are simple.
Frames of adult bees; open brood vs. capped brood
Count frames of adult bees to estimate workforce. Record frames with open brood and frames with capped brood, then total the frames brood for trend tracking.
Drone brood percentage and queen cells
Estimate percent drone brood and log the number and placement of queen cells. Note whether cells sit on the frame edge or in the center—these are key signs of swarm or supersedure impulses.
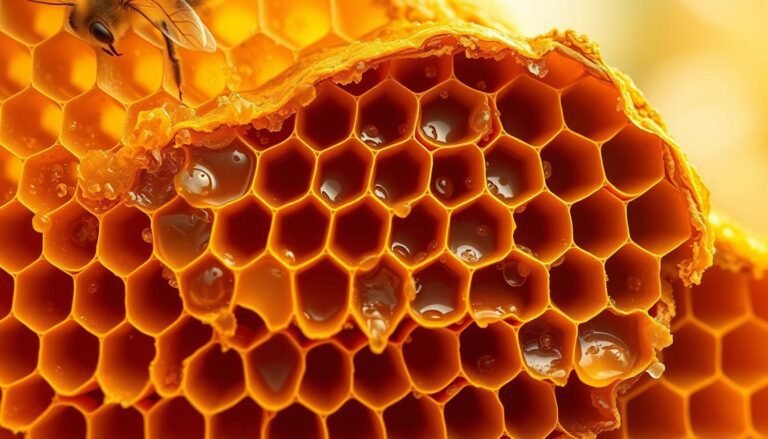
Frames of capped honey, nectar, pollen, and empty frames
Tally frames of capped honey, nectar, pollen, and empty comb. Check for dead bees on the bottom and look for deformed wings or visible mites.
“A consistent per-hive checklist makes decisions about splits, supering, or treatment clearer.”
- Quick checklist: frames adults, open vs capped brood, total brood frames, % drone brood, number of queen cells, frames stores, disease signs, overall strength (strong/average/weak).
Varroa mites and disease tracking made routine
A steady schedule of mite counts turns sporadic worries into clear, timely actions.

Make monitoring part of every inspection: use an alcohol wash or a well‑done sugar shake to measure mites per 100 bees. Start regular checks from late June and increase frequency through late summer when pressure rises.
Note visible signs such as deformed wings during an internal check. If wing deformities appear, add a focused count and treat thresholds as a prompt for action to limit viral spread.
Mite counts, deformed wings, and action thresholds
- Record method used (alcohol wash or sugar shake) so future comparisons are consistent.
- Log mites per 100 bees, date, brood context, and any drone brood counts that affect mite reproduction.
- Plan interventions before thresholds rise to protect the colony and nearby apiaries.
Recording treatments, brand, batch, and results
Write treatment details precisely: brand, type, manufacturer, batch number, and expiration date. Note application date and follow‑up count to confirm efficacy.
“Responsible records prevent repeated use of ineffective treatments and help protect neighboring colonies.”
Documenting queen status and colony temperament
A clear record of eggs and brood pattern gives the best evidence that a hive is queenright without extra disturbance.
Eggs, brood pattern, queen color/marking, and clues
Record eggs and brood first. Count frames brood and note continuity across inspections. Consistent eggs and uniform brood pattern are strong signs the queen is present.
When you cannot see the queen, rely on larvae stages and capped brood to avoid a needless search that stresses the bees.
- Mark queen color or note identifying marks to speed later checks and track replacements.
- Log the presence and placement of queen cells to flag supersedure or swarm impulses.
- Note frames with brood and any irregular brood patches as early signs to inspect further.
Temperament matters. Evaluate colony behavior each visit and link it to weather or nectar flow. Persistent aggression with a healthy brood pattern may point to environmental stress or strain.
“Standardized queen notes make trends clear and help the beekeeper decide on requeening or relocation.”
Quick checklist: eggs, frames brood count, queen marking, cells present, temperament, and context (weather/nectar). Keep entries short so trends are easy to spot and act on.
Documenting your beekeeping journey
Keep concise check boxes and a few lines of narrative to capture what matters from every inspection. This mix makes it easy to note brood size, queen clues, and resource balance in the moment.
Short checklists ensure critical items are never missed. Short narratives add context — weather effects, predator pressure, or a management choice that led to a change.
Over years, these combined notes form a living history of each colony. Trends in brood, honey stores, and temperament become obvious when entries use the same layout across hives.
- Use the same page format per hive for fast comparisons.
- Tag entries by topic, season, or hive number for quick retrieval.
- Record setbacks as carefully as wins to refine timing and technique.
- Add a short seasonal summary: what worked, what didn’t, next priorities.
“Consistent notes turn one‑off observations into long‑term insight.”
| Entry type | What to capture | Why it matters | Quick action |
|---|---|---|---|
| Checklist | Brood frames, queen cues, stores | Ensures consistent data across visits | Mark follow-up or treat |
| Narrative | Weather, foraging notes, odd behavior | Explains anomalies and context | Adjust inspection timing |
| Summary | Seasonal results and priorities | Guides next season planning | List supplies and goals |
| Index/Tags | Hive ID, topic, season | Speeds retrieval and comparison | Filter notes for decisions |
Turning notes into an efficient inspection workflow
Plan each apiary visit with a short pre-check list so inspections run smoothly and fast.
Pre-visit to‑do list converts past notes into clear tasks for the day. List what to check per hive, which supplies to pack, and any replacement or repair parts to bring.
Equipment and sequencing
Pack a compact kit: smoker, hive tool, gloves, a spare frame, and any treatment supplies. A single tool cut your handling time and stress on the colony.
Sequence visits by priority. Start with hives showing low brood or odd behavior so you spend limited time where it matters most.
Work habits that close the loop
Keep a running to‑do list and mark tasks done as you move through hives. Standardize a closing routine: check the entrance, secure lids, and write final notes before leaving the site.
- Use preprinted forms as a checklist to avoid oversight.
- Log time per hive to optimize routes and batch similar tasks.
- Assign follow-up dates so findings become timely action.
“A short plan and steady routine cut inspection time and improve results.”
Tools and handling that improve your record keeping
Set up a calm routine before you open a hive. Stage the smoker, curved-end tool, a waterproof notepad, and a pen in the same place every visit. This small habit keeps notes accurate while you work.
Smoker, hive tool, and gloves: working bees while taking notes
Use cool, dense white smoke sparingly to settle guard bees and buy time to write. Puff once at the entrance, then again behind the top box if guards look at you.
Choose a curved-end hive tool for smooth prying and scraping so frames come apart with minimal disturbance. That tool helps you move efficiently and keep focus on checklist items like brood and stores.
Wear a veil every day. Pick thin, long-cuff 5‑mil nitrile gloves for dexterity when you must handle small parts, or work bare-handed in calm weather to improve feel and speed.
“Move slowly and deliberately; good handling reduces agitation and protects colony stability.”
- Keep a waterproof notepad or preprinted form and stage pens or a voice recorder to avoid fumbling.
- Watch guard bees’ faces; a small puff of smoke is the cue to pause and resume note capture.
- Practice the same handling routine each visit so capturing clear notes becomes second nature.
Choosing your recording method: pen, audio, photos, apps
Pick a recording habit that fits how you work in the apiary and you will keep more consistent notes. A good method captures metadata, brood cues, queen signs, and quick actions without slowing an inspection.
Paper checklists and journals you can use in gloves
Paper forms work well with gloves. Start with free templates from the Canadian Honey Council, BBKA, York County, NY Bee Wellness, or Beekeeping For Dummies. Laminate a short form for quick field marks and add a fuller page later.
Audio/photo capture at the hive and transcribing later
Use photos for brood patterns, cells, and frames of honey; they make remote advice easier. If you use audio, narrate date, apiary, hive number, and a short list in the same order so transcription is fast.
Beekeeping apps and data export for long-term analysis
Try Hive Tracks, OSHives, BeeRM, Bee Plus, HiveSmart, or ApiaryBook. Prioritize apps that allow data export so colony records remain yours over the years.
| Method | Best for | Key advantage |
|---|---|---|
| Paper checklist | Gloved field use | Fast marks, low tech |
| Photo + audio | Speed and evidence | Visual proof, easy advice |
| App with export | Long-term analysis | Centralized data, CSV backup |
Seasonal documentation: spring build‑up to winter prep
Mark key seasonal milestones so feeding, supering, and winter prep happen at the right time for each colony.

Honey flow, dearth, feeding, and winterizing records
Spring: log brood expansion, nearby nectar sources, and when frames fill with pollen so you can add space without triggering swarm pressure.
During honey flow: note daily nectar intake, frames of capped honey, and the timing of peak activity. These notes guide when to add supers and when to plan harvests.
In dearth: record reduced foraging, rising consumption of stores, and feeding responses. Track which feeders and feed mixes worked on a given day.
Before winter: list winterizing steps—wraps, mouse guards, added ventilation—and confirm honey stores remain adequate for the season ahead.
“Seasonal records turn short-term observations into clear plans for feeding, space, and winter survival.”
- Note weather swings and water availability so records match real field conditions.
- Track queen performance and late-season brood — they set the tone for winter survival.
- Create a short per-season summary for each hive to refine timing of feeding, super additions, and winter prep year over year.
Swarm signs and actions worth noting
Watch for clear changes that signal a pending swarm and log them with date and context. Check for more queen cells and note where they sit on frames; placement helps tell swarm prep from supersedure.
Congestion indicators include heavy bearding, backfilling of the brood nest, and fewer empty frames. Record how many frames are free so you can decide whether to add space or split.
Distinguish relaxed orientation flights—short bobbing near the entrance—from a true swarm departure, which looks like a large cloud leaving. Log observations daily in peak season if signs escalate.
“Early, precise notes reduce lost bees and protect future honey production.”
- Track number and placement of queen cells to guide removal or splitting.
- Note drone brood changes that may accompany swarm pressure.
- Record the action taken (add space, split, remove cells) and the hive response at the next visit.
- Capture timing relative to nectar flow; warm, high‑flow days shorten response windows.
| Indicator | What to record | Likely action | Expected follow-up |
|---|---|---|---|
| Queen cells (count & placement) | Number, edge vs center frames | Remove, split, or observe | Recheck brood pattern next visit |
| Congestion | Bearding, backfill, free frames | Add frames or create split | Monitor stores and brood flow |
| Behavioral flights | Orientation bobbing vs mass exit | Avoid unnecessary disruption | Log swarm departure timing if it occurs |
| Drone brood changes | Percent drone brood and location | Consider impact on swarming tendency | Review results and adjust method |
Compliance and business basics for U.S. beekeepers
Make compliance and basic business records part of every apiary visit to protect hives and income.
Local rules vary. Research registration requirements and log apiary location and time when you set up hives. For example, New York City requires notification within 30 days of establishing a hive.
Local registration, treatment records, and retention periods
Keep treatment information precise: brand, type, manufacturer, batch, expiration, application date, and results. These notes support inspections and show safe care of brood, queen, and colony.
Tracking harvests and finances: honey, wax, queens
Log harvests by product and amount—honey, wax, pollen, propolis, and queen sales—so you can track yield per hive and plan inventory.
- Record income and expenses with receipts to back tax filings.
- Store compliance files with routine hive notes for quick retrieval.
- Set calendar reminders for registration renewals and permit deadlines.
“Organized records protect the colony, verify treatments, and make small operations audit-ready.”
| Record type | What to keep | Retention suggestion |
|---|---|---|
| Treatments | Product, batch, date, result | At least 3 years |
| Harvests | Product, amount, hive ID, sale | 3–7 years |
| Registration | Permit, location, renewal date | Keep until superseded |
For business setup and practical forms, consult a concise guide to beekeeping business basics.
Collaborating and sharing records with others
A common log format helps teams swap tasks without losing critical hive context. Use a single checklist layout so everyone captures the same inspection details and follows the same priorities.
Store reports in a cloud folder or shared notebook for quick updates after visits. That way, partners get timely information on frames of brood, stores, and temperament.
Attach photos of brood patterns, queen marks, and honey frames so remote reviewers can give informed feedback. Visuals reduce misunderstandings and speed decisions.
- Agree thresholds that trigger a ping—sudden drops in brood or signs of queen failure.
- Assign to-dos inside the shared record so each task and deadline is clear.
- Log decisions and outcomes to build team knowledge over time.
“Shared notes distribute work, keep partners aligned, and create continuity when one person is absent.”
After major events—splits, treatments, or harvests—share a short summary so everyone understands the follow-up way forward. Encourage open discussion of observations to improve consistency and reduce oversight among others managing the same colony.
From pages to patterns: reviewing years of hive data
Aggregated records let you see how queen changes, weather, and management choices shape colony outcomes over years.
Start by grouping inspection entries by hive and season. Compare frames brood counts for the same calendar week across years to spot shifts in brood buildup and peak nectar timing.
Track queen swaps and note how brood continuity and honey yield respond. This helps select queens that deliver steady brood and better colony performance.
Review treatment logs with results. Matching treatments to mite counts and later colony strength gives clear information on what works and when to act.
Summarize each year with lessons learned: tweaks to supering, split timing, and winter prep based on actual outcomes. Use those notes to test changes the next season.
- Aggregate inspection data by hive and season to reveal trends.
- Compare frames brood year over year to refine split and super timing.
- Correlate honey yields with weather and nectar notes for better planning.
- Share key findings with partners so all hives benefit from the same improvements.
For further reading on structured records and resources, see a comprehensive guide to beekeeping resources and books.
Common documentation mistakes and how to avoid them
Small, consistent notes taken during an inspection prevent small errors from growing into large problems. Missing date, weather, or hive number removes the context that makes later information useful.
Rushing leads to forgotten brood facts, skipped mite counts, or missed signs of disease. Write brief notes in the field so facts on eggs, queen clues, and stores stay accurate.
Set clear follow-ups. When a problem is found, add a calendar date and mark the action taken. Record treatment brand, batch, and outcome so you can judge efficacy later.
- Avoid skipping metadata: date, weather, and hive number matter.
- Capture exact counts: frames of brood and stores, not vague words.
- Log mites and disease signs: evidence drives the right action.
- Review notes before leaving: catch omissions and close the loop.
“Clear field notes save time and protect the colony from delayed responses.”
Conclusion
Turn routine checks into practical guidance by linking simple notes to clear follow-up actions. Keep entries short so they work on each visit and over long seasons.
Use a simple workflow of metadata, porch checks, and focused internal counts to save time and protect hive stability. Track eggs, frames of brood, and queen signs so growth and problems show up quickly.
Make mite monitoring a routine item and log results. Add a brief seasonal summary after major events to refine timing for honey harvests, feeding, and winter prep.
Good handling and the right tools make note-taking straightforward. Pick a method you will use consistently so records become a trusted ally in the way you manage colonies and improve outcomes over time.
FAQ
How often should I record hive inspections?
Inspect weekly to monthly depending on season. During spring build-up check every 7–10 days for swarm signs and queen activity. In summer reduce to every 2–4 weeks unless you’re harvesting or treating for mites. In fall and winter record at least once before cold weather and after major weather events.
What core metadata should every entry include?
Always log date, time, apiary location, and hive number. Add weather (temperature, wind, precipitation), nectar flow cues, and nearby blooms. Note who performed the inspection and any treatments applied.
Can I capture useful notes without opening the hive?
Yes. Record entrance traffic levels, orientation flights, signs of robbing, dead bees at the front, and any dysentery streaks. Perform a weight lift check at the back of the hive to estimate stores without removing frames.
What should I list during internal inspections?
Count frames of adult bees, identify open versus capped brood, note drone brood percentage and presence of queen cells, and tally frames of capped honey, nectar, pollen, and empty frames. Document frame positions when possible.
How do I track Varroa mite levels and disease signs?
Use a weekly or monthly mite test (alcohol or sugar roll) and record counts per 300 bees or percentage. Note deformed wings, spotty brood, foul odors, and any diagnostic photos. Log treatments with brand, batch, date, and outcome.
What clues confirm a queen is present and laying?
Look for fresh eggs in cells, consistent brood pattern, and absence of multiple emergent queen cells. Note queen color or marking when seen and any temperament changes. Record “queenright” status each inspection.
How should I document swarm risk and queen cells?
Record number, size, and location of queen cells (top bars, frame edges). Note colony population, congestion on frames, and reduced forager return. Add planned actions like splitting or requeening and timelines.
What tools help maintain accurate records in the field?
Use a smoker, hive tool, and gloves to work safely while recording. Carry a waterproof pocket journal or a clipboard with a laminated checklist. A smartphone for photos or audio notes speeds capture without delaying the inspection.
Should I use paper or digital records?
Both have merit. Paper checklists work well while wearing gloves and serve as a quick backup. Digital apps (HiveKeepers, Beekeeper’s Journal, BeePlus) allow photo attachment, export, and long-term analysis. Choose a method you will use consistently.
How do I record treatments and comply with local rules?
Log treatment type, brand, batch number, dose, application date, and withdrawal periods. Many U.S. counties require hive registration and retention of treatment records for one to three years—check state and local requirements and store records securely.
What seasonal items deserve special attention in notes?
In spring track queen status and supering needs. During honey flow record nectar sources and honey frame positions. In dearth note supplemental feeding and mite treatment timing. Before winter document stores, insulation, mouse guards, and ventilation.
How can I turn notes into an inspection workflow?
Create a pre-visit checklist with equipment, PPE, and treatment supplies. Standardize a frame-by-frame routine: quick external scan, entrance check, then internal frame notes in the same order each time. Use templates to speed entry and reduce missed observations.
What common record-keeping mistakes should I avoid?
Avoid vague entries, inconsistent units, and missing dates. Don’t skip treatment batch numbers or fail to photograph unusual signs. Keep entries brief but specific, and back up digital files regularly.
How do I use photos and audio effectively at the hive?
Photograph frames, queen cells, and suspect brood with scale or ruler for reference. Record short voice notes describing location and concern, then transcribe or attach them to the hive record later. Label files with date, apiary, and hive number.
What financial and harvest records should I maintain?
Track honey and wax yields per hive, input costs (equipment, treatments, feed), sale prices, and inventory. Record harvest dates and amounts, packaging details, and buyer information for tax and business planning.