Main honey flow marks a short, intense period when many nectar sources bloom together under warm, humid skies. During that time, hives change fast: entrance traffic surges, combs fill out rapidly, fresh white wax appears and boxes gain weight.
Ideal conditions include adequate rain, then sunny days around 65–85°F. Skilled practitioners use routine, careful observation to spot early signs so they can add supers at about 70–80% capacity.
This guide will show how to read signals both outside and inside the hive, link them to weather and bloom stages, and turn those cues into timely beekeeping moves. The ability to tell a main flow from minor nectar collections grows over years of field work and testing with lift checks, luggage scales, and frame ripeness tests.
Key Takeaways
- Recognize main flow by heavy traffic, white wax, strong floral scent, and quick weight gain.
- Watch weather: rain followed by warm, humid days often triggers peak nectar.
- Use lift checks and scales to confirm when to add supers.
- Learn the difference between main and minor nectar activity through repeated observation.
- Practical, field-tested tips help beekeepers optimize timing for harvests and colony care.
What a Honey Flow Is and Why It Matters for Your Honey Harvest
A true production window begins as surrounding plants bloom together and bees bring in steady, heavy loads. This marks a main nectar surge: multiple major sources yield surplus nectar beyond colony needs.
Main flow vs. minor flows: a main period supports rapid comb build-out and repeated daily gains in supers. Minor flows give short bursts of forage that rarely translate to large, sustained production.
Watch bee behavior closely. During a main flow, departures are purposeful and fast while returns are slower with full crops. House bees fan and draw wax quickly. These changes point to true production, not just scattered foraging.
“Experienced beekeepers match observation notes with yard records to time additions and avoid honey-bound colonies.”
- Define main flow as surplus nectar that supports significant stored product beyond maintenance.
- Contrast main and minor periods to avoid premature supering or harvesting.
- Document inspection notes so you can link behavior to actual gains later.
For practical guidance on timing super additions, see this short primer: timing super additions. Integrating environmental cues with inside-hive signs helps maintain brood health while maximizing production season after season.
Environmental Conditions That Trigger or Limit Nectar Flow
Nectar production hinges on a short weather recipe, not just the presence of blooms. Recent rain followed by warm, sunny, and humid days creates the best chances for strong nectar secretion across many plants.
Weather pattern basics
Rain then warmth: wet soils plus several clear days lift secretion and invite heavy foraging. Ideal daytime temperatures often sit between 65–85°F for general sources.
Temperature and crop notes
Oilseed rape (canola) and similar crops usually need roughly 60–68°F (16–20°C) to secrete well, with about 68°F (20°C) often optimal.
Soil, wind and microclimate effects
Soil moisture, relative humidity, wind, soil pH, and varietal differences strongly shape nectar secretion. Strong wind can stop foraging even when plants look abundant.
Microclimates matter: cold hollows or shaded slopes can suppress nectar compared with warm, well-drained, south-facing sites.

“Even a bloom-rich field may yield little if the environmental triggers are missing.”
- Watch for the June dearth when spring crops finish before summer sources start; monitor stores and bee behavior and provide feed if colonies fall low.
- Track conditions by area and season so you can add supers just ahead of peak environmental windows and catch the main period of production.
- Field scouting and simple records tie weather to actual gains; use those notes to plan inspections on likely strong days.
For practical environmental monitoring and measurement techniques, consult this guide on measuring the environment and this regional overview of climate impacts.
Reading Local Flora: Tracking Nectar Sources and Peak Bloom
Start by tracking nearby fields and patches to predict when nectar sources will peak. Build a simple calendar that lists clover, basswood (linden), mixed wildflowers, and canola/OSR by typical start, peak, and finish dates.
Field scouting confirms whether plants are in true peak bloom and whether bees visit heavily. Walk sites weekly during bloom. Note flower age, shoot thickness, and where blossoms sit on the plant—these factors change nectar output.
Practical steps
- Map reliable patches: mark fields and hedgerows that historically drive main production windows.
- Log dates: record bloom start, reach peak bloom, and end to refine your calendar year over year.
- Correlate notes with hive weight: link scouting entries to gains to confirm which sources actually add surplus.
- Watch overlaps: when clover, linden, and wildflowers bloom together, they create longer, stronger periods than single-species peaks.
Local flora knowledge lets you place hives for best returns and time management actions during the main season.
For regional planning and further reading on timing, see this primer on recognising nectar periods and a resource guide for local practice: recognise nectar periods and regional reference guide.
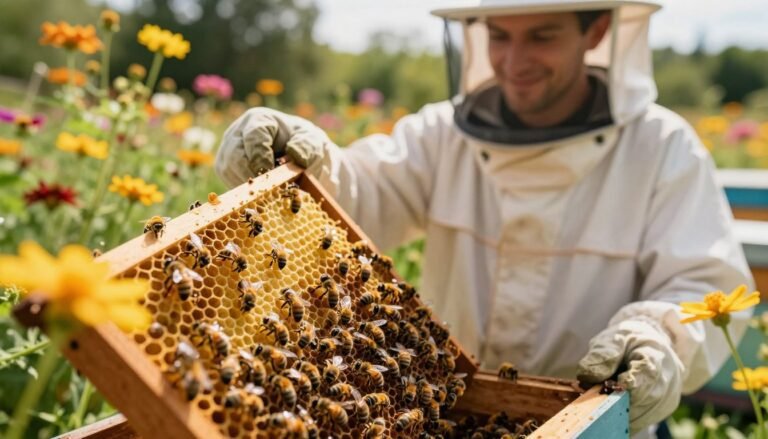
Honey Flow Indicators Beekeepers Should Know
A rapid change at the hive entrance often gives the earliest, clearest sign of surplus nectar arriving. Watch departures, returns, and overall activity to separate short bursts from sustained production.

Entrance traffic surges
Look for bullet-like departures and steady streams of returning foragers. Returns slow when crops are full and you can see distended abdomens.
Inside-hive signals
Fresh white wax fragments at the landing board and a pronounced sweet floral aroma around the hive are strong signs. Listen for house bees fanning near the frames in the evening; that ventilation signals active nectar processing.
Rapid weight gain and comb build
Supers gaining pounds in days and rapid comb draw are objective evidence. Systematic capping at lower moisture shows bees rushing to preserve stores.
- Log foraging activity and compare notes across inspections.
- Differentiate heavy pollen intake from nectar by checking weight and ripeness behaviors.
- Confirm with quick lift checks or a luggage scale before management changes.
Measuring and Confirming a Flow: From Scales to Moisture Cues
A quick, repeatable weighing routine reveals whether incoming nectar is sustained or merely sporadic. Weekly lift checks or a luggage scale show real gains in pounds and separate noise from true production.
Hive and super weight tracking
Record total weight changes for each hive on a standard chart. Strong colonies may add multiple pounds per day; three or more pounds per week is a useful threshold to flag and add a super.
Evening hum and moisture cues
Listen for a loud evening hum and watch house bees fanning—this ventilation drives fresh nectar from high water down to about 18% moisture for ripened honey.
- Spot-check a few representative hives to infer apiary trends without full disruption.
- Note fewer water-foraging bees as a sign that processing, not watering, occupies the colony.
- Compare weight logs with weather and bloom notes to confirm a true flow.
“Pair objective weight data with aroma, fanning, and comb capping to avoid false positives.”
U.S. Timing: Spring Buildup, Summer Peak, and Late-Season Considerations
Across the country, colonies build through spring and often hit peak collection in June through August. That pattern gives most yards a clear summer production window, but local variation matters.
Typical windows by season
Spring brings brood expansion and the first steady gains. Many yards then move into a summer surge where midsummer crops drive rapid comb draw.
Late season can offer a second pulse or taper into a dearth. Plan for both possibilities in your yearly calendar and keep records to spot shifts.
How elevation and coast affect timing
Elevation, coastal influence, and local flora all shift the calendar. Inland valleys often peak earlier. Coastal and high-elevation sites run later.
- Many beekeepers report early July harvests in some regions, but this is only a general guide.
- Use prior-year comparisons and weight logs to anticipate equipment and labor needs.
- Coordinate supering and queen or colony management around when the honey flow typically peaks in your area.
| Region type | Typical peak | Management note |
|---|---|---|
| Inland valleys | Late June–early July | Pre-stage supers in late June; watch rapid gains |
| Coastal plains | July–August | Delay final extraction; expect extended bloom |
| High elevation | July–September | Shift supering later; monitor for late-season pulses |
| Mixed flora sites | Staggered peaks | Overlapping blooms may sustain yields outside peak weeks |
Build a regional calendar from direct observations and weight data rather than relying on averages alone.
For timing harvests and confirming readiness, consult guidance on when to harvest honey.
Management Actions During a Confirmed Flow
A confirmed production window calls for fast, practical changes at the hive to protect colony space and maximize returns.
Prevent honey-bound colonies: add a super when the top box is about 70–80% full. This keeps comb open above the brood and reduces crowding that can trigger swarming.
Extraction strategy
Partial extraction during the period frees storage quickly and keeps production rolling. It needs extra labor and clean equipment on hand.
Waiting until after the peak simplifies processing and preserves continuous storage while you leave more in place for colony needs.
Balancing colony needs
Monitor brood and the queen’s laying pattern. Intense intake often diverts workers to nectar processing and the queen may slow laying.
- Stage extra supers and frames ahead of peak weeks to avoid lag.
- Keep space above the cluster so bees move stores upward efficiently.
- Tailor moves to local timing and colony strength; strong colonies can outpace equipment and become honey-bound or swarm-prone.
- Leave adequate stores if a short dearth may follow the main period.
Knowing When the Flow Tapers and Timing Your Honey Harvest
When the apiary loses its steady hum, use objective frame checks to plan an efficient harvest. Small changes at the entrance and in hive behavior often tell you the main period is ending.
Behavioral slowdowns and defensive shifts
Watch for reduced foraging activity, fewer purposeful departures, and slower returns with lighter crops. Colonies can become more defensive as nectar sources fade and guard duty rises.
Inspect every 7–10 days to catch these shifts early and compare notes across the year. That record helps you match harvest timing to local plant calendars and avoid surprise dearths.
Frame-level readiness: 80% capping and the shake test
Extraction-ready frames usually show at least 80% capped cells. For uncapped cells use the shake test: uncap a small patch and tip the frame gently—liquid that pours out indicates too much moisture to extract.
Confirm a few representative frames before pulling a super. This reduces wasted handling and keeps combs intact for reuse.
Avoiding pitfalls: granulation and dearth robbing
OSR/canola and some clover blends can granulate fast. Remove supers promptly after those blooms finish to prevent unextractable combs.
Plan your honey harvest window to minimize disturbance and lower robbing risk during local dearths. Check brood and stores before removal so colonies keep enough reserves for the rest of the year.
“Stage equipment, confirm readiness, and schedule extraction quickly after the main bloom ends for best returns.”
- Readiness signals: reduced traffic, 80% capped on frames, passed shake test.
- Weather and dearth risk: time pulls to avoid hot, windy days and local shortages.
- Pre-harvest checklist: equipment staged, extraction plan, post-harvest feeding if stores run low.
- Review inspection notes and the beekeeping calendar to refine timing each year.
Conclusion
A clear winning strategy combines simple metrics, floral scouting, and prompt hive moves when conditions align.
Integrate measured weight gains, capping and comb checks with local bloom calendars and weather notes. Track recent rain, warm sunny days, and crops like OSR/canola or clover to link field cues to on-hive signals.
Use repeatable checks—lift tests, a luggage scale, and quick frame inspections—to validate what you see and hear. Over years, careful observation trains experienced beekeepers to act fast and protect colony space while maximizing production.
Scout plants, watch the hive, measure, confirm, manage space, and harvest at ripeness. Then close the loop by recording results and refining your local plan. For seasonal tasks and a simple checklist, see seasonal beekeeping tasks.
FAQ
What is a nectar production period and why does it matter for harvest planning?
A nectar production period is when local plants secrete surplus nectar that foragers convert into comb-stored product. This window determines when colonies can build stores and when a beekeeper can add or remove supers. Tracking these periods helps avoid being honey-bound, ensures enough room for brood, and times extraction for best quality and yield.
How do main production windows differ from minor ones?
Main windows produce abundant, sustained nectar across many plant species and fill supers rapidly. Minor windows are short, patchy, and often tied to a single bloom like a wildflower flush. Main windows typically allow a full harvest; minor windows may boost colony stores without creating a surplus worth extracting.
How can observation optimize colony production during a strong nectar period?
Experienced keepers watch traffic, hive weight, comb build, and brood patterns. They add or remove supers based on these cues, monitor queen performance, and check for robbing. Frequent, short inspections avoid disruption while allowing timely management to maximize collection and colony health.
What weather conditions most often trigger abundant nectar secretion?
Warm, sunny days with moderate humidity and recent rain often prompt heavy nectar secretion. Stable conditions over several days support sustained foraging. Cold snaps, heavy rain, or prolonged wind reducenectar availability and cut foraging activity.
Are there temperature thresholds for certain crops to secrete nectar?
Yes. Some crops like canola (oilseed rape) and clover tend to secrete usable nectar when daytime temps reach roughly 60–68°F or warmer. Thresholds vary by species, so local crop behavior and microclimate data are useful for predicting timing.
How do soil moisture and microclimates affect nectar output?
Adequate soil moisture after rain supports flower health and nectar secretion. Sheltered or south-facing sites often warm earlier and produce nectar sooner than exposed areas. Wind reduces effective foraging even if flowers secrete nectar, so local topography matters.
What is a regional dearth and how should I plan for it?
A regional dearth is a predictable gap in major nectar sources, such as the June dearth in many temperate zones. Plan by ensuring colonies have space and sufficient stores before the gap, reducing colony population if needed, and timing feeding or stock movement to bridge low-production periods.
How do I build a local nectar calendar?
Record bloom times for dominant plants—clover, basswood (linden), wildflowers, and canola—in your area over several years. Note peak bloom, duration, and relative nectar quality. Combine observations with weather records to refine predictions annually.
What should I look for when scouting fields for nectar sources?
Confirm abundant blooms, strong bee visitation, and multiple floral species. Heavy, consistent visitation indicates a reliable source. Also note bloom density and nearby competing crops to estimate how long the source may support large-scale foraging.
What entrance traffic signs indicate a major nectar period?
Look for high departure rates with many foragers leaving and returning laden—returns are typically slower and heavier. Surges during warm midday hours and steady numbers throughout the day suggest abundant nearby nectar.
What inside-hive signals show active collection and storage?
Fresh white comb, a strong floral aroma in the brood chamber, and house bees fanning at the entrance or cluster point all indicate heavy in-hive processing. Increased nectar-processing activity and less brood disturbance are common too.
How useful is hive weight gain as an indicator?
Rapid, sustained weight gain and supers filling quickly are strong quantitative indicators. Regular weekly scale checks or lift tests reveal trends and help decide when to add supers or prepare for extraction.
What does comb build-out and systematic capping tell me?
Fast comb construction shows ample nectar and workforce. When workers begin systematically capping cells at lower moisture levels, the crop is maturing and framing for extraction should be planned, watching for at least 80% cap coverage on frames intended for harvest.
How can I measure and confirm a nectar period using tools?
Use hive scales for continuous weight data, luggage scales or periodic full-hive lifts for spot checks, and a refractometer to test moisture on sample frames. Combine these with evening listening (evening hum) to confirm active evaporation and processing.
What does evening hive ventilation tell me about moisture reduction?
Vigorous evening fanning and strong airflow indicate bees are evaporating nectar toward storage moisture levels (around 18% for many crops). Consistent ventilation across several nights supports the conclusion that nectar is nearing harvestable maturity.
When do U.S. regions typically see spring buildup and summer peaks?
Timing varies: many temperate inland areas hit a late-spring to mid-summer peak. Coastal and lower-elevation regions may start earlier or have extended seasons. Always adjust expectations to elevation, proximity to coastlines, and dominant local flora.
How do elevation and coast vs. inland locations change the calendar?
Higher elevations usually delay bloom times and shorten windows. Coastal areas often have milder, extended seasons, while inland zones may experience sharp peaks and rapid dearths. Match management to local phenology rather than a national calendar.
When should I add supers during an active collection period?
Add extra super space when current supers reach 70–80% fill. This prevents being storage-bound and reduces swarming pressure. Add frames gradually and monitor weight and traffic to ensure spacing matches colony growth.
Should I extract during a continuing nectar period or wait until it ends?
Both approaches work. Partial extraction during an ongoing period can prevent overcrowding and salvage quality if rapid nectar influx risks granulation. Post-flow extraction often yields more mature, stable frames. Choose based on storage space, crop type, and logistics.
How do I balance leaving enough stores while harvesting?
Ensure colonies retain enough reserves for brood rearing and for winter preparation—this varies by region and season. Leave ample sealed stores in brood boxes, and avoid over-harvesting during late season or before known dearths.
What behavioral signs show a nectar period is ending?
Watch for reduced foraging traffic, more defensive behavior, fewer laden returns, and less in-hive processing. A drop in daily hive weight and decreased comb-building are also clear signs that nectar availability is tapering.
How do I confirm frames are ready for harvest at the frame level?
Target frames with about 80% or more sealed cells. Use a refractometer on a small sample to check moisture. The shake test—lightly shaking a frame to see if liquid sloshes—is a quick field check but more subjective than instrument readings.
What risks should I avoid at the end of a nectar period?
Watch for granulation-prone crops such as canola, which can crystallize in supers if extracted too late. Also guard against robbing during dearths by minimizing open nectar exposure, and avoid leaving insufficient stores for the colony’s needs.